5GHz WiFi Missing on OnePlus 13 Converted from COS to OOS [Fix]
In this guide, we will show you a couple of nifty workarounds that should help you fix the issue of 5GHz WiFi missing on your OnePlus 13 device converted from the ColorOS [COS] to OxygenOS [OOS]. There are quite a few advantages of running the Global variant of the OS on OnePlus.
With less bloatware, more efficient, snappy, and fast usage experience, and a bug-free ecosystem, many users who get their hands on the Chinese variants of this device make a switch to the Global variant right away. All that you need to do is unlock the bootloader and flash the OxygenOS ROM in the Fastboot/FastbootD Mode. However, carrying out this conversion could also result in quite a few issues.

And that has indeed been the case with the thirteenth iteration of the device. Numerous users have voiced their concern that the 5GHz WiFi is missing on their OnePlus 13 which has been converted from the ColorOS [COS] to OxygenOS [OOS]. If you are also facing this issue, then this guide will provide you with a couple of handy workarounds to rectify this bug. So without further ado, let’s check them out.
- Fix 5GHz WiFi Missing on OnePlus 13 Converted from ColorOS COS to OxygenOS OOS FIX 1: Change Region FIX 2: Flash Signal Fix Module
Fix 5GHz WiFi Missing on OnePlus 13 Converted from ColorOS COS to OxygenOS OOS
It is recommended that you try out each of the below-mentioned workarounds and then see which one spells out success. So with that in mind, let’s get started.
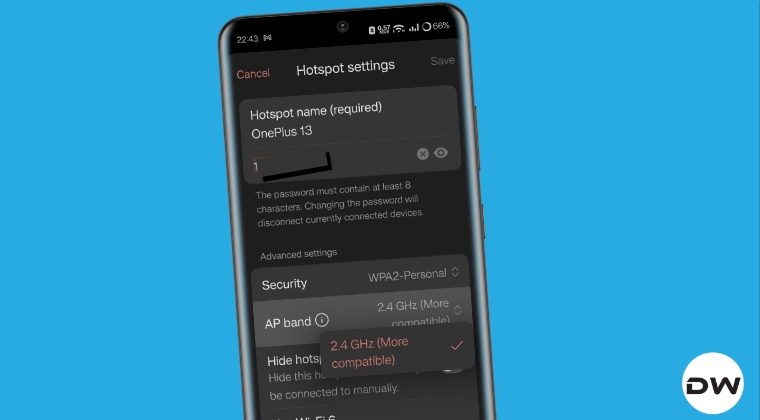
FIX 1: Change Region
- Many users have said that switching the region to China has addressed the underlying issue.
- Therefore, head over to Settings > Language & Region > Region and select China from the list.
- Now check if you get the 5GHz option under Hotspot Settings > Advanced Settings > AP Band.
FIX 2: Flash Signal Fix Module
The developer who has created the ROM port from ColorOS to OxygenOS has also provided a Magisk module that might help you fix issues related to carrier data and WiFi. Therefore, download the module from here , flash it via Magisk, reboot your device, and check if it works out in your favor or not.
- How to Root OnePlus 13 via KernelSU Next and SUSFS
- How to Flash TWRP Recovery on OnePlus 13R/Ace 3
- Unlock Bootloader and Root OnePlus 13R/Ace 3 via KernelSU
- How to Switch From ColorOS to OxygenOS on OnePlus 13

(Cancel Reply)
Δ
How to Root OnePlus 13 via KernelSU Next and SUSFS
In this guide, we will show you the steps to root your OnePlus 13 via KernelSU Next and SUSFS. There exist quite a few ways using which you can root your Android device, with Magisk reigning supreme at the top. However, we are seeing a slight change in the priority among the tech enthusiasts. There has been a minuscule yet noticeable shift among the users from Magisk to its counterparts.
These include the likes of unofficial forks of Magisk like Kitsune or Delta, or other third-party alternatives like KernelSU, APatch, and KernelSU Next. So why this change all of a sudden? Well, it has now become quite a challenging task to hide root as banking and payment apps have put in place numerous checks for the Magisk binary.
However, they are yt to do so for the aforementioned apps. Hence, if you rooted via any of those apps, then there’s a high chance that you can easily bypass the root checks on your device and use payment apps without any issues. So due to all these reasons, this guide will show you the steps to root your OnePlus 13 via KernelSU Next and SUSFS. Follow along,
- How to Root OnePlus 13 via KernelSU Next and SUSFS METHOD 1 [Shorter Method] METHOD 2 [Longer Method]
How to Root OnePlus 13 via KernelSU Next and SUSFS

Before starting, please take a backup of all the data on your device. Droidwin and its members wouldn’t be held responsible in case of a thermonuclear war, your alarm doesn’t wake you up, or if anything happens to your device and data by performing the below steps.
METHOD 1 [Shorter Method]
How to Root any OnePlus via KernelSU Next and SUSFS
METHOD 2 [Longer Method]
- To begin with, download the same firmware that is installed on your device.
- You may verify the same from the device’s Version Number.
- Now extract it, get the payload.bin file, and load it into the Fastboot Enhance Tool . Then extract the init_boot.img file from it.
- Next up, download and extract the Android SDK Platform Tools on your PC.
- Then enable USB Debugging and OEM Unlocking, and connect your device to PC via USB.
- Now unlock the bootloader on your device via the fastboot flashing unlock command.
- Then install the KSU Next app > patch the init_boot.img file via it.
- Now transfer this patched file to platform-tools and rename it to patched_init_boot.img
- Next up, download and install the Key Attestation app on your device.
- Then download the 6.6.66 kernelsu next boot.img (or more than .66 if available) from here .
- Now boot your device to the Fastboot Mode via: adb reboot bootloader
- Then flash the patched init_boot via: fastboot flash init_boot patched_init_boot.img
- Now restart your device, launch KernelSU Next, and make sure it is working in LKM Mode.
- Then get the vbmeta.img file from the same firmware version that is installed on your device.
- Now transfer the file to the platform-tools folder. Then boot your device to the Fastboot Mode adb reboot bootloader
- Now disable Android Verified Boot by flashing vbmeta.img as follows: fastboot –disable-verification flash vbmeta vbmeta.img
- Now flash the boot.img as follows: fastboot flash boot boot.img
- Then flash the SUSFS module from here . Now copy the verified boot hash under “root of trust”
- Go to /data/adb/VerifiedBootHash and put the string you copied in the text file
- Finally, restart your device for the changes to take place.
- How to Switch from Magisk to KernelSU
- How to Hide Root via KernelSU on Rooted Android
- Rooting via Magisk/KernelSU/APatch: Boot or Init Boot
- How to Flash Kernel with Integrated KernelSU on Galaxy S24 Ultra
- Freddy 2 months ago Reply Your instructions don’t make sense Longer method 4.Then install the KSU Next app > patch the init_boot.img file via it. Okay explain where to get this init_boot.img Sadique Hassan 2 months ago Reply sorry mate for the confusion. I have updated the guide with more clarity..
- Muji 11 months ago Reply Please give a susfs img for one plus 13r
(Cancel Reply)
Δ
