Android Rescue Party Trigger: How to Fix
In this guide, we will show you various methods to fix the Android Rescue Party Trigger. In my decade-plus experience of flashing and tinkering with system files, I have come across quite a few issues, but the one that I was recently greeted with intrigued me the most.
And the reason for the same was its naming scheme- Rescue Party Trigger- with each word in this message having its own significance! But trust me, it has nothing to celebrate as it is one of the worst parties that I have ever gone to! So what does this error mean, and more importantly, how to rectify it? Let’s find out.
- What is Android Rescue Party Trigger?
- Fix Android Rescue Party Trigger FIX 1: Wipe Cache FIX 2: Wipe Data FIX 3: Flash Firmware
What is Android Rescue Party Trigger?
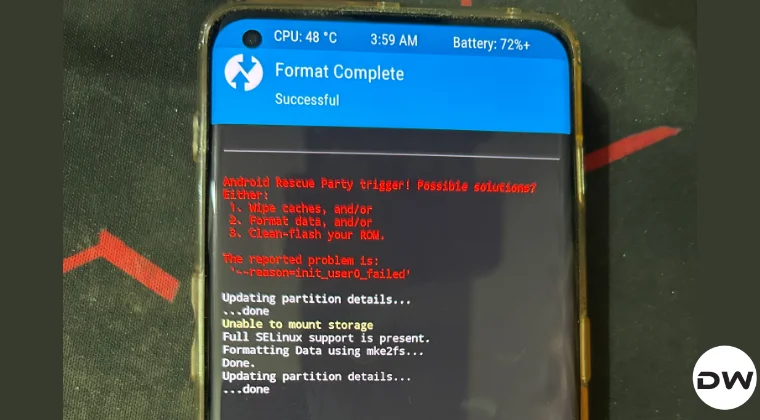
Android Rescue Party Trigger is, infact, a feature which was first introduced in Android 8.0 Oreo. It tends to get triggered when the ‘system_server’ restarts more than five times within a 5-minute period or if a persistent system app crashes more than 5 times in 30 seconds. As soon as this feature is initiated, it will reboot your device straight to the recovery mode. Here’s what Google has to say in this regard:
Android 8.0 includes a feature that sends out a “rescue party” when it notices core system components stuck in crash loops. Rescue Party then escalates through a series of actions to recover the device.
So if you are also stuck in this mode, then this guide will show you a couple of handy methods to fix this problem and access the OS. Without any further ado, let’s get started.
Fix Android Rescue Party Trigger
In order to rectify this issue, you’ll first have to boot your device to the recovery mode, which in most cases should already be the case because Android Rescue Party Trigger automatically reboots the device to this mode. However, if that is not the case with you, then you may do so by powering off your device [long-press the Power key for around 8-10 seconds] and then pressing and holding the Power and Volume Up keys for around 5-6 seconds.
Once you are inside the recovery, you can carry out the below-listed workarounds to fix this problem. Follow along. If possible, do take a complete device backup beforehand. Droidwin and its members wouldn’t be held responsible in case of a thermonuclear war, your alarm doesn’t wake you up, or if anything happens to your device, and data by performing the below steps.
FIX 1: Wipe Cache
- From TWRP, head over to Wipe > Advanced Wipe.
- Check Dalvik/ART Cache and the Cache partitions.
- Now perform a right swipe to wipe these partitions.
- Finally, go to Reboot > System and check the result.
FIX 2: Wipe Data
Heads up: This process will wipe off all the data from your device.

PS: We are doing a Format Data from the Wipe section, we are not wiping the Data partition, both are different things and should not be confused with [the latter will not work here.]
- From TWRP, head over to Wipe > Format Data.
- Then type in YES and tap on the blue checkmark.
- Finally, go to Reboot > System to boot to the OS.
FIX 3: Flash Firmware
Heads up: This process will wipe off all the data from your device.
If none of the aforementioned methods worked in your favor, then your last course of action should be to reflash the stock firmware [Fastboot ROM/Factory Image/Full Firmware] onto your device. So from TWRP, go to Reboot > Bootloader and your device will boot to Fastboot Mode. You may then flash the firmware and the underlying issue will be fixed.

- How to Disable Force Encryption on Android via DFE and TWRP
- How to Remove Fingerprint Icon from the Lock Screen on Android
- How to Reset the Battery Cycle Counter to 0 on an Android Device
- How to Remove the Android System SafetyCore from Your Device

(Cancel Reply)
Δ
How to Remove Fingerprint Icon from Lock Screen on Android
In this guide, we will show you the steps to remove the fingerprint icon from the lock screen on your Android device. Thanks to the open-source nature of the OS, you can carry out a plethora of tweaks on your device. While most of them tend to add new features or remove the unnecessary ones, there are a few that might leave some of your heads scratching. And the one which we are discussing here is just that.
There’s no use case or benefit as such for removing the fingerprint icon from the lock screen on your Android device [well, apart from giving you a cleaner lock screen!], but after all, not every tweak deserves an explanation, and some are done just for fun. And the one which we are discussing here falls in this category. So, on that note, let’s hop onto this intriguing journey and show you the steps to get this job done right away!
- How to Remove the Fingerprint Icon from the Lock Screen on Android
- How to Remove the Fingerprint Icon from the AOD Screen on Android
- How to Bring Back the Fingerprint Icon
How to Remove the Fingerprint Icon from the Lock Screen on Android
This tweak has been tested on Samsung devices, including the latest S25 series. It may or may not work on other Android devices, though you may still give it a try because there’s nothing to lose!
- First off, download and install the SetEdit app from the Play Store.
- Now download & extract Android SDK Platform Tools on your PC.
- Then enable USB Debugging on your device and connect it to your PC.
- Now open Command Prompt inside the platform-tools folder and type: adb shell pm grant by4a.setedit22 android.permission.WRITE_SECURE_SETTINGS
- Now launch SetEdit and select Secure Table from the right-hand side.
- Finally, set the value of the “fingerprint_screen_on_icon_lock” to 0.
How to Remove the Fingerprint Icon from the AOD Screen on Android
Change the value of “fingerprint_screen_off_icon_aod” to 0 from 2 to remove the fingerprint icon from the AOD screen.
How to Bring Back the Fingerprint Icon
Change the value of “fingerprint_screen_on_icon_lock” back to its default value, which is 2, and the fingerprint icon will be back in the lock screen. Likewise, change the value of “fingerprint_screen_off_icon_aod” to 2 to bring back the icon on the AOD screen.
- WhatsApp Fingerprint Lock not working [Fixed]
- How to Add Genshin Fingerprint Animation on OnePlus
- Google Wallet crashes via Fingerprint on Lock Screen [Fixed]
- Fix Fingerprint Sensor not working on Pixel Android 14
(Cancel Reply)
Δ
