Backup and Restore App Data after Factory Reset via Swift Backup
In this guide, we will show you the steps to back up your app data via Swift Backup and then restore it after performing a factory reset. In the general use case scenario, backing up the data over to Google One and then restoring it should be more than sufficient. However, there are two major drawbacks with that backup mode- it doesn’t backup the app data and you have no choice but to upload the backup over to Google Drive.
As far as the first instance is concerned, Google will only keep track of all the apps installed on your device The next time you restore the data, it will simply reinstall those apps from Play Store. While you will get back the app but you wouldn’t get its data back [forgot about your level 1000 progress in Candy Crash, you’ll have to restart from Level 1!].
In this regard, earlier we used to have Titanium Backup, which was able to backup and restore each and individual bit of data. Moroever, you could store the data locally as well, there was no need to upload it over to the Google Clouds. Many years later and we are still yet to have a worthy competitor for it, however slowly but surely we are moving in that direction.
In the current state, using the Swift Backup with Shizuku are our best bet which would allow you to back up your app data and then restore it after performing a factory reset. But before proceeding ahead, let’s make you acquainted with some important stuff.
- Does Swift Backup Require Root?
- How to Backup App & Its Data via Swift Backup
- How to Restore App Data via Swift Backup
Does Swift Backup Require Root?
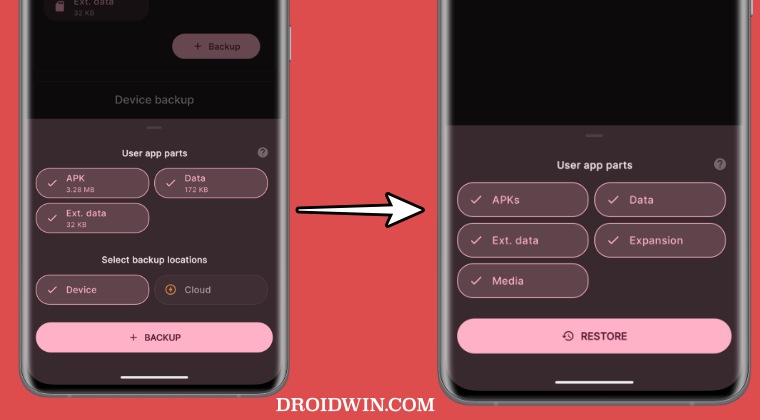
Swift Installer works across both rooted and non-rooted devices. If your device is non-rooted, then Swift Installer will be able to back up APK, Ext. data, Expansion, and Media, but it wouldn’t be able to back up the app data [data partition cannot be accessed by any app unless it is given admin-level privileges aka your device is rooted]. On the other hand, in a rooted device, you could backup the app data as well, apart from that APK, Ext. data, Expansion, and Media.
So is there any benefit of using Swift Backup on a non-rooted device? Well, if you are looking to have a local copy of the app backup instead of uploading it over to the cloud, then this is your best and most probably the only bet. With that said let’s make you aware of the steps to back up your app data via Swift Installer and then restore it after performing a factory reset.
How to Backup App & Its Data via Swift Backup
- Non-rooted users should install and set up Shizuku on their devices.
- Now download and install Swift Backup on your device.
- Now launch it and either sign in via Google or skip it.
- Then tap on Grant All Permissions > Grant Permissions.
- Non-Rooted users will get a Shizuku prompt, tap on Allow all the time.
- On the other hand, rooted users will get a Magisk request, tap on Grant.
- You may now carry out the desired backup [apps, SMS, calls, WiFi, etc].
- For the sake of reference, let’s back up the Shizuku app, so select it.
- Above is a screenshot from a non-rooted device, which will allow you to back up APK and Ext Data.
- Below is a rooted device that allows you to additionally back up the app’s Data as well.
- So tap on backup and then choose the backup location [local/on device or clouds]. That’s it.
How to Restore App Data via Swift Backup
As already discussed before, you will only be able to restore the app data if your device is rooted. For non-rooted devices, only the app will be installed from the store. So with that in mind, let’s show you the steps to restore the app and its data in both scenarios.
- Non-Rooted users should first set up Shizuku on their devices.
- Now launch Swift Backup and go to Apps Quick Actions.
- Then tap on Restore all apps and choose From Device or Clouds.
- Now select the desired app to be restored and tap on Restore Options.
- A non-rooted device could restore the APKs, Ext Data, Expansion, and Media.
- On the other hand, a rooted device could also select the Data to be restored.
- Once you have made the desired selections, tap on Restore. That’s it.
- Fix OnePlus Fingerprint issues without Persist backup
- Google One Backup not working on Android: How to Fix
- Cannot Backup iPhone Data to iCloud using Mobile Data [Fix]
- How to Backup EFS Partition/IMEI Number on Samsung

(Cancel Reply)
Δ
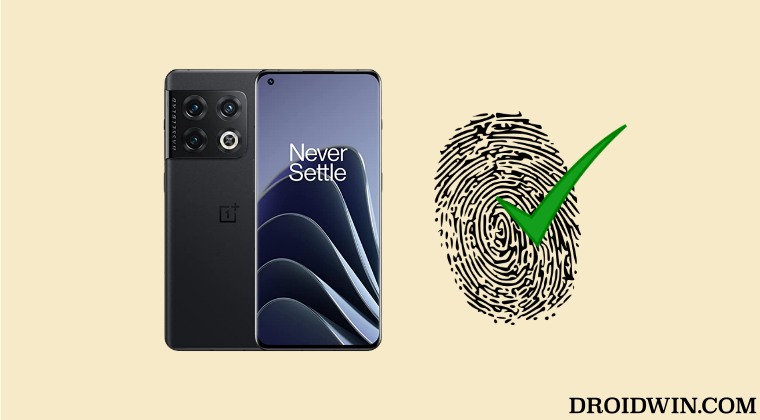
Fix OnePlus Fingerprint issues without Persist backup
In this guide, we will show you the steps to fix the OnePlus fingerprint issues without using the persist backup. OnePlus has long been among the most active players in custom development. Even though MSM Download Tool has become a thing of the past, but that hasn’t stopped tech enthusiasts from trying out new tweaks. You just need to take a backup of all the partitions and then dive deep dive into the technicalities of the open-source ecosystem.
While all the partition backups are equally important, but for me two really stand out among the crowds- the EFS partition that holds the IMEI number and the Persist partition that houses the fingerprint. This is because while you might be able to recover other partitions by flashing that partition file from a shared user firmware, but that would never work with the two aforementioned partitions as both are unique for every Android device.
But even then, we all have been on the receiving end of forgetting to take a backup or the backup getting corrupted or deleted unintentionally. Well, if you are also in the same boat, then this guide will help you out, at least with regard to fingerprints. In this guide, we will show you the steps to fix the fingerprint issues on your OnePlus device without using the persist backup file. Follow along.
- Fix OnePlus Fingerprint issues without Persist backup STEP 1: Unlock Bootloader STEP 2: Flash persist of any other user STEP 3: ReCalibrate Fingerprint
Fix OnePlus Fingerprint issues without Persist backup
The below process will require you to purchase an Optical Fingerprint Calibration [see STEP 3] which costs around Rs 1000 [$ 12.2] and in my case it proved to be a worthy investment in comparison to going to the official service center. Anyways, the choice is all yours. So decide accordingly and then proceed ahead. Droidwin and its members wouldn’t be held responsible in case of a thermonuclear war, your alarm doesn’t wake you up, or if anything happens to your device and data by performing the below steps.
STEP 1: Unlock Bootloader
To begin with, you’ll have to unlock the bootloader. This will wipe off all the data and might nullify the warranty as well. So if that’s well and good, then do check out our guide on How to Unlock Bootloader on any OnePlus Device [Video] .
STEP 2: Flash persist of any other user
- Next up, grab hold of the persist.img file [you may ask it from any other user] corresponding to your device.
- Then download and extract Android SDK Platform Tools on your PC.
- Now place the persist.img file inside the platform-tools folder.
- Then enable USB Debugging on your device and connect it to your PC via a USB cable.
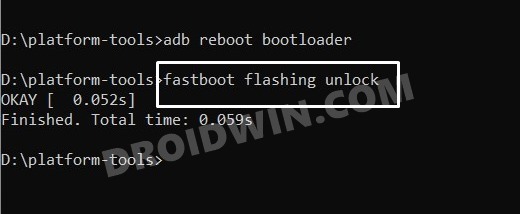
- Now open CMD inside the platform-tools folder and execute the below command to boot your device to Fastboot Mode: adb reboot bootloader
- Now type in the below command to flash the persist file: fastboot flash persist persist.img
- You may now reboot to the OS via the below command: fastboot reboot
STEP 3: ReCalibrate Fingerprint
Now comes the most important part of this guide. You’ll now have to re-calibrate the fingerprint on your phone. For that, you need to buy an Optical Fingerprint Calibration tool such as the Relife RL-071B or rl-071A. Once you have got this tool, let’s proceed ahead to fix the fingerprint on your OnePlus device.
- Bring up the dialer and type in the below code *#899#
- Now select AfterSale Devices Calibration. It will ask for a code, type in the below code and hit OK. 6776
- Skip [hit Pass or do a back gesture] all the other calibration tests until you reach fingerprint.
- On fingerprint calibration, press Start and follow the on-screen instructions: yellow – yellow, black -black, and stripped- blue [in my case].
- The stripped test usually never works in the initial attempts. You might get errors like Relative Illuminance Abnormal [in such cases, you just need to apply a little bit more pressure on the screen].
- So carry out this step a couple of times and ultimately you’ll achieve success. Once done, restart your device.
- Once the device boots up, you could now re-add your fingerprint from the Settings menu.
- Take a Backup of Persist Partition: Fix Fingerprint Not Working
- RAM Expansion greyed out on OnePlus: How to Fix
- How to Enable Engineer Mode on any OnePlus device
- How to Enable 5G in OnePlus Phones [2 Methods]
- AbdulWasay 3 years ago Reply OnePlus 8 in2017 after downgrade baseband unknown Solution plz Lucian 2 years ago Reply For nothing phone 1 there is a way to recover broken persist partition. I ended up with no fingerprint and no serial number.
(Cancel Reply)
Δ
