Beginner’s Guide on How to Create a Complete Backup of Android Device
In this guide, we will be covering in detail the procedure of creating a Complete Backup of your Android Device. Read this tutorial and implement the said practices on your device right away.
The best part of an Android Device is its open source nature. Unlike the iOS ecosystem, here you are not limited by a boundary. It is due to this reason that we are still seeing the rise of many new types of customizations being done in Android devices. But this is where it becomes a little bit scary. More the tweaking capabilities, the more the risk associated with it. So it has become of top priority to create a backup of your Android device.
- Why Make a Backup of your Android Device
- How to Create a Backup of all the Data Present on your Device 1. Create a Backup of Major Device Attributes Users on Android 8 (Oreo) or below: Users on Android 9 (Pie) 2. Creating Backup of Important Files, Documents, PDF, etc 3. Creating Backup of WhatsApp Chats, Images, and Videos
- What Determines the Speed of Backup
- Final Thoughts
Why Make a Backup of your Android Device
You may ask, “I hardly do any customizations on my device, do I still need to have a backup” ? Until a few years ago, you may have ignored it. But not anymore. This is because nowadays, even downloading apps from the Google Play Store is not safe and may inject viruses and malware on your device. Not only this many users also download and install apps from other websites on Google. These are the biggest source of malware carriers.
With that said, let us now move to the next section to create a complete backup of your Android Device.
PREREQUISITE
The most important point worth discussing here is that your device should be logged in with your Google ID. Make sure that you remember the password of this ID, as it may be required while restoring the data. All these data would be backup up to the Google Drive account. Although Google may do it for you, in some cases, you may have to enter the login details yourself. Make sure to use the same Google ID there as well.
How to Create a Backup of all the Data Present on your Device
There are various methodologies involved in creating the backup of any Android Device . We would be discussing each one of them in a detailed manner. Let’s begin with the process.
1. Create a Backup of Major Device Attributes
In this section, the following backups will be created:
- App Data
- Call logs
- Contacts
- Device Settings (stock wallpapers and ringtones, Wi-Fi passwords, address of Bluetooth devices, etc)
- Photos and Videos
- SMS text messages
If you have any confusion regarding which photos and videos will be backed up, just open up the Google Photos App on your device. If you don’t have it yet, it is highly recommended to install it.
- Once installed, open it and sign it with the same Google ID which you are using on your device.
- Tap the three vertical lines present at the top left and select Settings .
- Tap the first option- Back up & sync . Make your desired preferences.
Let us now begin with the process of creating the backup of the above-mentioned attributes for your Android device.
Users on Android 8 (Oreo) or below:
- Go to the Settings option of your device.
- Scroll down to the Backup and reset option and select it.
- Have a look at the backup account section and make sure you have provided the correct Google address. if not, tap on it and select Add account . Complete the on-screen instructions to set up your account.
- Also, make sure that the Automatic restore option is also enabled .
- Finally, tap on Back up my data and turn on the toggle.
Users on Android 9 (Pie)
- Navigate to the Settings menu on your device.
- Go to System and select the Advanced option.
- Then tap on Backup .
- Have a look at the Account section and make sure the current account is being shown. Otherwise, tap on it and select Add account. Follow the on-screen instructions to finish setting up your account.
- Under the next section, you have the Active backups . It shows what all is going to be backup up.
- [Optional] Tap on Photos and Videos and make any changes, if you wish.
- Come back to the backup screen, and enable the toggle next to Back up to Google Drive.
- Finally, tap on Back up now.
[Have a Rooted Device? Refer to this guide and create a Nandroid Backup ]
2. Creating Backup of Important Files, Documents, PDF, etc
Surprisingly as it may sound, but the files present on your device wouldn’t be back up- even if you carry out the above-mentioned steps. Files including any MS Word Doc, Excel spreadsheets, Powerpoint Presentations, PDFs, ZIP files, etc. But there is still a quick and easy way of having the backup of these files. Just follow the below instructions:
- Open the Google Drive app on your device.
- Make sure to log in with the same Gmail ID as present on your device. If required: tap the circle present at the top right, choose “Add another account” and add the primary Google account.
- Tap the plus sign present at the bottom right.
- “Create new” menu will appear. Select the Upload option.
- Chose as many files as you wish and tap on Open at the top right.
- All your selected files will be uploaded to Google Drive.
[Google Drive, by default, has only 15GB of Storage. After you exhaust your quota, you need to empty up your pockets. But here is a trick through which you Get Unlimited Storage on your Google Drive- For Free! ]
3. Creating Backup of WhatsApp Chats, Images, and Videos
Creating a backup of the App data via the device’s Backup option will not create a backup of WhatsApp chats and media files. For this, you need to follow the below-mentioned points.
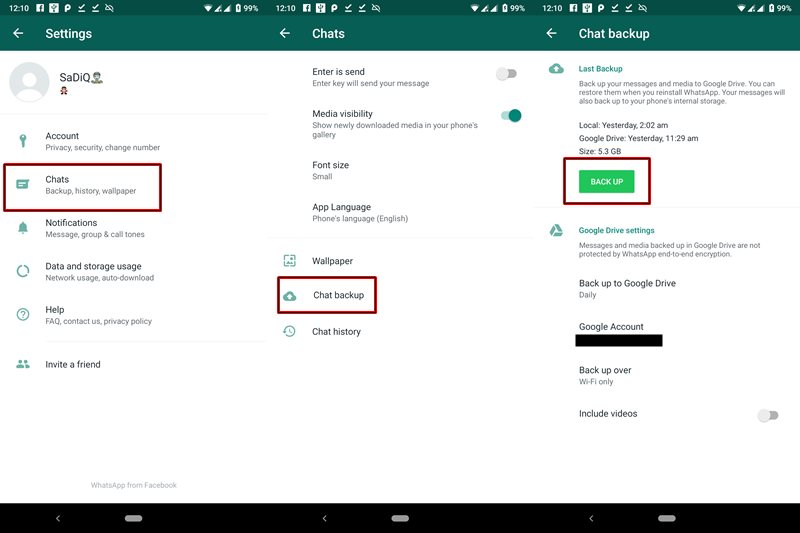
- Open WhatsApp and tap the three vertical dots present at top right
- Tap on Settings .
- Go to Chats option.
- Tap on Chat backup.
- [OPTIONAL] Have a look at the Google Account section and make sure you are using the same account as present on your device and the Google Drive app. Otherwise, tap on that section and select Add account and add your Google account.
- Have a look at the other options present there and make the desired changes.
- Finally, tap on BACK UP to begin the backup process.
[More WhatsApp Tips and Tricks: Enable the Fingerprint Lock option on WhatsApp!]
What Determines the Speed of Backup
It doesn’t matter which Android version you have. Neither the RAM or your device’s CPU has any considerable effect as such on the backup process. Internet speed and the amount of data being uploaded are the only two attributes that impact the total time it takes in creating a backup of your Android Device.
Final Thoughts
In today’s changing times, where new features and customizations are the need of the hour, it is extremely important to be on a safer side. therefore it is of paramount importance to have a complete backup of all your data present on your Android device. It doesn’t matter where you are a techno-geek or just any other normal user, keep it on top of your bucket list.
So this was an important guide covering various methods of creating a back up of all the available data of your Android device. As far as the various games are concerned, just make sure to sign in with your Google or Facebook account. By doing so, all your progress will be synced as your game progresses.

(Cancel Reply)
Δ
WhatsApp to Finally Launch the Much Awaited Feature [APK Available]
Whenever one thinks of contacting their near and dear ones, probably the only app that comes to their mind is WhatsApp. It is not that the messaging sector is bereft of any competition. The point is, such has been WhatsApp stronghold that the word ‘chatting’ seems to be the new synonym of WhatsApp.
And now, it seems that the communication giants have finally paid heads to one of the most widely requested features. As you might be aware that unlike other social apps, WhatsApp isn’t known to be among the first to launch any new feature. Whether it was the sticker pack, voice calls or video calls, it always took its fair share of time. And this is where it manages to score above its competitor.
It never wants to have a first-mover advantage. Rather, it first tests the app within its developer’s community. These are the members known as Alpha-Testers. Then it moves on to a selected few groups of users (known as beta testers). Finally, if everything is well and good, the app is released for the general public on the Play Store.
And here is one such feature released by WhatsApp which might finally be a cause of concern for its various competitors. Being one of the WhatsApp testers, I have been able to get my hands on this APK with the said feature enabled. But what is this feature all about? Read on further to know more.
[ More Interesting WhatsApp news: Read Here ]
- What Is This Latest WhatsApp Feature All About?
- Steps to Enable the FingerPrint Unlock Feature on WhatsApp
- Does This Hide Everything?
- Could I Hide Messages From the Notification Panel?
- How to Turn off WhatsApp Notifications?
- Will My FingerPrint Data be Misused by WhatsApp?
- Final Thoughts FAQs
What Is This Latest WhatsApp Feature All About?
One reason why some people still go for the Telegram App for communicating is the Safe and secure platform that it provides. By introducing various security mechanisms, such as the 2-Factor Authentication, WhatsApp is surely catching up with the former. And now it has added another important feature in its arsenal. But what explicitly is this feature?
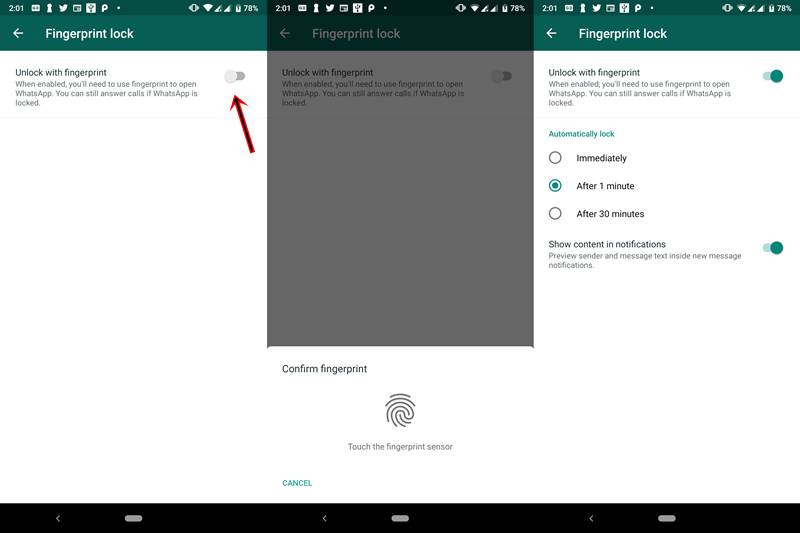
WhatsApp now has added the Fingerprint Lock Feature in its app. Previously called the Screen Lock or Authentication feature, the name probably speaks for itself. Applicable in Android 6.0 and later, every time you open the app, it needs to be unlocked via your fingerprint. But that’s not all.

You could also modify the time period after which you want the said feature to get active. For some, it might be quite annoying to authenticate every time he/she opens his app. But for others who consider privacy as their top concern, they want it to be enabled all the time. Taking this into consideration, the following time span is available to enable the “use fingerprint to unlock” option:
- Immediately
- After 1 minute
- After 30 minutes
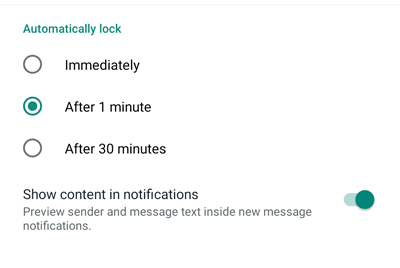
For example, if you chose the ‘Immediately’ option, WhatsApp will enable this feature at that instance. Hence, every time you open the messaging app, you need to unlock it via your fingerprint.
Steps to Enable the FingerPrint Unlock Feature on WhatsApp
It is extremely important to get your hands on the latest beta version of WhatsApp in order for the said feature to work. But being a member of WhatsApp beta tester, I was able to get my hands on the test version of WhatsApp. Download it here:
- Download: WhatsApp for Android v2.19.222 (beta version)
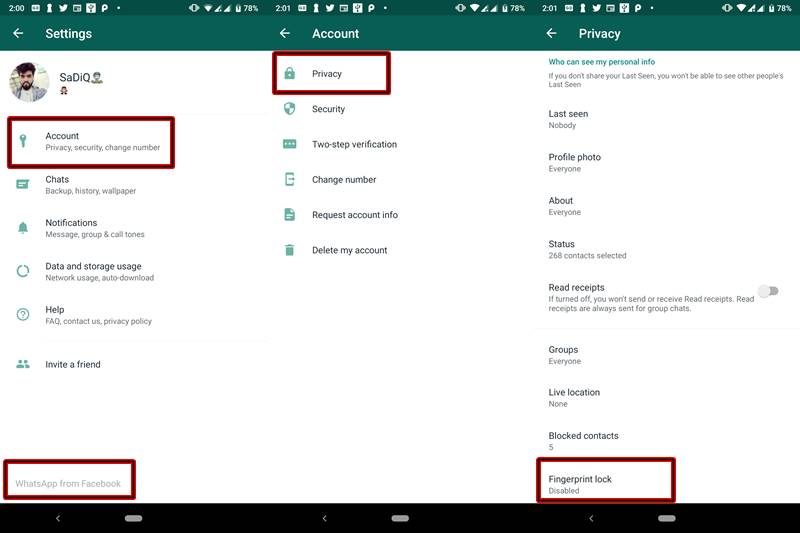
Once downloaded, install it on your device. Then open the app and head over to Settings > Account > Privacy . Under the Privacy Option, you will see a new feature called Fingerprint Lock . Enable the switch next to Unlock with fingerprint to activate this feature on your WhatsApp.
Does This Hide Everything?
The answer is both Yes and No. Inside the app, everything gets hidden . You will be greeted with a blank screen and a text that says “Content hidden due to fingerprint lock” (see below screenshot). So until you authenticate the app with your fingerprint, you wouldn’t be able to see any messages. That was the obvious part. Now let’s discuss the less obvious one.
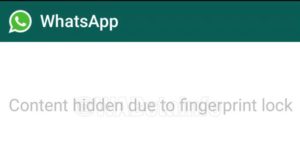
Source:WhatsAppBetaInfo
Even after you enable the fingerprint option, you will be in a position to view WhatsApp Messages, the sender info and the message date and time. All this could be viewed from the Notifications panel of your device. But isn’t it a security flaw on the part of WhatsApp? No, it isn’t.
This is because a third-party app has no control over your device’s system menu. Being an external app, WhatsApp can modify whatever it likes with its app, but outside the app, its functionality is limited. The device’s Notification Panel is handled by Andriod System. Hence it is the sole discretion of the System (or to be precise- the users) to show/hide these notifications.
Could I Hide Messages From the Notification Panel?
Although you could easily hide the messages from the notification panel , I would recommend not doing so. this is because WhatsApp is no longer used for casual chit chats. Many important and formal conversations are taking place nowadays on this messaging platform. Turning the notification off will make you completely unaware of the messages being sent to you. You may, therefore, miss out on important events. However, if you still prefer to turn off the notifications, follow the below method.
How to Turn off WhatsApp Notifications?
Given below are two methods to completely turn off Whatsapp notifications. Proceed at your own peril. You could try any of the two given methods. The first method, although short and simple, may work only on the latest Android version. If it doesn’t work for you, try the second alternative. That is the universal method and will work on all the devices.
METHOD 1: Turn off WhatsApp Notifications from the Notification Panel
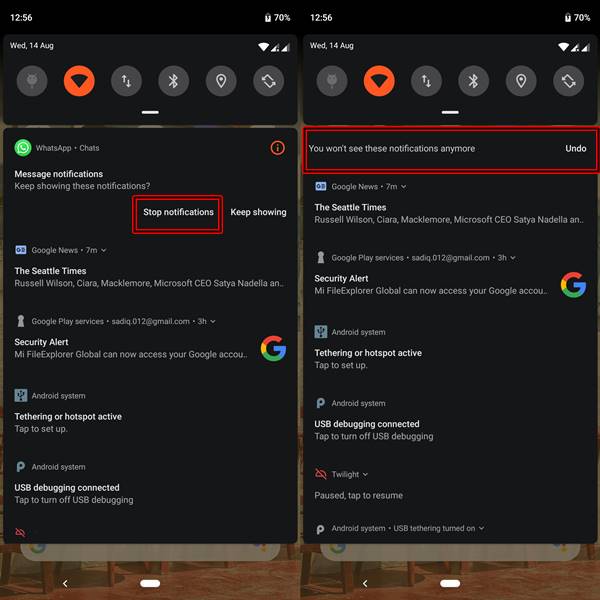
- Long press on the WhatsApp Notification on the Notification Panel.
- You will be greeted with two options: Stop Notifications and Keep Showing.
- Tap on Stop notifications . that’s it. You will no longer be notified about any WhatsApp activity on your device.
METHOD 2: Turn off WhatsApp Notifications from the App’s Setting Menu
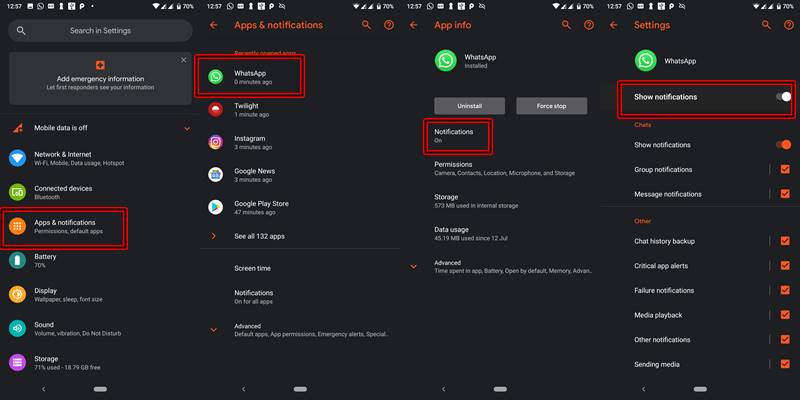
- Go to the Settings menu of your device.
- Navigate to Apps & Notifications or Notifications , whatever option is present on your device.
- Scroll down to WhatsApp and tap on it.
- [On Android 9.0 Pie] Tap on Notifications.
- Disable the toggle which says Show notifications or Block All.
Will My FingerPrint Data be Misused by WhatsApp?

Just like any other Android app, Whatsapp will not be able to access, store, transfer or modify any of your fingerprint or biometrics data. Rest assured, your data is completely safe and will only be stored in your Android System. Once you format your device, the data would also be erased.
Final Thoughts
This is indeed a welcome move by the world’s most popular messaging service. Any act which makes the app more safe and secure will be equally liked by everyone. Hence adding the fingerprint feature to the WhatsApp is a step in the right direction. What do you think? Feel free to voice your thoughts, views, and reactions to this news in the comment section below.
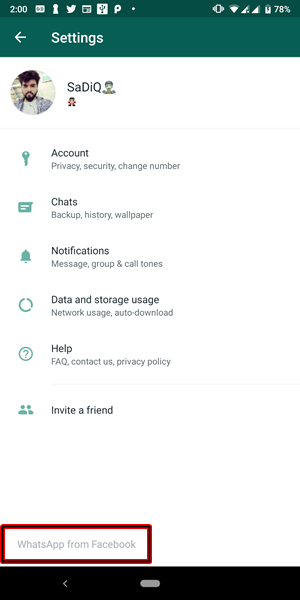
BONUS: In the Latest Version of WhatsApp (v2.19.222), Facebook has also renamed the app name from “WhatsApp” to “WhatsApp from Facebook”. Have a look at the below screenshot.
Q1) Will my pre-installed version of WhatsApp get this update?
No, in order to get the Fingerprint Lock feature, you must be using the WhatsApp Beta v2.19.222. Get it from the Download Section of this post.
Q2) After installing the said version, I am not able to see the Fingerprint feature in my WhatsApp.
If you have installed the version 2.19.222 of WhatsApp but still didn’t got this feature, then head over to Settings > Chats > Chat backup and make a backup of your chat. Then uninstall WhatsApp and re-install it. You should get this feature now.
Q3) Again, no success?
Even after that, if you aren’t able to receive the FingerPrint Lock feature of WhatsApp, then probably wait for the next beta release of WhatsApp. This post will be automatically updated once a new version is released.
(Cancel Reply)
Δ
