Bluestacks cannot start when Hyper-V is enabled: How to Fix
In this guide, we will show you various methods to fix the “BlueStacks can’t start when Hyper-V is enabled” error on your Windows 11 PC. When it comes to Android emulators, then hardly an iota of a doubt that Bluestack is one o the best in this domain. Both its app and cloud-based cross-platform products behold a plethora of nifty features in its arsenal. However, in spite of all the goodies attached, it isn’t free from its fair share of issues either.
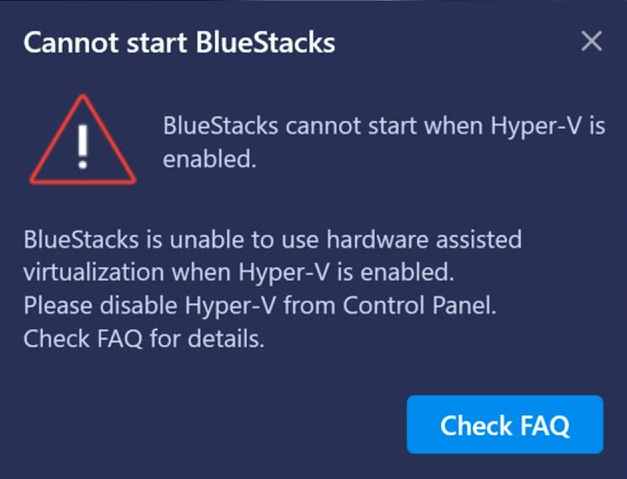
Numerous users have voiced their concern that they are getting the “BlueStacks can’t start when Hyper-V is enabled” error on their Windows 11 PC. As a result of which, they are unable to launch Bluestack and try out their preferred Android apps or games. As far as the reason for this is concerned, it could be attributed to Microsoft’s hardware virtualization product. So in this guide, we will show you how to address this virtualization which in turn should fix the Bluestack issue. Follow along.
- Fix Bluestacks cannot start when Hyper-V is enabled FIX 1: Update Blustacks FIX 2: Disable Hyper-V
Fix Bluestacks cannot start when Hyper-V is enabled
It is recommended that you try out each of the below-mentioned workarounds and then see which one spells out success for you. So with that in mind, let’s get started.
FIX 1: Update Blustacks
Previous versions of Bluestacks aren’t compatible with Hyper-V. So if you try and run them, they would straightaway give you this error message. Therefore, you should consider updating Bluestacks to one of those versions that come with in-built support for Hyper-V. Here’s how it could be done:
- To begin with, bring up Run via Windows+R and type in the below command: appwiz.cpl
- Now select Bluestacks from the list and hit Uninstall.
- Then proceed with the on-screen instructions to complete the uninstallation.
- Once done, head over to the Bluestacks website and download the “Nougat 64-bit” version.
- Then launch the setup and proceed with the on-screen instructions to complete the installation.
- Once done, it should fix the “BlueStacks can’t start when Hyper-V is enabled” error in Windows.
FIX 2: Disable Hyper-V
As already mentioned before, the culprit is Microsoft’s hardware virtualization product Hyper-V. To rectify this issue, you will have to turn it off. So if you are not ready yet to upgrade Blustack, then disabling Hyper-V is your only way out. Here’s how it could be done:
- Bring up the Run dialog box via Windows+R shortcut keys.
- Then type in the below command and hit Enter to open Windows Features: optionalfeatures.exe
- Now, uncheck Hyper-V, Virtual Machine Platform, and Windows Hypervisor Platform and click OK.
- It will install the necessary dependencies. Once done, restart your PC for the changes to take place.
- How to Install and Enable Hyper-V in Windows 11 (Opens in a new browser tab)
- VT-X/AMD-V Hardware Acceleration is Not Available on Your System [Fix]
- Windows Error 2 Occurred While Loading The Java VM [Fixed]
- Convert Legacy BIOS to UEFI and MBR to GPT in Windows 11

(Cancel Reply)
Δ
