Bypass New Google Restriction: Get Free Unlimited Photos Storage
UPDATE 6: 28th July 2025: We have yet another non-root method that will give you unlimited Google Photos storage. And out of all the non-root methods available, this is the best one out there! [Refer to ‘Using GMS Core’ Method]. UPDATE 5 : 28th January 2025: A new “non-rooted” method is now live that will bless you with unlimited free Google Photos storage on your Android device [check out the “Using Revanced Google Photos” section]! UPDATE 4 : 28th January 2025: Added a new method to get unlimited free Google Photos storage without rooting your Android device [check out the “More Technical But Less Effort Taking” section]!

UPDATE 3 : 27th November: Added yet another method that will help you get unlimited free Google Photos storage just by flashing a single module! UPDATE 2 : 14th August 2024: Added a method to spoof your device to Pixel 9 Pro and get 2TB free storage for Google One for up to 1 year! We aren’t just talking about Google Photos, this includes all the Google Apps, including Drive!]. Scroll to the end of this guide to know more. UPDATE 1 : November 9th, 2022: Added a new method that will give you unlimited photo storage in Original Quality instead of Storage Saver!.
In this guide, we will show you the steps to get free unlimited Google Photos storage on any Android device. This article has been written after Google announced that they would stop offering unlimited free High-Quality Storage. Now, they would rather cap it at 15GB, after which you will have to shell out some bucks. However, there exist numerous workarounds through which you could still get free unlimited Google Photos storage on your device. Before we list out the instructions, here’s a quick recap of the latest development surrounding the news.
- Google Photos High-Quality Storage is Now Capped
- Get Free Unlimited Google Photos Storage on Android [Non-Root] Create New Gmail Accounts! Using GMS Core Spoof your Device to Pixel XL [Custom ROMs]
- Get Free Unlimited Storage on Google Photos [Root Method] METHOD 1: Using Free-Unlimited-Google-Cloud-Backup Module METHOD 2: Using Pixelify Module METHOD 3: Using PFLite Minimal Mode
- Get 2TB Free Google One Storage [Spoof to Pixel 9/10]
Google Photos High-Quality Storage is Now Capped
So just a few days back, Google dropped a bombshell announcing that they would no longer offer free unlimited storage. As of now, the Silicon Valley giants offer unlimited High-Quality and 15GB Original Quality storage. The former is a loss-less compression technique used by Google that squeezes the image by a huge margin but without compromising on the image resolution.
As far as the Original Quality goes, well it is as its name suggests, the images and videos were saved in their original format. However, the storage for the same was limited to 15GB.
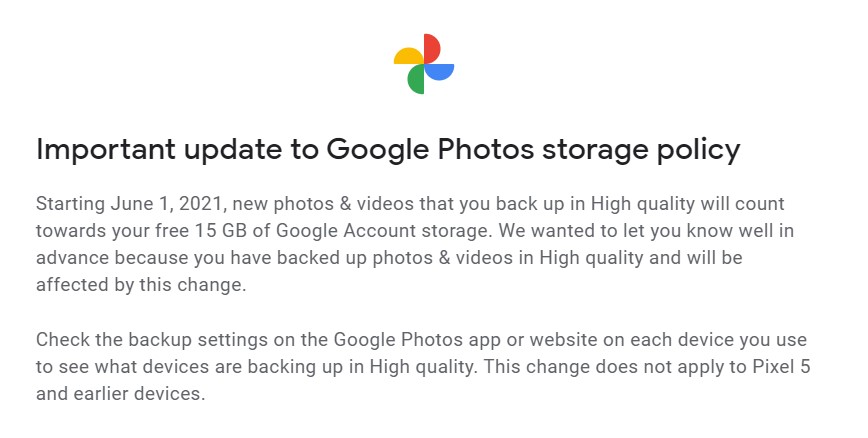
For most users, the High Quality was able to checkmark their daily requirements plus it offered free unlimited storage, hence there was no need for a second thought. But all this now changing. Google will now count the High-Quality storage against the 15GB storage. This 15GB is the same storage that is shared across all your Google services (including Drive as well). This rule is going to be active from June 1st, 2021.
All the media files that you will be storing till that date won’t be counted against this limit. But the uploads that will take place from that date onwards will count against your quota of 15GB. The only ones escaping all these restrictions are the Google Pixel devices . UPDATE: Now even newer Pixel devices (Pixel 6 series and later) won’t give you unlimited storage.
So most of you might be interested in knowing how could a non-Pixel device get the same perks. Well, this guide will help you achieve just that. Today we will show you how to get unlimited Google Photos storage on any Android. Follow along for detailed instructions.
Get Free Unlimited Google Photos Storage on Android [Non-Root]

Create New Gmail Accounts!
This is a nifty workaround in which we will tailor the offering from Google to our needs. So here’s the thing. Google, after the new rule, only offers 15GB of High-Quality storage. This cap is associated with your Google account that you have signed in with. But there’s no restriction whatsoever as to the total number of Google accounts that you could create.
As of now, I am currently running around 5 Google Accounts on my Android device, which in total is offering me 95GB of free space. Hence, I have set the Google Photos settings to always save the images and videos in the Original uncompressed quality rather than the usual High compressed quality. When one account gets filled up, I move over to the next one, and so on.
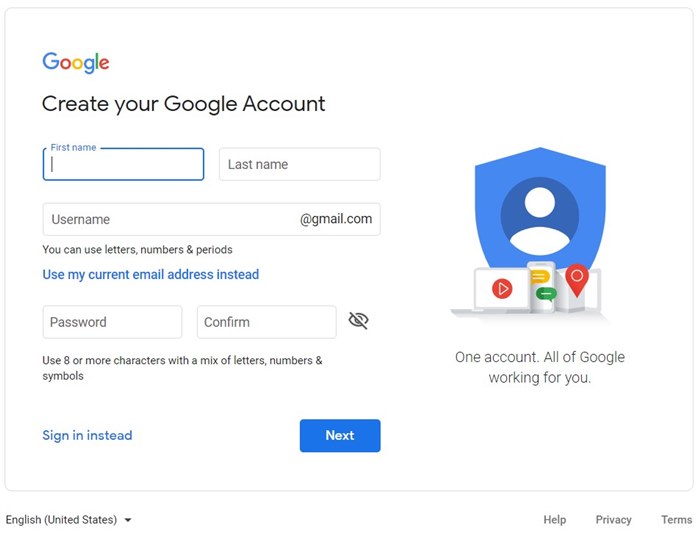
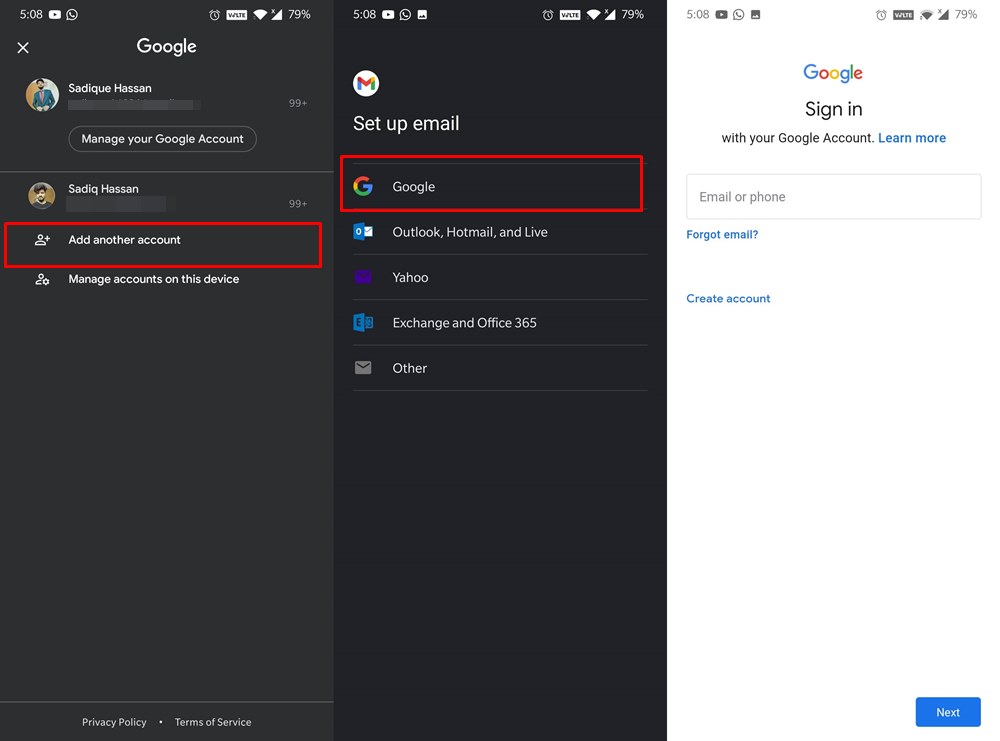
Let’s take Gmail as an example. Now tap on your avatar situated at the top-right and then tap on Add another account. Select Gmail from the list and then follow the on-screen instructions and your new Google account with 15GB of free space will be created in no time whatsoever.
However, creating unlimited Google accounts is not everyone’s cup of tea [mine neither], so what else can be done in a non-rooted ecosystem? Well, it turns out a few other impressive yet technical methods through which you can get this job done. Follow along for the instructions.
Using GMS Core

This version of Google Photos, which requires you to sign into a modified version of Google Mobile Services (GMS). If that’s all well and good, then here’s how you can make full use of this tweak:
- To begin with, download and install GMSCore on your device.
- Launch it, go to Google Accounts, and sign in to your account.
- Once done, download and install the ReVanced GPhotos app.
- Finally, launch it and enable Backup. Enjoy your free storage!

NOTE: You’ll now have two Photos apps in the app drawer. One from the Revanced [new] and the other will be your original one [old].
Spoof your Device to Pixel XL [Custom ROMs]
Nowadays, many custom ROMs like Evolution X and rDroid come with a built-in option that will allow you to spoof your device to Pixel XL and get you unlimited Google Photos Storage in original quality. You only need to enable a single toggle and that’s it, no need for root or any custom binary! [However, since we are spoofing the device to Pixel XL, make sure you disable all the other spoofing options on your device, such as Play Store spoofing to the latest Pixel devices. This is because your device cannot be spoofed to two Pixel devices at the same time!]. So without any further ado, let’s show you how this can be carried out.
- First and foremost, have a look at the changelog for the desired ROM and verify if they have Unlimited Google Photos Storage or not [crDroid and EvolutionX might be the best options to check out for starters. You may laos check out our comprehensive custom ROM installation videos playlist on YouTube ].
- Then flash the ROM onto your device. While there’s no universal set of instructions that will be applicable across all the devices, but the general steps are as follows: Using AOSP Recovery which comes with the ROM [such as crDroid Recovery]: Boot to Fastboot via adb reboot bootloader > Flash Recovery via fastboot flash recovery recovery.img > Reboot to Recovery via fastboot reboot recovery > Format Data > ADB Sideload ROM via adb sideload rom.zip > Format Data > Reboot to System. Using TWRP/OrangeFox Recovery: Boot to Fastboot via adb reboot bootloader > Flash Recovery via fastboot flash recovery recovery.img > Reboot to Recovery via fastboot reboot recovery > Format Data > Flash ROM ZIP via Install option > Format Data > Reboot to System.
- Now head over to Settings > ROM Customization Page > Miscellaneous > Component Spoofing > Google Photos Spoof > Delete Data of Google Photos > Restart Device.
Get Free Unlimited Storage on Google Photos [Root Method]

Well, this has been personally my favorite method. In this, we would be converting our device to one of the Pixel devices. Then all you have to do is sign in with your existing Google ID. When you do so, Google will identify that the account is now associated with a Google Pixel device and your account will then automatically qualify for unlimited free Photos storage. So while rooting is considered by many to be a risky process but the plethora of perks associated with it all makes up for it. On that note, let’s get on with the instructions set.
Motorola One Action Spoofed to Pixel 3XL
First and foremost, your device needs to be rooted. Do keep in mind that the entire rooting process might be risky for some of you out there. If you don’t have much clue regarding this, then we would suggest you stick with the non-root method. However, if you are ready to plunge into the rooting scenes, then you are more than welcome. Droidwin and its members wouldn’t be held responsible in case of a thermonuclear war, your alarm doesn’t wake you up, or if anything happens to your device and data by performing the below steps.
METHOD 1: Using Free-Unlimited-Google-Cloud-Backup Module
- To begin with, root your device via Magisk and enable Zygisk as well.
- Then download the Free-Unlimited-Google-Cloud-Backup-Magisk-Module . You may also try modules like Unlimited-GooglePhotosBackupMod or gphotos-unlimited
- Now launch Magisk, go to Modules, and tap on Install from Storage.
- After that, select the module and flash it. Once done, hit Reboot.
- Finally, delete the data of the Google Photos app [optional but recommended].
- That’s it. You should have unlimited Google Photos Storage in Original Quality.
METHOD 2: Using Pixelify Module
This module will only work till Android 13. For Android 14+, refer to the above module.
This mod will spoof your device to Pixel 1, thereby giving you unlimited storage in Original Quality [instead of Storage Saver]! Apart from that, it will give you the option to add a plethora of other Pixel-related goodies [listed after the instructions]. Moreover, this module supports numerous OS builds [including the latest Android 13] and supports numerous Android devices and custom OS skins as well. So without any further ado, let’s check it out.
- First off, root your device using this guide: How to Root Android Device via Magisk .
- Then launch the Magisk app and tap on the Settings icon situated at the top right.
- After that, enable the toggle next to Zygisk and restart your device.
- Then download the Pixelify Module from GitHub and transfer it to your device.
- Now launch the Magisk App, go to the Modules section, and tap on Install from Storage.
- Navigate to the downloaded module and select it. It will now ask you to flash a few additional features.
- Press Volume Up to reply YES or Volume Down to reply No. Finally, hit Reboot on the last screen that appears.
- Once your device boots up, go to Settings > Apps > select Google Photos.
- Then go to its Storage section and tap on Delete Data > Delete.
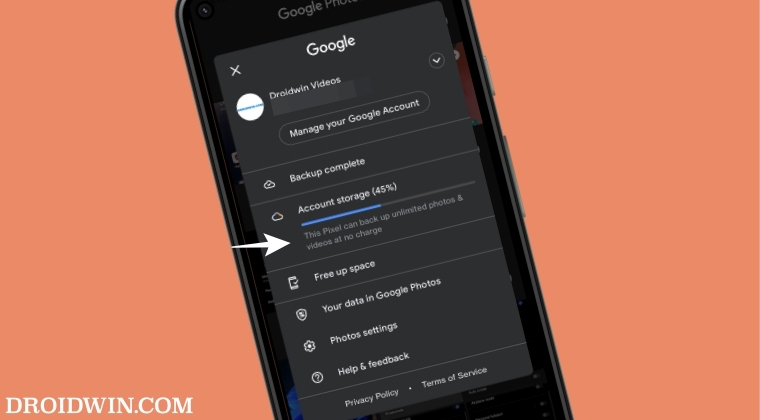
- Now launch Google Photos and sign in to your account. You will now see the following message across the app: This Pixel can back up unlimited photos and videos at no charge.
- That’s it. Your device has now been spoofed to Pixel with free unlimited Google Photos storage.
Pixelify Module Features

........................

Pixel 6 Live Wallpapers*

Magic Eraser (USE THIS APK)(7+)

Google Dialer Direct Call (12+)

New At a Glance feature (12+ & Dec+ Patch)

Google Quick Pharse*

Google Next Generation Assistant Typing (Next Generation Assistant Required)*

Call Caption Typing (12+)

Live Captions different language

Adaptive Charging (Google SystemUI)

Adaptive Connectivity (11+)

Adaptive Sound (11+)*

Battery Widget (Working depends on rom)

Call Captions (11+)(Depends on Rom)

Enables Nexus, Pixel, and Android One app support

Extreme Battery Saver (11+) [ Settings > Battery > Battery Saver > Extreme Battery Saver -12 ]

Google Dialer Call Screening

Google Dialer Hold for me

Google Dialer Call Recording (Device depended for working)

Google Digital Wellbeing Heads up

Google Duo features

Google Fit Heart rate

Google Fit Respiratory rate

Live captions (10+)

Next Generation Assistant* (10+)(Optional)

Now Playing Export* (Works only on Pixel Phone)

Pixel Device spoofing (Optional)

Pixel Blue theme accent

Pixel bootanimation (Optional)

Pixel Launcher (10+)(Optional)

Pixel Live Wallpapers (Optional)

Pokemon SideKick Live Wallpaper (Optional-Included with LiveWallpapers)

Portrait Light (10+)

Screen Attention Service

Smart Compose

Unlimited Photos backup (Storage saver)

Unlimited Photos backup (original) (needs Zygisk or Riru)
METHOD 3: Using PFLite Minimal Mode
This will spoof your device to Pixel 3XL thereby giving you unlimited Google Photos Storage at Original Quality till 31 January 2022 and in Storage Saver after 31 January 2022. [Looking to get Original Quality forever? Check out Method 1 and 2 instead].
- First off, refer to our guide to root your device: How to Root Android Device via Magisk Patched Boot
- Once rooted, you will then have to download the PFLite.MINIMAL.v2.0.P3XL.zip module from GitHub.
- This module will spoof your current Android device to Pixel 3XL and will let you enjoy the associated goodies as well.
- Anyway, after downloading the module, transfer it to your device.
- Then launch the Magisk Manager app on your device.
- Tap on the module icon situated at the bottom right.
- Next up, select the Install from Storage option. Navigate to the PFLite.MINIMAL.v2.0.P3XL.zip file and select it.
- Magisk will now begin the flashing process which should take only a couple of seconds. Once that is done, tap on the blue Reboot situated at the bottom.
- Once the device reboots, it’s time to delete the Google Photos app data and cache. Don’t worry you wouldn’t lose any data as they are stored in the clouds. So head over to Settings > Apps and Notifications > See all xx apps > Scroll to Google Photos > Storage and Cache > Tap on Clear Storage. Hit OK in the confirmation dialog box that appears.
- Now launch the Google Photos app and you would be greeted with the message that you get unlimited free storage for full-resolution photos and videos…..from your Pixel device.
- Now tap Next and you should now see the Free Backup at High Resolution under High Quality. Select it and tap Confirm.
- Go through the welcome screen to finish the setup. That’s it. You could even head over to your device’s About Phone section and verify that your device is indeed Google Pixel 3XL. I have carried these steps on my Motorola One Action, but as evident from the below screenshot, it has been spoofed into Pixel 3XL.
Get 2TB Free Google One Storage [Spoof to Pixel 9/10]

We found a nifty workaround using which you can spoof your device to Pixel 9 Pro and get up to 2TB of free Google One storage. This isn’t just limited to Google Photos but is valid across all the Google apps and services, including Drive. However, before you try out this tweak, there are a couple of crucial points worth keeping in mind, namely:
- It is highly recommended that you try this tweak on your secondary account as Google might take action and suspend the account on which this account has been carried out [although I’ve been using unlimited Google Photos storage for ages and my account is still up and running, still let’s be safe than sorry].
- Not everyone is getting the 2TB storage for 1 year. Some are getting for 6 months, others for 3, and some even for just one single month. For some, this tweak didn’t even work out. So the mileage may vary for each user out there.
If that’s all well and good, then let’s get started with the instructions. Droidwin and its members wouldn’t be held responsible in case of a thermonuclear war, your alarm doesn’t wake you up, or if anything happens to your device and data by performing the below steps.
- Root your device via Magisk / KernelSU / APatch .
- Then download the Pixel 9 Pro Spoof mod .
- Or use Pixel 10 Pro Spoof module [NEW].
- Now flash this module via your rooting app.
- Finally, hit Reboot and check out the result.
- Top 10 Apps for Facebook to Enrich Your Experience
- How to Install Split APKs (APKM) on any Android Device
- Detailed Steps to Fix adb is not recognized Error
- How to Fix Unauthorized Device with ADB Commands [3 methods]
- Fix Android stuck in Recovery Mode: No Command screen

- Poorna chand chicky 10 months ago Reply Storage
- Poorna chand 10 months ago Reply Storage
- Mo 4 years ago Reply Folks, any luck rooting your phone to Pixel 1 (instead of Pixel 3)? Please share!
- Kush Gupta 5 years ago Reply Have you tried the pixel 1 mimicking has it worked?
- Ankit 5 years ago Reply Hey, I used this module on my Resurrection Remix rom, and my device gets stuck in the boot loop. However, my device is now recovered from the boot loop. Any other advice you wanna give to use this trick? Sadique Hassan 5 years ago Reply Hi Ankit, sorry for the bootloop. Anyways, you could try another trick- Use the STEP 1 to STEP 4 of this guide: How to Pass Magisk SafetyNet on Rooted Android This guide will allow you to spoof your device all the way up to the latest Pixel 5. So you may give it a try.
- Johnson 5 years ago Reply After installing the module, Google Play and Google Play Service keep stop working and keep displaying a prompt. It basically prevent me using my phone. Sadique Hassan 5 years ago Reply Hi Johnson, did you tried deleting Google Play and Google Play Service data (make sure to sync the data first). Furthermore what prompt are you getting? Is it a force stop message? Mike 5 years ago Reply The same thing is happening to me (constant force stop messages) and I made sure I set up this on a freshly installed device, with no Google Play login yet Sadique Hassan 5 years ago Reply Hi Mike, considering your device is rooted, you could also try out this guide: How to Pass Magisk SafetyNet on Rooted Android Just try STEP 1 to 4 of that guide. In that, we will be spoofing your device to a Pixel handset. Lime 5 years ago Reply Hi, I tried the guide, set the device fingerprint to Pixel 3 via props, option 1 – Edit device fingerprint to be Google Pixel 3 google/blueline/blueline:9/PQ3A.190801.002/5670241:user/release-keys but Photos still says “unlimited upload” and when I upload anything, it still counts towards the storage. Any idea if the spoofing really works with Google Photos as of June 2021? Sadique Hassan 5 years ago Reply Hi Lime, as per the latest Google Photos Update, only the original Pixel (Pixel 1 series) has unlimited Google Photos storage at Original Quality. So you could try spoofing the device to Pixel 1 and then check the results.
- John 5 years ago Reply Great tutorial! I was planning on buying a pixel just so I can have my current phone sync photos to it to upload but this is easier (and cheaper). One question, is there anyway to spoof the phone into thinking it’s a pixel 1 instead of a pixel 3? I believe the pixel 1 still get unlimited original storage forever (supposedly) instead of just until 2022. Thanks! George 5 years ago Reply My thoughts exactly. Seems like this is just kicking the can another 12 months where there’s gotta be a way to bypass the limit indefinitely. May try setting my old nexus 6 to a pixel one to see if that works, if I can find it 😂 Sadique Hassan 5 years ago Reply Hi John, thanks for your appreciation. And, you seem to have asked quite an interesting question. Once I get hold of my test device, I will try modifying the build prop file’s fingerprint section to that of pixel 1 and will then share the results. Iz 4 years ago Reply Has there been an update with the pixel 1 spoof? arafath 5 years ago Reply Hey tried the magisk module but sadly the backup options are not showing up for me. Although it says backing up for your pixel is unlimited in g.photos setting but when tapped no backup setting appears. What i think google has seem to patch the workaround. Would be nice if you could update us with a new solution. Thank you Sadique Hassan 5 years ago Reply Hi Arafath, thanks for bringing it to my notice. Will check it out and let you know
- Kris 5 years ago Reply Thank you so much for this tutorial!! This has to be the easiest way to do it with Magisk. Sadique Hassan 5 years ago Reply Thanks for the appreciation Kris. Yes, this is indeed quite an impressive module, it’s just that not many people know of this as of now.
(Cancel Reply)
Δ
