Cannot Download OnePlus Downgrade Firmware [Fixed]
This guide will show you an interesting method to fix the issue of being unable to download the OnePlus downgrade firmware. Over the past couple of months, the OEM has made it quite difficult for the end users who are trying to get hold of the firmware files. While it has already stopped hosting firmware on its site [the last one was for OnePlus 9, I suppose], even the ones that it provides over its Community posts in the form of latest OS updates are now inaccessible to the users.
In this regard, we have already covered a couple of bugs, in the form of: Access Denied 403 Forbidden When Downloading OnePlus Firmware [Fix] and How to download OnePlus downgrade firmware when removed from the servers . And now, a new issue has just made its way.

Numerous OnePlus users have voiced their concern that they are not even able to download the downgrade firmware. Whenever they are trying to so, they are instead greeted with the This site cannot be reached. DNS_PROBE_FINISHED_NXDOMAIN. If you are also in the same boat, then this guide will help you out. Follow along for the fix.
Fix Cannot Download OnePlus Downgrade Firmware
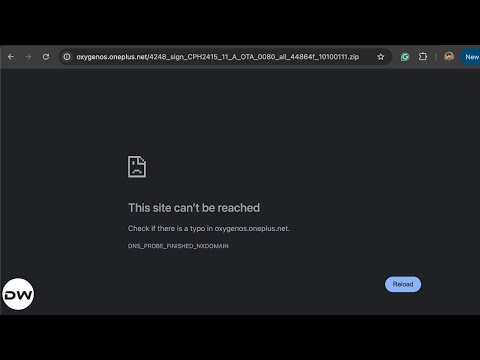
The culprit behind this issue is a DNS misconfiguration, oxygenos.oneplus.net resolving to NXDomain . This issue can be solved by manually adding a hosts file entry pointing to Akami’s edge IP. Here’s how: [Credits: XDA Senior Member lordsheapshyt].

- To begin with, open the hosts file on your platform: On Windows: %SystemRoot%\System32\drivers\etc\hosts On Linux: /etc/hosts On Android [your device should be rooted and you should use a root-supported file manager app]: /system/etc/hosts On Mac: Open Terminal > Type in sudo nano /private/etc/hosts > Type your password.
- Then type in the below address in the host file and save the changes 23.48.224.239 oxygenos.oneplus.net On Windows: Open the file via Notepad > Type the address > Save it via Ctrl+S. On Android: use the File Manager’s built-in text editor app > type in the address > hit the Save icon. [Note: Some phones might require the system partition to be R/W before you can save any changes to the hosts file.] On Mac: Use the arrow key to bring the cursor to the end of the file > type in the address > hit Ctrl+X > hit Y > hit Enter.
- It is also recommended to flush the browser’s DNS Cache. If you are using a Chromium browser, then head over to: chrome://net-internals/#dns
- Now, click Clear Host Cache. Finally, head over to the desired file’s download link, and this time it will be downloaded.
- How to Root any OnePlus via KernelSU Next and SUSFS
- How to Flash Different Region Firmware via Local Install on OnePlus
- A Comprehensive Guide to Create a OnePlus Fastboot ROM
- How to Fix Throttling Issues in OnePlus Devices

(Cancel Reply)
Δ
How to Root any OnePlus via KernelSU Next and SUSFS
In this guide, we will show you the steps to root your OnePlus device using KernelSU Next and SUSFS. When it comes to gaining administrative privileges over your device, Magisk has long been the go-to choice for tech enthusiasts. However, over the last few months, we have witnessed a slight change in this trend, with many people moving towards KernelSU.
One major reason for the same is the issues with hiding the root when it comes to Magisk. Even if you end up passing the Basic and Device test [well, in some cases, even the Strong Test] and hide the Magisk app, the banking and payment apps will still end up identifying that your device is rooted via Magisk, and hence they will refuse to function.
Fortunately, at least for now, that isn’t the case with KernelSU. This, when combined with the SUSFS, gives you the most stringent root hiding environment along with a slew of additional advanced-level tweaks. So, without any further ado, let’s make you aware of the steps to root your OnePlus device using the combination of KernelSU Next and SUSFS. Follow along.
- How to Root any OnePlus Phone via KernelSU Next and SUSFS SUPPORTED DEVICE LIST INSTALLATION STEPS
- How to Install OnePlus Kernel with KernelSU Next without TWRP
How to Root any OnePlus Phone via KernelSU Next and SUSFS

Before starting, take a backup of all the data on your device, just to be on the safe side. Droidwin and its members wouldn’t be held responsible in case of a thermonuclear war, your alarm doesn’t wake you up, or if anything happens to your device, and data by performing the below steps.
SUPPORTED DEVICE LIST
As of now, these are the supported devices, though more devices will be added in the near future, so stay tuned!
OP ACE 2 PRO

OP ACE 2

OP ACE 3V

OP ACE 5

OP ACE 5 PRO

OP NORD 4

OP OPEN

OP PAD 2

OP 10 PRO

OP 10T

OP 11R

OP 11

OP 12

OP 12R

OP 13

OP 13R

OP 13S
INSTALLATION STEPS

- First off, download the required files from below: OnePlus Kernel with KernelSU Next and SUSFS Support KernelSU Next App SUSFS Module
- Then install the TWRP Recovery onto your device.
- Now reboot your device to TWRP Recovery using: adb reboot recovery // from the OS fastboot reboot recovery // from Fastboot Mode
- Now go to Install > select the OnePlus Kernel > flash it.
- Then go to Reboot and select System to boot to the OS.
- Next up, install the KernelSU Next app. Then launch it.
- Go to Modules, tap Install, and flash the SUSFS Module.
- Now, hit Reboot. Once it boots up, tap Open next to SUSFS.
- Then tap on Custom SUSFS Settings and customize it as per your liking.
- How to Root OnePlus 13 via KernelSU Next and SUSFS
- How to Root OnePlus 11 using KernelSU Next and SUSFS
- Detailed Guide to Hide Root via KernelSU on Rooted Android
- How to Install OTA Updates on Rooted Device via KernelSU
How to Install OnePlus Kernel with KernelSU Next without TWRP

Some OnePlus devices might not have a working TWRP Recovery. So in such cases, here’s what you need to do:
- First off, download the required files from below: OnePlus Kernel with KernelSU Next and SUSFS Support KernelSU Next App SUSFS Module
- Download the same firmware which is installed on your device.
- Then extract the init_boot.img from it using Fastboot Enhance.
- Now transfer the file to your device. Then install KernelSU Next.
- Launch it, tap on the downward arrow > select a file > init_boot.
- File will now be patched. Transfer it to the platform-tools folder.
- Now open the Command Prompt inside the platform-tools folder.
- Then type in the below command to boot your device to Fastboot. adb reboot bootloader
- Now type in the below command to flash this patched init_boot: fastboot flash init_boot patched_init_boot.img
- Then type the below command to boot the device to the rooted OS fastboot reboot
- Install the Kernel Flasher app , launch it, and tap View next to both slots.
- Then note down the Slot name [A or B] that gives you the Flash option.
- Now tap on Flash > Flash AK3 ZIP > select the OnePlus Kernel.
- Once done, restart the device for the kernel to be up and running.
- Next up, install the KernelSU Next app. Then launch it.
- Go to Modules, tap Install, and flash the SUSFS Module.
- Now, hit Reboot. Once it boots up, tap Open next to SUSFS.
- Then tap on Custom SUSFS Settings and customize it as per your liking.
- ae 3 months ago Reply does it not work on oxygenos 16 because the apps are no longer being granted root access
- Akash 5 months ago Reply Need kernal su file for oneplus 8 pro running 13
(Cancel Reply)
Δ
