Change Refresh Rate for Individual Apps on Android
In this guide, we will show you the steps to change the refresh rate for individual apps on your Android device. When it comes to the refresh rate settings, then you either have the option to set a specific rate throughout the OS or have a variable refresh rate. While the latter is much more flexible, however, the ultimate decision to implement the rate for an app lies in the hand of the OS itself. You do not have any say as to what refresh rate will be applied to a particular app.
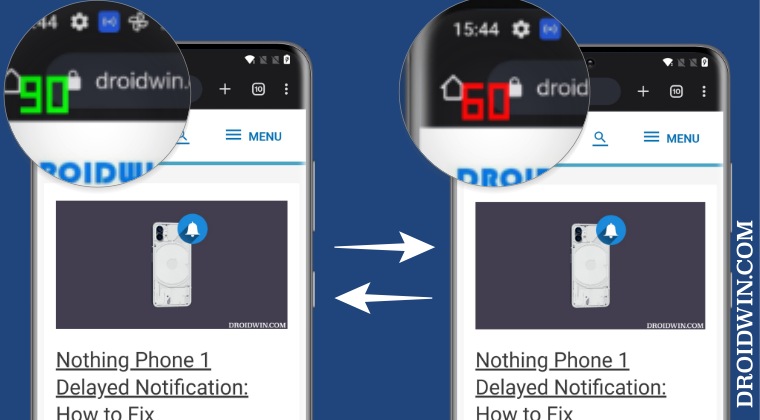
For example, if the OS finds that the 60z refresh rate is more than sufficient for Chrome, then it will straightaway implement that, you have no option to further increment it to 90Hz. This lack of options tends to infuriate the users, and rightly so. Ont he plus side, there does exist a nifty workaround through which you could change the refresh rate for individual apps on your Android device. And in this guide, we will show you how to do just that. Follow along.
How to Change Refresh Rate for Individual Apps on Android
- To begin with, download and install the SmartHertz app from Play Store. Then launch it.
- If your device is rooted, tap on Do it for Me! It will bring a Magisk prompt, tap on Grant.
- For non-rooted devices, tap on Open App Settings and grant it Unrestricted Battery access.
- Go back to the app, tap on Open Settings and enable the toggle next to Allow System settings modification.
- Again go back to the app and you should be taken to the Application section.
- Select the desired app from the list and choose the refresh rate of your choice.
- Enable 120Hz Refresh Rate in Snapchat, Instagram, GCam Camera
- Force 120Hz Refresh Rate in any Android via ADB Commands
- How to Change Refresh Rate in Android via ADB Commands
- Enable 120Hz Refresh Rate in Power Saving Mode in Samsung One UI 4

(Cancel Reply)
Δ
