Download and Install Android 14 GSI ROM [Video]
In this guide, we will show you the steps to download and install the Android 14 GSI ROM onto your device. The fourteenth iteration of the OS has just been released by Google and there are quite a few noteworthy features to look forward to. The ability to give permissions to individual images/videos instead of the entire gallery, a built-in app App Cloning feature, and the predictive back gesture are just some of its noteworthy features.
However, at the time of writing, the OS is only available for Pixel users [who could install it via Sideload , Fastboot , or Flash Tool ] and it would take literally months before other OEMs get their hands on this. However, you could easily skip this waiting queue and welcome abode the latest OS via the Generic System Image. So without further ado, let’s show you the steps to download and install the Android 14 GSI ROM onto your device.
The latest Android 15 GSI ROMs are now live! Do check them out.
- How to Install Android 14 GSI ROM Via Fastboot Commands STEP 1: Install Android SDK STEP 2: Enable USB Debugging and OEM Unlocking STEP 3: Unlock Bootloader STEP 4: Download Android 14 GSI ROM STEP 5: Download vbmeta STEP 6: Boot Device to Fastboot Mode STEP 7: Disable Verity Check STEP 8: Flash Android 14 GSI ROM via Fastboot
- How to Install Android 14 GApps
- How to Install Android 14 GSI ROM via DSU Sideloader
- How to Install Android 14 GSI ROM on Samsung Devices
How to Install Android 14 GSI ROM Via Fastboot Commands

The below instructions are listed under separate sections for ease of understanding. Make sure to follow in the exact same sequence as mentioned. Droidwin and its members wouldn’t be held responsible in case of a thermonuclear war, your alarm doesn’t wake you up, or if anything happens to your device and data by performing the below steps.
STEP 1: Install Android SDK

First and foremost, you will have to install the Android SDK Platform Tools on your PC. This is the official ADB and Fastboot binary provided by Google and is the only recommended one. So download it and then extract it to any convenient location on your PC. Doing so will give you the platform-tools folder, which will be used throughout this guide to install the latest Android 14 GSI ROM on your device.
STEP 2: Enable USB Debugging and OEM Unlocking
Next up, you will also have to enable USB Debugging and OEM Unlocking on your device. The former will make your device recognizable by the PC in ADB mode. This will then allow you to boot your device to Fastboot Mode. On the other hand, OEM Unlocking is required to carry out the bootloader unlocking.
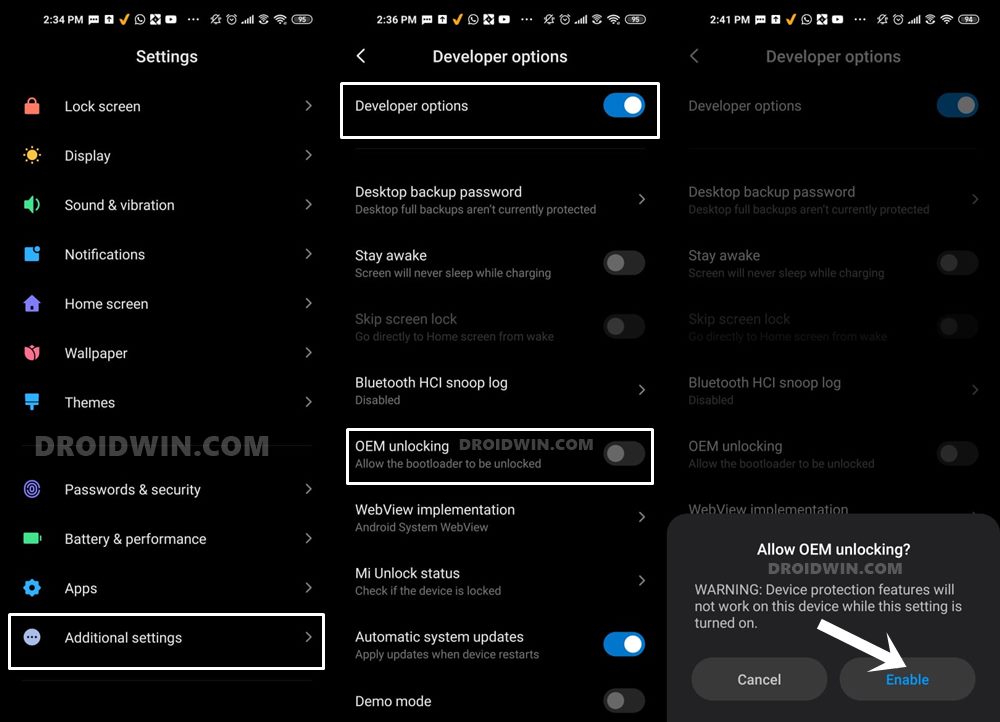
So head over to Settings > About Phone > Tap on Build Number 7 times > Go back to Settings > System > Advanced > Developer Options > Enable USB Debugging and OEM Unlocking.
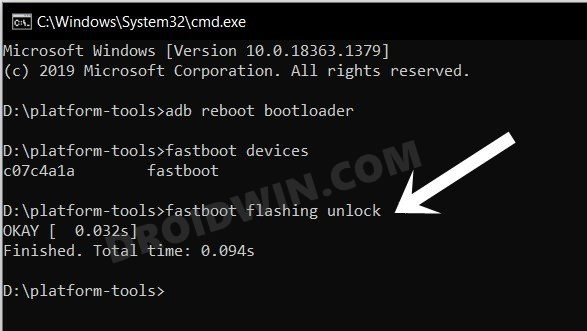
STEP 3: Unlock Bootloader
Next up, you will also have to unlock the device’s bootloader. Do keep in mind that doing so will wipe off all the data from your device and could nullify its warranty as well. So if that’s all well and good, then please refer to our detailed guide on How to Unlock Bootloader of Any Android Device .
STEP 4: Download Android 14 GSI ROM
- Grab hold of the GSI ROM for your device from the below link [list will be populated with more GSI ROMs as and when they are live]. Moreover, if you are confused between Ponces and Treble Droid AOSP, then go for Ponces as it seems to be better functioning (as per the users’ feedback) ……………………………………….. ANDROID 14 ……………………………………….. GOOGLE GSI: FLASH LINK AOSP GSI ROM [PONCES]: DOWNLOAD LINK AOSP GSI ROM [TREBLE DROID]: DOWNLOAD LINK LINEAGEOS: DOWNLOAD LINK + VIDEO GUIDE EVOLUTION X ROM: DOWNLOAD LINK + VIDEO GUIDE DERPFEST ROM: DOWNLOAD LINK + VIDEO GUIDE PIXELOS: DOWNLOAD LINK + VIDEO GUIDE CRDROID: DOWNLOAD LINK + VIDEO GUIDE VOLTAGEOS: DOWNLOAD LINK + VIDEO GUIDE PROJECT ELIXIR: DOWNLOAD LINK + VIDEO GUIDE SUPERIOROS: DOWNLOAD LINK + VIDEO GUIDE FLEX UI: DOWNLOAD LINK | VIDEO GUIDE LeOS: DOWNLOAD LINK | VIDEO GUIDE HORIZONDROID: DOWNLOAD LINK | VIDEO GUIDE MIKU UI: DOWNLOAD LINK | VIDEO GUIDE PROJECT SAKURA: DOWNLOAD LINK | VIDEO GUIDE RISINGOS: DOWNLOAD LINK | VIDEO GUIDE LEAFOS: DOWNLOAD LINK | VIDEO GUIDE EVOLUTION XYZ: DOWNLOAD LINK | BOOTLOOP FIX IMBROGLIOS: DOWNLOAD LINK | VIDEO GUIDE OZODROID: DOWNLOAD LINK | VIDEO GUIDE EVERESTOS: DOWNLOAD LINK | VIDEO GUIDE EVOLUTION XYZ: DOWNLOAD LINK | VIDEO GUIDE iodéOS: PIXEL | NON-PIXEL | VIDEO LINK [NON-PIXEL] PROJECT MATRIXX: DOWNLOAD LINK | VIDEO GUIDE ………………………………………….. ANDROID 13 ………………………………………….. ARRROWOS: DOWNLOAD LINK | VIDEO GUIDE PIXEL EXPERIENCE PLUS: DOWNLOAD LINK | VIDEO GUIDE SPARKOS: DOWNLOAD LINK | VIDEO GUIDE CHERISHOS: DOWNLOAD LINK | VIDEO GUIDE AFTERLIFE: DOWNLOAD LINK | VIDEO GUIDE COLTOS: DOWNLOAD LINK ………………………………………….. Which GSI to Download: arm64/a64/bgn/bvn/bgs/vndklite?
- Now extract it via 7-ZIP to the platform-tools folder on your PC.
- This will give you the system.img file, which will act as our GSI ROM.
STEP 5: Download vbmeta
- First off, download the stock firmware for your device
- Then extract it and get hold of the vbmeta.img file.
- Now transfer the vbmeta.img to the platform-tools folder on your PC.
STEP 6: Boot Device to Fastboot Mode
- First off, connect your device to the PC via a USB cable. Make sure USB Debugging is enabled.
- Then head over to the platform-tools folder, type in CMD in the address bar, and hit Enter. This will launch the Command Prompt.
- Type in the following command in the CMD window to boot your device to Fastboot Mode adb reboot bootloader
- To verify the Fastboot connection, type in the below command and you should get back the device ID. fastboot devices
- If you are not getting any serial ID, then please install the Fastboot Drivers on your PC.
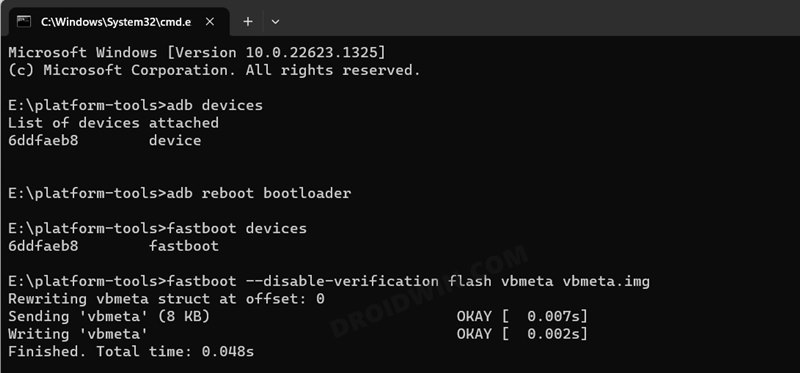
STEP 7: Disable Verity Check
Type in the below command to flash the vbmeta and hence disable the verification check of the vbmeta partition on your device
fastboot --disable-verification flash vbmeta vbmeta.img
STEP 8: Flash Android 14 GSI ROM via Fastboot
- As of now, your device will be in the Fastboot Mode. So type in the below command to boot to FastbootD Mode fastboot reboot fastboot
- Now delete the logical partition to free up some space on your device: fastboot delete-logical-partition product_a
- You may now flash the GSI ROM via the below command [system.img is the name of the GSI ROM] fastboot flash system system.img
- Once done, you’ll now have to do a format data, so use the below command fastboot -w
- Finally, reboot your device to the newly installed OS via the below command fastboot reboot
- Fix WiFi/Internet/Network not working in GSI ROM
- 5G, Bluetooth, 90Hz Display, DT2W not working in GSI ROM: How to Fix
- Fast Charging not working in GSI ROM: How to Fix
- Brightness Slider not working in GSI ROM: How to Fix
- Headphone Jack not working in GSI ROMs: How to Fix
- How to Resize System Partition to Install GSI ROM
How to Install Android 14 GApps
If you have flashed a GSI that doesn’t have GApps but you wish to install it, then do refer to our guide on How to Download and Install Android 14 GApps .
How to Install Android 14 GSI ROM via DSU Sideloader
You could also install Android 14 GSI without using the PC, all thanks to the DSU Sideloader app. To try it out, do check out the below-linked guide.
How to Install any GSI ROM on Android without PC [Video]
How to Install Android 14 GSI ROM on Samsung Devices
Refer to our below guide to install Android 14 GSI on your Samsung device.
How to Install GSI ROMs on Samsung Devices
- How to Install Android 14 on any Android Device [4 Methods]
- Brightness Slider not working in GSI ROM: How to Fix
- Fast Charging not working in GSI ROM: How to Fix
- Headphone Jack not working in GSI ROMs: How to Fix

- Advait H. Raut 1 year ago Reply Hi Sadik, Good Day. I did tried GSI Rom from LineageOS 21 & installed it on my M42 5G samsung phone. Everything worked except. But for calling I was not able to make Phone calls phh treble setting on GSI ROM for samsung didnt help . i can get 4g signal i can receive sms, i can do chats on whatsapp, but cannot call via cellphone provider , i cannot see network selection for 2G network in network selection section . also i was only able to make calls on Whatsapp and that too via putting phone on external speaker and not on internal speaker. Any help on this will be issue , if you can provide will be appreciated. Thanks in Advance. Advait H. Raut
- Daniel Arvelaez 2 years ago Reply Hi what’s up greetings Any solution for random reboots with this rom? My phone is infinixhot11play, I hope you can help me.
- Antonio Zambrano 2 years ago Reply HI, FRIEND! You know that I have a problem with the GSI rom, the maximum brightness it offers me is less than half of what it would be in my phone’s original system, I don’t know if it has any solution I have root permissions. My device is a TECNO POVA 3, lf7
- Kendrick 2 years ago Reply Sms is not working on evolution and lineage not sure why, tried all that I could but nothing worked for me
(Cancel Reply)
Δ
