Download & Install Android 16 Custom ROMs on Galaxy A52s 5G
From this guide, you can download and install the latest Android 16 custom ROMs for your Galaxy A52s 5G. This time around, Google launched the first Developer Preview just a month after launching Android 15 stable. As a result of this, all its update cycles follow an earlier timeline when compared with its counterpart.
Apart from the fact that OEMs are able to release the update at a much faster rate than before, we are also witnessing some impressive custom ROM development at an impressive rate. So the devices that had already reached their end of life [EOL] are now being blessed with the sixteenth iteration of the OS, albeit via the custom ROM route.
And the Galaxy A52s 5G is one such device that is about to receive tons of intriguing goodies and a plentitude of new features, all thanks to these ROMs. So without any further ado, let’s make you aware of the installation steps.
- A Few Points Worth Discussing
- Download Android 16 Custom ROMs on Galaxy A52s 5G
- How to Flash PixelOS Android 16 on Galaxy A52s 5G
- How to Flash UN1CA One UI 8 on Galaxy A52s 5G
- How to Flash Lunaris AOSP Android 16 on Galaxy A52s 5G
- How to Flash crDroid Android 16 on Galaxy A52s 5G [QPR 2]
- How to Flash Evolution X Android 16 on Galaxy A52s 5G Flash Via Evolution X Recovery Flash Via TWRP
- How to Flash DerpFest Android 16 on Galaxy A52s 5G
- How to Flash VoltageOS Android 16 on Galaxy A52s 5G
- How to Flash InfinityX Android 16 on Galaxy A52s 5G
A Few Points Worth Discussing

Before starting, please back up all the data on your device just to be on the safe side. Droidwin and its members wouldn’t be held responsible in case of a thermonuclear war, your alarm doesn’t wake you up, or if anything happens to your device, and data by performing the below steps.
- NOTE 1: After flashing most of the AOSP ROMS given below, WiFi might not work on your device. Worry not! Just flash this fix in the TWRP Recovery, and the WiFi will be up and running right away.
- NOTE 2: If you have flashed a TWRP Recovery and are proceeding to flash a ROM, then you have two options- -Reboot to system and then reboot back to recovery: this way, you’ll be able to transfer the ROM ZIP file to your device. The only drawback is that it will take quite a lot of time. -Reboot to Recovery. You wouldn’t be able to access the device’s storage on your PC, and you wouldn’t be able to transfer the ROM to your device’s Internal Memory via ADB Push as well. But you can still easily do an ADB Push to the /data directory of your device. This is the method that I usually go for because it saves quite a lot of time.
Download Android 16 Custom ROMs on Galaxy A52s 5G
PixelOS: DOWNLOAD
LunarisAOSP: Link 1 | Link 2
[Credits: XDA Member Jiro28]
VoltageOS: DOWNLOAD
[Credits: P.A.N.Z. Core Team, Simon1511, Arslan140, P.A.N.Z,
DaviDev985, Kenway214, Identifier, alex_gailt]
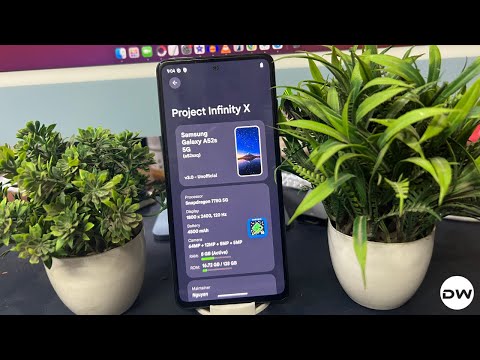
InfinityX: DOWNLOAD
[Credits: Nguyễn Phong, Simon1511, Arslan140]
DerpFest: DOWNLOAD LINK
[Credits: XDA Member genoxci_dev]
Evolution X: ROM | RECOVERY | VBMETA
[Credit: XDA Member nguyenphong888]
crDroid [QPR 2]: ROM | RECOVERY
[Credit: XDA Senior Member nguyenphong888]
Other Files
TWRP | VBMETA
How to Flash PixelOS Android 16 on Galaxy A52s 5G

- Download and install the TWRP Recovery onto your device.
- Now reboot your device to the newly flashed TWRP recovery.
- After that, go to Wipe > Format Data > YES > hit checkmark.
- Next up, transfer the ROM ZIP file to your device and flash it.
- Once done, go to Wipe > Format Data > YES > hit checkmark.
- Finally, head to Reboot > System to boot to the PixelOS ROM.
How to Flash UN1CA One UI 8 on Galaxy A52s 5G

- Download and install the TWRP Recovery onto your device.
- Now reboot your device to the newly flashed TWRP recovery.
- After that, go to Wipe > Format Data > YES > hit checkmark.
- Next up, transfer the ROM ZIP file to your device and flash it.
- Once done, go to Wipe > Format Data > YES > hit checkmark.
- Finally, head to Reboot > System to boot to the UN1CA ROM.
How to Flash Lunaris AOSP Android 16 on Galaxy A52s 5G

- Download and extract Android SDK Platform Tools.
- Then unlock the bootloader on your Samsung device.
- Now, download and extract the Odin Tool on your PC.
- Now boot your device to Download Mode for flashing.
- Launch Odin and make sure your device is listed there.
- Now go to its Options tab and uncheck the Auto Reboot.
- Then click on AP, navigate to recovery.tar, and select it.
- Then load the vbmeta_patched.tar file to the Userdata slot.
- Now hit Start. The recovery will be flashed onto your device.
- Once done, reboot the device directly to the TWRP Recovery .
- From TWRP Recovery, go to Wipe > Format data > type Yes.
- Then go to Install > select the ROM ZIP file > swipe to flash it.
- Once done, go to Wipe > Format data > type Yes > hit checkmark.
- Finally, tap Reboot System Now to boot to the newly flashed OS!
How to Flash crDroid Android 16 on Galaxy A52s 5G [QPR 2]

- Download and extract Android SDK Platform Tools on the PC.
- Then enable USB Debugging and OEM Unlocking on your device.
- Once that is done, you should now unlock the bootloader .
- Now download and extract the Odin Tool on the PC.
- Then transfer the recovery.img to the platform tools folder.
- Then, open the Command Prompt inside this folder.
- Next, type the commands below to TAR the recovery: tar –format=ustar -cvf recovery.tar recovery.img
- Now, boot your device to Download Mode for flashing.
- Launch Odin and make sure your device is listed there.
- Now go to its Options tab and uncheck the Auto Reboot.
- Then click on AP, navigate to recovery.tar, and select it.
- Now, click Userdata, load the vbmeta_patched , and load it.
- Now hit Start. The recovery will be flashed to your device.
- Then reboot your device directly to the crDroid Recovery .
- From Lineage Recovery, go to Factory Reset > Format data.
- Once done, select Apply Update > Apply from ADB option.
- After that, type in the below command in the CMD window adb sideload rom.zip
- The flashing will now start. Once done, you will get a prompt.
- Hit Yes if you wish to sideload any ZIP file like GApps or Magisk .
- Or else tap on No if you don’t want to sideload any other ZIP file.
- Finally, tap Reboot System Now to boot to the newly flashed OS!
How to Flash Evolution X Android 16 on Galaxy A52s 5G

- Download and extract Android SDK Platform Tools on the PC.
- Then enable USB Debugging and OEM Unlocking on your device.
- Once that is done, you should now unlock the bootloader of your device.
Now, there are two ways of flashing this ROM- via Evolution X Recovery and using TWRP. We have given both methods below; you may try out the one that is in sync with your requirement.
Flash Via Evolution X Recovery
- Now download and extract the Odin Tool on the PC.
- Transfer the recovery.img to the platform tools folder.
- Then open the Command Prompt inside this folder.
- Next, type the commands below to TAR the recovery: tar –format=ustar -cvf recovery.tar recovery.img
- Now boot your device to Download Mode for flashing.
- Launch Odin and make sure your device is listed there.
- Now go to its Options tab and uncheck the Auto Reboot.
- Then click on AP, navigate to recovery.tar, and select it.
- Now click Userdata, load the vbmeta_patched, and load it.
- Now hit Start. The recovery will be flashed to your device.
- Then reboot your device directly to Evolution X Recovery .
- From Lineage Recovery, go to Factory Reset > Format data.
- Once done, select Apply Update > Apply from ADB option.
- After that, type in the below command in the CMD window adb sideload rom.zip
- The flashing will now start. Once done, you will get a prompt.
- Hit Yes if you wish to sideload any ZIP file like GApps or Magisk .
- Or else tap on No if you don’t want to sideload any other ZIP file.
- Finally, tap Reboot System Now to boot to the newly flashed OS!
Flash Via TWRP
- Now install the TWRP Recovery on your device and then boot to it using: adb reboot recovery
- Now do a Format Data [if you haven’t done so while installing the TWRP]
- Now, transfer the ROM ZIP file to your device.
- Then, head to Install, select the ROM ZIP file, and then swipe to flash.
- If you want to flash any other ZIP file , then first do a reboot to the recovery.
- Now go to Format Data > Type YES > Hit the blue checkmark at the bottom.
- Now go to “Wipe” > “Advanced Wipe” > wipe Metadata and Cache partitions.
- Finally, go to Reboot > System. Your device will boot to the newly flashed OS.
How to Flash DerpFest Android 16 on Galaxy A52s 5G

- Download and extract Android SDK Platform Tools on the PC.
- Then enable USB Debugging and OEM Unlocking on your device.
- Once that is done, you should now unlock the bootloader of your device.
- Now install the TWRP Recovery on your device and then boot to it using: adb reboot recovery
- Now do a Format Data [if you haven’t done so while installing the TWRP]
- Now, transfer the ROM ZIP file to your device.
- Then, head to Install, select the ROM ZIP file, and then swipe to flash.
- If you want to flash any other ZIP file , then first do a reboot to the recovery.
- Now go to Format Data > Type YES > Hit the blue checkmark at the bottom.
- Now go to “Wipe” > “Advanced Wipe” > wipe Metadata and Cache partitions.
- Finally, go to Reboot > System. Your device will boot to the newly flashed OS.
How to Flash VoltageOS Android 16 on Galaxy A52s 5G

- Download and extract Android SDK Platform Tools on the PC.
- Then enable USB Debugging and OEM Unlocking on your device.
- Once that is done, you should now unlock the bootloader of your device.
- Now install the TWRP Recovery on your device and then boot to it using: adb reboot recovery
- Now do a Format Data [if you haven’t done so while installing the TWRP]
- Once that is done, transfer the ROM ZIP file to your device.
- After that, head to Install, select the ROM ZIP file, and then swipe to flash.
- If you want to flash any other ZIP file , then first do a reboot to the recovery.
- Now go to Format Data > Type YES > Hit the blue checkmark at the bottom.
- Now go to “Wipe” > “Advanced Wipe” > wipe Metadata and Cache partitions.
- Finally, go to Reboot > System. Your device will boot to the newly flashed OS.
How to Flash InfinityX Android 16 on Galaxy A52s 5G
- Download and extract Android SDK Platform Tools on the PC.
- Then enable USB Debugging and OEM Unlocking on your device.
- Once that is done, you should now unlock the bootloader of your device.
- Now install the TWRP Recovery on your device and then boot to it using: adb reboot recovery
- Now do a Format Data [if you haven’t done so while installing the TWRP]
- Once that is done, transfer the ROM ZIP file to your device.
- After that, head to Install, select the ROM ZIP file, and then swipe to flash.
- If you want to flash any other ZIP file , then first do a reboot to the recovery.
- Now go to Format Data > Type YES > Hit the blue checkmark at the bottom.
- Now go to “Wipe” > “Advanced Wipe” > wipe Metadata and Cache partitions.
- Finally, go to Reboot > System. Your device will boot to the newly flashed OS.
- How to Install ColorOS 15 Android 15 on Galaxy A52s 5G
- How to Install One UI 7 Android 15 on Galaxy A52s 5G
- Root Galaxy A52s 5G using KernelSU Next and SUSFS
- Install iodeOS on Galaxy A52s 5G, Galaxy Tab S5e (LTE/Wi-Fi)

(Cancel Reply)
Δ
Root Galaxy A52s 5G with KernelSU and KernelSU Next SUSFS
In this guide, we will show you the steps to install the latest Ascendia Kernel with KernelSU/KernelSU Next SUSFS on your Galaxy A52s 5G. Nowadays, there exist quite a few ways of gaining administrative privileges over your device. While Magisk is still the go-to choice for the masses, however, in recent times, many users are making a shift towards the likes of APatch and KernelSU. One major reason for the same is the fact that hiding the root has become quite a challenging task when it comes to Magisk.
On the other hand, many banking and payment apps are yet to give any major attention to the APatch and KernelSU. So if you root your device using either of these two approaches, then there’s a high chance of your device being able to mitigate the Play Integrity fiasco. So in this guide, we will be taking the kernel approach and listing the steps to root your Galaxy A52s 5G by installing the Ascendia Kernel, which comes embedded with KernelSU.
- How to Root Galaxy A52s 5G with Ascendia Kernel and KernelSU Features of the Ascendia Kernel Supported Devices Flashing Steps
- How to Root A52s 5G via KernelSU Next and SUSFS
How to Root Galaxy A52s 5G with Ascendia Kernel and KernelSU

Before starting, please take a complete device backup. Droidwin and its members wouldn’t be held responsible in case of a thermonuclear war, your alarm doesn’t wake you up, or if anything happens to your device, and data by performing the below steps.
Features of the Ascendia Kernel
- Built from A528NKSU4GXE1 kernel source code
- Linux 5.4.254, based on LA.UM.9.14.r1-22000-LAHAINA.QSSI12.0
- Pure stock kernel, only minor changes were applied
- Built with Clang 11.0.2 ( r383902b1 ) Toolchain
- Samsung Knox features disabled (RKP, FIVE, Defex, etc.)
- (Almost) All of Samsung’s debug killed
- Switchable SELinux status
- Camera bootloader lock fix included
This kernel [and the featured image as well] has been developed by XDA Senior Member RisenID, so all thanks go to him.
Supported Devices
- SM-A528B (a52sxqxx)
- SM-A528B (a52sxqzt)
- SM-A528N (a52sxqks)
Flashing Steps

- Download and extract Android SDK Platform Tools .
- After that, unlock the bootloader on your device.
- Next up, install the TWRP Recovery on your device.
- Then download the Ascendia Kernel with KernelSU: Ascendia KernelSU v1.0.1 (One UI/GSI) Ascendia KernelSU v1.0.1 (AOSP)
- Now boot your device to the TWRP Recovery using: adb reboot recovery
- After that, take a backup of the following partitions: Boot, DTBO, Vendor Boot, Vendor Image
- Now go to Install, select the Ascendia KernelSU, and flash it.
- Then go to Reboot and select System. The device will boot to the OS.
- Now, download, install, and launch the KernelSU Manager app .
- Finally, verify whether your device is successfully rooted via this app.
How to Root A52s 5G via KernelSU Next and SUSFS

- Download and extract Android SDK Platform Tools .
- After that, unlock the bootloader on your device.
- Next up, install the TWRP Recovery on your device.
- Then download the KernelSU Next with SUSFS: KernelSU-Next v1.0.6 (One UI) KernelSU-Next v1.0.6 (AOSP)
- Now boot your device to the TWRP Recovery using: adb reboot recovery
- After that, take a backup of the following partitions: Boot, DTBO, Vendor Boot, Vendor Image
- Now go to Install, select the KernelSU Next, and flash it.
- Then go to Reboot and select System. The device will boot to the OS.
- Now, download, install, and launch the KernelSU-Next Manager app.
- Finally, verify whether your device is successfully rooted via this app.
- Then download the SUSFS module , flash it via KernelSU Next, and restart the device.
- Now go to Modules, tap on Open next to SUSFS, and carry out the desired tweak.
- Once done, tap on Custom SUSFS settings and tweak it as per the requirements.
- Install iodeOS on Galaxy A52s 5G, Galaxy Tab S5e (LTE/Wi-Fi)
- How to Install UN1CA ROM on Galaxy A52s 5G
- WiFi Fix for Custom ROMs for Galaxy A52s 5G/M52/A73
- How to Install Android 15 Custom ROMs on Galaxy A52s 5G
- Botond 4 months ago Reply I need help the susfs days failed the module . And Idk how to find modules for root. I want to increase sot on my device
(Cancel Reply)
Δ
