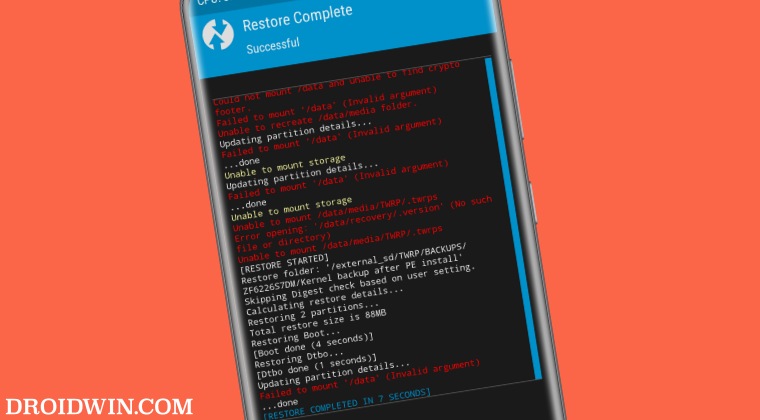
Failed to mount /data (Invalid Argument) in TWRP: How to Fix
In this guide, we will show you the steps to fix the Failed to mount /data (Invalid Argument) error in TWRP. While porting custom recovery is becoming extremely difficult ever since the release of Android 12, however, if given a chance, every user would prefer to opt for it instead of getting the job done via Fastboot Commands. And there are quite a few compelling reasons for the same.
Among them, the ability to take Nandroid Backup and the ease of flashing custom ROMs are two of the most prominent ones. However, even then, you might still come across a few issues with your daily usage of these custom recoveries. In this regard, the Failed to mount /data (Invalid Argument) error in TWRP is the most common as well as the most infuriating one.
When this error shows up, you wouldn’t be able to access the data partition, or in other words, any file on your Internal Storage. Along the same lines, you might not even be able to wipe any partitions on your device as well. So to overcome all these roadblocks, let’s proceed ahead and rectify this issue once and for all.
- Fix Failed to mount /data (Invalid Argument) in TWRP STEP 1: Repair Data Partition via TWRP STEP 2: Change the File System
Fix Failed to mount /data (Invalid Argument) in TWRP
The below process will wipe off all the data from your device, so please take a complete device backup beforehand. Likewise, keep a custom ROM ZIP file in the platform-tools folder as in some cases, you might get the NO OS Installed message at the end. When that happens, we will simply flash this ROM to boot your device to the OS. Droidwin and its members wouldn’t be held responsible in case of a thermonuclear war, your alarm doesn’t wake you up, or if anything happens to your device and data by performing the below steps.
STEP 1: Repair Data Partition via TWRP
- From TWRP, go to Wipe > Advanced Wipe.
- Then select Data and tap on Change or Repair File System.
- Now select Repair File System > Swipe to Repair.
STEP 2: Change the File System
- From TWRP, go to Wipe > Advanced Wipe.
- Then select Data and tap on Change or Repair File System.
- Now select Change File System and choose exFAT.
- Again go to Change File System and this time select ext4.
- Once done, go to Reboot > Recovery [you might get No OS installed, ignore it for now].
- Then go to Wipe > Format Data > type in YES > hit the checkmark.
- Now transfer the ROM file to your device and flash it.
- Once again, go to Wipe > Format Data > type in YES > hit the checkmark.
- Finally, go to Reboot and System. Your device will boot to the newly installed OS.
- How to Replace TWRP with AOSP Recovery
- How to Replace AOSP Recovery [Lineage/Pixel/etc] with TWRP
- Cannot Access Internal Storage in TWRP: How to Fix
- TWRP Failed to unmount /data: Device or resource busy [Fix]

- Loris 2 years ago Reply THANK you, it worked for my old redmi note 7, twrp said \system and \data were “not valid”, so with this method I resolved. Bye!
- moresat 2 years ago Reply my filesystem is e2fs schould I follow this guide anyway?
- CHETAN 2 years ago Reply thank you, it worked for me
- dharmendra chouhan 3 years ago Reply thank you so much you saved me twice….
(Cancel Reply)
Δ
