Fix Oplus EDL Tool Failed to Send Programmer/Failed to Configure
In this guide, we will show you various methods to fix the Failed to Send Programmer/Failed to Configure error in the OPLUS EDL Tool. The fate of free EDL flashing always hangs by a thin thread. After MSM, we got a couple of other EDL Tools, but all of them get patched sooner than later by Oppo. While you always have the option to opt for remote flashing, but these guys seem to charge an astronomical amount [anywhere between $60-$100].
Then there’s always the option to send your device to the service center, where you’ll be able to get it fixed for free [your negotiation skills play a major part in it]. Unfortunately, not every region has a service center. That’s the reason why we are mostly on the lookout for free EDL services, which, at the time of writing, are available for us. The OPLUS EDL Tool allows you to flash EDL firmware for numerous OnePlus, Oppo, and Realme devices.
While it requires Firehose files for it to function, fortunately, as of now, we have that as well. Still, EDL flashing is not an easy task, and the fact that it gets bugged with issues every now and then only makes the matter worse. In this regard, the Failed to Send Programmer/Failed to Configure error is the most common one that I have come across in the OPLUS EDL Tool. If you are also currently getting bugged by this issue, then this guide will help you out. Follow along for the fixes.
- Fix OPLUS EDL Tool Failed to Send Programmer/Failed to Configure FIX 1: Try the Cable/Ports Tweaks FIX 2: Turn off Windows Defender FIX 3: Try an Older Version FIX 4: Verify the Firehose Files FIX 5: Verify EDL Drivers Installation FIX 6: Use Cloud Loaders FIX 7: Boot to EDL/Firehose at Last
Fix OPLUS EDL Tool Failed to Send Programmer/Failed to Configure
Before starting, please take a complete device backup [read the userdata partition by the EDL Tool]. Moreover, i t is recommended that you try out each of the below-mentioned workarounds and then see which one spells out success. So with that in mind, let’s get started. Droidwin and its members wouldn’t be held responsible in case of a thermonuclear war, your alarm doesn’t wake you up, or if anything happens to your device and data by performing the below steps.
FIX 1: Try the Cable/Ports Tweaks
The most basic tweak that usually ends up fixing most of the issues. Since we are dealing with EDL Mode, not every USB cable is capable of handling this mode. So please switch over to a different cable and then retry the process.
Likewise, you should not use the USB 3.0 port; instead, use the 2.0 port and then see if it works for you. Since we are on the matter of basic fixes, I would also recommend that you please do a restart before launching the tool again.
FIX 2: Turn off Windows Defender
If Windows Defender or any antivirus is enabled for that matter, then this tool will not work. So you have two options at hand- either stay in the protective environment and bid goodbye to the tool, or temporarily turn off the Defender and then try using the tool. As far as the latter is concerned, here is what needs to be done:
- Go to the Start Menu, search for Windows Security, and open it.
- Then choose Virus and Threat Protection from the left-hand side.
- Now, click on Manage Settings under Virus and Threat Protection.
- Finally, disable the toggle next to Real-time Protection. That’s it.
FIX 3: Try an Older Version
The tool has this knack of checking for updates as soon as you launch it and won’t let you use the older version of the tool, no matter what. However, there might be a way out, using which you can use the downgraded version of the tool. Here’s how:
- Head over to C:\Windows\System32\drivers\etc\hosts
- Then open the host file and add the below line to it: 127.0.01 hsbpi.anteasy.com.a1.initaa.com
- Now save the file via Ctrl+S and restart your PC [recommended].
- Then download an older version of the tool from here and try using it.
FIX 4: Verify the Firehose Files
Using an incorrect firehose file [any of the three- Device Programmer, Digest, and Sign] is another common cause of this issue. So please double-check that you’re using the files for the right chipset.

FIX 5: Verify EDL Drivers Installation
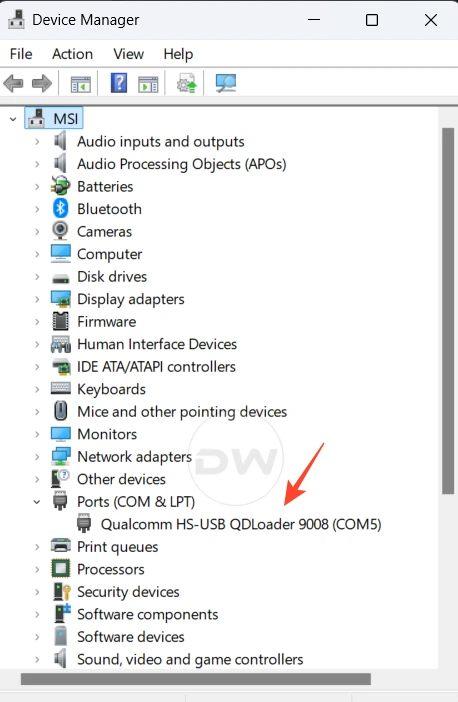
It is of paramount importance that you have the EDL Drivers installed, and your PC can detect the device in the EDL Mode. If you haven’t yet installed the drivers, then do so from here. If you have done so already, then launch Device Manager > expand the Ports section > verify your device is shown as Qualcomm HS-USB QDLoaders 9008.
FIX 6: Use Cloud Loaders
Newer versions of the tool now come with one-click firehose loaders. You just need to select the chipset from the drop-down menu, and it will automatically load the Device Programmer, Digest, and Sign files. There’s no need to manually load all these three files. So try out this feature and then give another shot at the tool and check out the results.

FIX 7: Boot to EDL/Firehose at Last
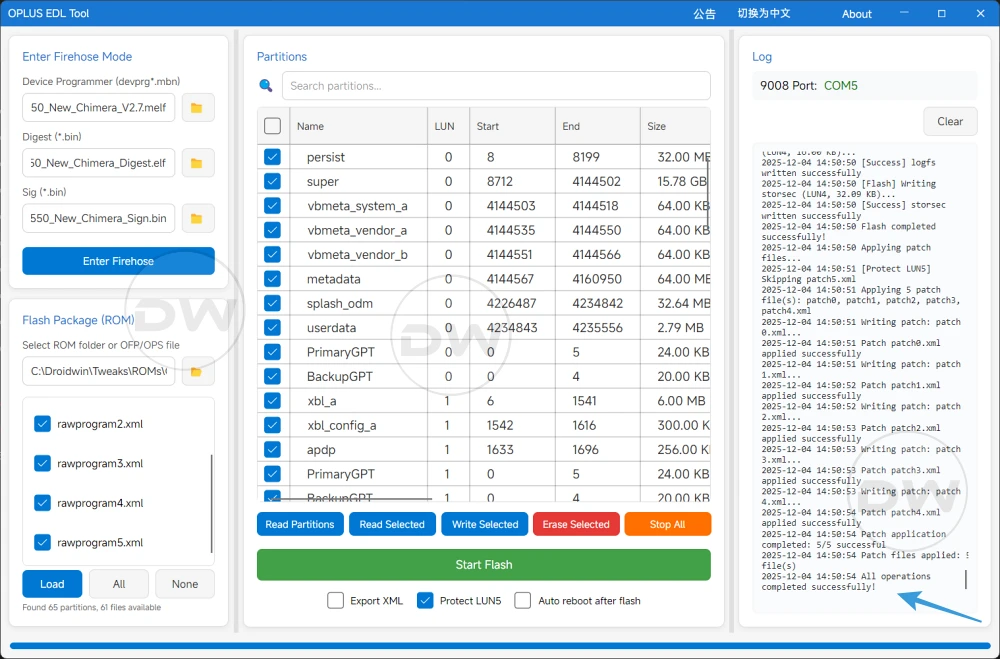
There are two instances when you can boot the device to the EDL Mode: during the initial phase or at the very last, when all the other sections of the tool have been populated. It is recommended that you go with the latter one. So first load all three firehose files, then load the rawprogram.xml files from the firmware, and verify that the partitions from the firmware that are to be flashed are now being displayed. Once that is done, boot the device to the EDL Mode > click on Enter Firehose > hit Flash/Write Selected.
- How to Flash Files via EDL Tool [Supports Locked Bootloader]
- How to EDL Flash via DeepSmartTool and Unbrick OnePlus
- Download OnePlus EDL ROM for Unbrick Purpose
- EDL Unbrick is now available for Xiaomi devices- Skip Authentication
- How to Unbrick Samsung Phones via EDL Mode

(Cancel Reply)
Δ
