Fix Qualcomm HS USB Diagnostic 900E instead of QDLoader 9008
In this guide, we will show you the steps to fix the issue of the PC showing Qualcomm HS-USB Diagnostic 900E instead of Qualcomm HS USB QDLoader 9008. Devices till the OnePlus 9 series are still among the most favorite toys for the tech enthusiasts, due to just one reason- it has an active unbrick tool, which is a rarity nowadays. Thanks to the presence of the MSM Download Tool, you can easily unbrick your device from any dead state.
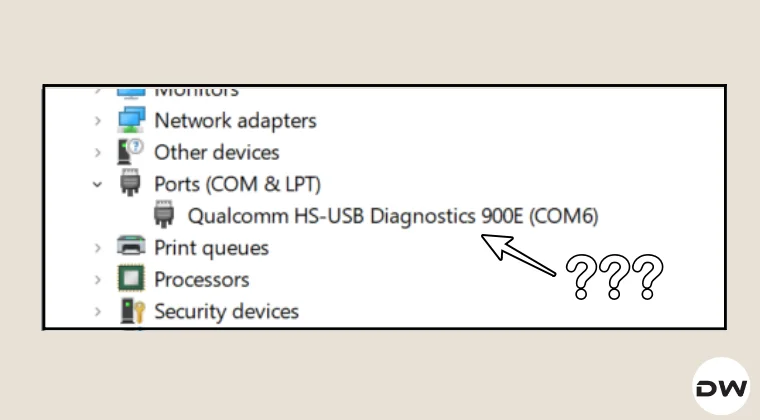
However, the process isn’t as straightforward as it might look. You have to checkmark a few prerequisites off the list, and even then, you might come across a few problems. One among them is the Device Manager showing Qualcomm HS USB Diagnostic 900E instead of Qualcomm HS USB QDLoader 9008. If you are also facing this problem, then this guide will help you out. Follow along for the fixes.
- Fix Qualcomm HS USB Diagnostic 900E instead of QDLoader 9008 [EDL] Install Qualcomm USB Drivers Disable Driver Signature Enforcement Correctly Boot to EDL Mode Using the Fastboot Tweak
Fix Qualcomm HS USB Diagnostic 900E instead of QDLoader 9008 [EDL]

It is recommended that you try out each of the below-mentioned workarounds and then see which one spells out success. So with that in mind, let’s get started. Droidwin and its members wouldn’t be held responsible in case of a thermonuclear war, your alarm doesn’t wake you up, or if anything happens to your device, and data by performing the below steps.
NOTE: MSM Tool will wipe off all the data from your device and will relock the bootloader as well [though you can easily unlock it later on via the fastboot flashing unlock command], so only proceed ahead if it’s all well and good.
Install Qualcomm USB Drivers
First off, you will have to download and install the Qualcomm USB Drivers. This is needed so that your PC (and the MSM Tool) is able to identify the connected device in EDL Mode. So, refer to our guide on Qualcomm HS-USB QDLoader 9008 Drivers: Download & Install and get the job done.

Disable Driver Signature Enforcement
Next up, you’ll have to disable the Driver Signature Enforcement on your PC so that Windows doesn’t conflict with the EDL Drivers [Qualcomm HS USB Drivers]. So, refer to our detailed guide on How to Disable Driver Signature Verification on Windows 10/11 and get this job done right away.

Correctly Boot to EDL Mode
- Launch the MSM Tool and click on Start. Then, power off your device.
- Then press and hold the Volume Up and Volume Down keys together.
- With both these keys pressed, connect your device to the PC via a USB cable.
- That’s it. Your device is now booted to EDL Mode. To verify the same, press Windows+X and select Device Manager.
- Then expand the Other Device or Ports section and your device will be listed as Qualcomm HS-USB QDLoader 9008.
Using the Fastboot Tweak
I found a very intriguing workaround which involves using the hardware key combination that you use to boot the device to Fastboot Mode [Power and Volume Down in OnePlus 11 and most of the other OnePlus devices, whereas Power, Volume Up, and Down in OnePlus 9 Pro]. When you do so, you’ll feel a slight variant [if your device is soft bricked, then it will boot to Fastboot Mode. In that case, press the Volume key to bring the Power Off option and press the Power key to confirm]. When you feel a vibration, press and hold the Volume Up and Down keys, and while holding both these keys, connect your device to the PC via the USB cable- your device will boot to EDL Mode.
- How to Flash EDL Firmware on OnePlus: MSM & Oppo Flash Tool
- How to Access the EDL Test Point on Various Android Devices
- Fix OnePlus automatically exits EDL Mode within 5 seconds [Video]
- How to Unbrick OnePlus via EDL Cable Deep Flash

(Cancel Reply)
Δ
