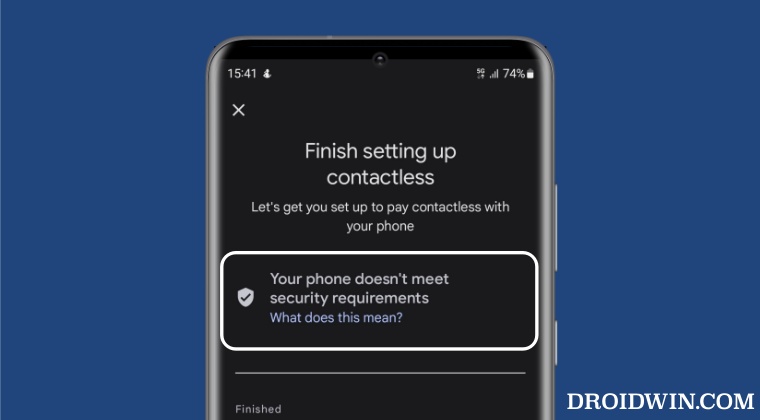
Google Pay/Wallet ‘Your phone doesn’t meet security requirements’ [Fix]
- Guide For Rooted Devices FIX 1: Via Magisk Alpha FIX 2: Via KernelSU/Next
- Guide for Non-Rooted Devices FIX 1: Wipe Cache Partition FIX 2: Delete Device Data
Guide For Rooted Devices
In this section, we will show you a couple of handy methods to fix the ‘Your phone doesn’t meet security requirements’ error in Google Wallet when your device is rooted and/or its bootloader is unlocked. So without any further ado, let’s get started.

FIX 1: Via Magisk Alpha

You may download the Magisk Alpha app from any third-party site of your choice. As of now, we are using it from the Magisk Alpha Telegram group.
- First off, launch Magisk Alpha > go to Settings > Hide the Magisk app.
- Now go to Configure Denylist and enable the toggle next to these apps Google Play Services Google Play Store Google Services Framework Banking App Name
- Now create a blacklist using Hide My Applist and apply it to desired bank app.
- Then pass at least the Device Integrity , though the Strong will be the best.
- Also, create a custom.pif.json file .
- Now, delete the data of Google Play Service, Google Play Store, Google Service Framework, and the bank app.
- Finally, restart your device and check out the result. If it’s still not working, then proceed with the below steps.
- Now go to the below location and open the target.txt file: data/adb/tricky_store/target.txt
- Then add its app package name in that text file and save it
- Again, delete the data of Google Play Service, Google Play Store, Google Service Framework, and the bank app.
- Now, restart your device and check if it fixes the ‘Your phone doesn’t meet security requirements’ error in Google Wallet.
FIX 2: Via KernelSU/Next
- To begin with, it’s recommended to root your device using KernelSU / KernelSU Next app.
- Then launch it, go to Modules, and flash the SUSFS module [if supported by your kernel].
- Now create a blacklist using Hide My Applist and apply it to the bank app.
- Then pass at least the Device Integrity , though the Strong will be the best.
- Also, create a custom.pif.json file .
- Now go to the below location and open the target.txt file: data/adb/tricky_store/target.txt
- Then add its app package name in that text file and save it
- Now delete the data of Google Play Service, Google Play Store, Google Service Framework, and the banking app.
- Now, restart your device and check if it fixes the ‘Your phone doesn’t meet security requirements’ error in Google Wallet.
Guide for Non-Rooted Devices
In this guide, we will show you various methods to fix the ‘Your phone doesn’t meet security requirements’ error on Google Pay. When it comes to mobile payment services, then it’s the offering from the Search engine ain’t that is among the popular players in town. Whether it’s in-app, online, or contactless payments, it beholds all these functionalities under its arsenal. However, in spite of all the goodies attached, it isn’t free from its fair share of issues either.
As of now, numerous users have voiced their concern that they are getting the ‘Your phone doesn’t meet security requirements’ error whenever they are trying to make a payment via Google Pay. As of now, the issue is widely affecting Samsung devices, though a few reports from Pixel users are also emerging as of late. For the unaware, this issue usually arises when your device’s bootloader is unlocked and it is rooted via Magisk.
In such cases, the Knox counter gets tripped or the Safetynet flag gets triggered , thereby resulting in the inability of the banking and payment apps to function properly. However, all the affected users have their devices neither bootloader unlocked nor rooted, so this makes the matter all the more concerning. With that said, there does exist a couple of nifty workarounds that shall help you rectify this bug. So without further ado, let’s check them out.
While most users were able to rectify this issue after deleting the device’s cache, a few of them had to opt for the nuclear route of factory resetting their device. we have listed both these fixes below, you should first start off with the cache deletion and if it doesn’t work out, then opt for a device reset. But please take a complete device backup before trying out any of the below-listed fixes.
FIX 1: Wipe Cache Partition
- Power off your device. Then press and hold the Power and Volume Up keys for a few seconds.
- Your device will now boot to Stock Recovery.
- Use the Volume keys to select Wipe Cache Partition and hit the Power key to confirm it.
- Then select Yes using the Volume key and press the Power key to confirm it.
- Once done, highlight Reboot System now using the Volume key and press the Power key to confirm it.
FIX 2: Delete Device Data
- Head over to Settings > General management > Reset.
- Then go to the Factory Data Reset section and tap on Reset.
- Finally, tap on Delete All and wait for the process to complete.
- Once done, set up your device and the issue should be rectified.
That’s it. These were the two different methods to fix the ‘Your phone doesn’t meet security requirements’ error on Google Pay. As far as the official stance on this matter is concerned, the developers are aware of this issue, but they haven’t given out any ETA for the rollout of a fix. As and when that happens, we will update this guide accordingly. In the meantime, the aforementioned workarounds are your best bet.
- NFC Payment in Google Pay not working on Pixel devices [Fix]
- How to Use Google Pay [GPay] in Rooted Android
- Google Pay rooted or running uncertified software on Android 12L [Fixed]
- Install Google Pay/Wallet in Galaxy Watch 5/Pro in Unsupported Country

- Tariq Butt 3 years ago Reply I made the mistake of joining the Android 13 beta programme on Samsung S21. My build number starts with a TP1A which denotes it is STILL beta. Samsung think I am on the official Android 13 but when I re boot my phone I do receive a message explaining that I am on the Beta and some apps may not work. Now Google Wallet doe NOT work. I tried your instructions what wiped the cache partition, deleted everything & reset my phone again to no avail. So perhaps you could suggest what I can try ? Your help is much appreciated. My email is tariqfbutt@outlook.com Many Thanks
(Cancel Reply)
Δ
How to Get Fingerprint PIF.JSON File using Play Integrity Fork
In this guide, we will show you the steps to get the fingerprint PIF.JSON file using Play Integrity Fork. A week back or so, we got the unfortunate news that the Play Integrity Fix module has been discontinued by the developer chiteroman. We can’t thank him enough for the invaluable work he has done for this community. But going forward, what can be our next course of action?
Well, while this module was up and running, another developer [osm0sis] was also running a fork of this module, which goes by the name Play Integrity Fork. While we wouldn’t say that it was under the shadow of Fix, but it wasn’t being used that much when compared to its counterpart.

However, all that is about to change now, and so there are a few queries that might pop up in your minds. In this regard, one of the most common questions that I have been asked for the past week is how to get the fingerprint PIF.JSON file in the Play Integrity Fork module.
As you might already be aware, the Fix module already has this embedded in its module; you just need to launch it via KSUWebUI, hit the Fetch PIF.JSON option, and you’ll get the file. But that’s not possible via the Fork module via the direct route. Why? Let’s find out, and after that, we will list the plausible steps through which you can get this file using this module. Follow along.
- Why is the PIF JSON Fingerprint File Missing in Play Integrity Fork
- How to Get the Fingerprint PIF.JSON File using Play Integrity Fork
- Direct Download PIF JSON Files
Why is the PIF JSON Fingerprint File Missing in Play Integrity Fork
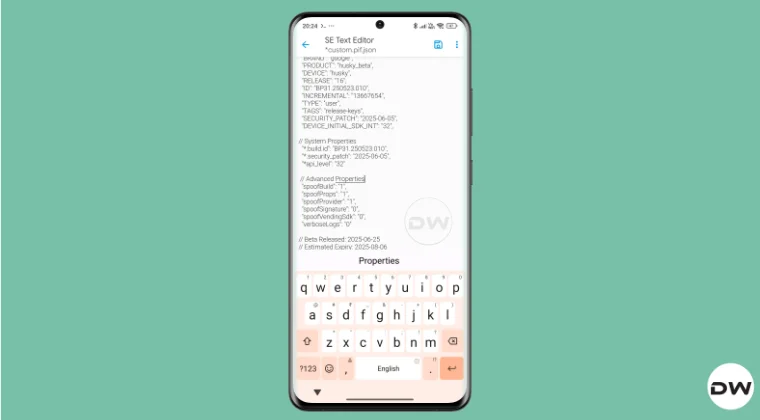
By default, the module comes with a template of a PIF JSON file that you need to fill in manually. You can get this file from /data/adb/modules/playintegrityfix. Once you fill in the values, simply rename it to custom.pif.json, and your task stands complete. But why hasn’t the dev simply added this file, as was the case with the Fix module? Here’s what he has to say regarding this:
There’s intentionally no pif.json in the module because the goal remains to be futureproof, and including something that may be banned and obsolete within days would be contrary to that goal.

However, finding these files might not be everyone’s cup of tea. Not only are a few of these remains, but finding them is also quite an effort taking task. The developer acknowledges this, and hence, he has added a script to extract the latest Pixel Beta fingerprint along with the module. The script is named autopif2, which generates a random device fingerprint from the latest Pixel Beta. So let’s have a look at the steps to make full use of this file.
How to Get the Fingerprint PIF.JSON File using Play Integrity Fork

Before starting, please take a backup of all the data on your device, just to be on the safe side. Droidwin and its members wouldn’t be held responsible in case of a thermonuclear war, your alarm doesn’t wake you up, or if anything happens to your device, and data by performing the below steps.
NOTE: There are quite a few ways of getting this job done, however, I personally found Termux to be the easiest among all of them. But if you want to try out any other method, then run the generation script from a root manager app that supports the module Action button or from a file explorer app that supports script execution.
- To begin with, flash the wget2 module via Magisk / KernelSU / APatch .
- Then, flash the Play Integrity Fork CI module from GitHub Actions .
- Now, download and install the Termux app from F-Droid.
- Then launch it and execute the following three commands: su //you’ll get a SU request, hit Grant cd /data/adb/modules/playintegrityfix //to change the directory to the module’s sh autopif2.sh –preview // this will give you the fingerprint file
- You can also add a few other parameters to the above command, namely: su -c sh /data/adb/modules/playintegrityfix/autopif2.sh -a -m -p -s -a Advanced -m Match -p Preview -s Strong
- Once done, head over to the below location to access the custom.pif.json /data/adb/modules/playintegrityfix
Direct Download PIF JSON Files
If you don’t want to manually carry out the aforementioned steps, then you may directly get the PIF JSON file from our below guide:
Download PIF JSON File from Here
- How to Pass Strong Integrity Using Revoked/Banned Keybox File!
- How to Pass Play Integrity in New Android 13+ Checks
- Guide to Pass Strong Integrity on Unlocked Bootloader & Root!
- How to Spoof/Fake/Hide Bootloader Unlock Status
- How to Pass Play Integrity Test on any Custom ROM [Video]
- Drw 6 months ago Reply Problem solved. Termux wasn’t prompting me to grant su user access. Found where to enable it in the KSU Next GUI under Superuser.
- Drw 6 months ago Reply I’m getting “su program not found.” Rooted with ksu and susfs. Modules installed are BKI, Play integrity fork, shamiko, susfs for ksu, tricky store, wget2, zygisk lsposed, and zygisk next. Nothing tweaked.
- mario 7 months ago Reply sorry, what do you mean with “Then, flash the Play Integrity Fork CI module from GitHub Actions.” ? i have pif v13 flashed in magisk
- Mohamed 7 months ago Reply Hi, can you please help me with a vaild keybox pleaaase 🙏
- Antonis 7 months ago Reply 1) “Then, flash the Play Integrity Fork CI module from GitHub Actions” https://github.com/osm0sis/PlayIntegrityFork/actions what do i download? 2) and then what do i do with custom.pif.json ?
- Antonis 7 months ago Reply “Then, flash the Play Integrity Fork CI module from GitHub Actions” https://github.com/osm0sis/PlayIntegrityFork/actions what do i download?
(Cancel Reply)
Δ
Google Pay/Wallet ‘Your phone doesn’t meet security requirements’ [Fix]
- Guide For Rooted Devices FIX 1: Via Magisk Alpha FIX 2: Via KernelSU/Next
- Guide for Non-Rooted Devices FIX 1: Wipe Cache Partition FIX 2: Delete Device Data
Guide For Rooted Devices
In this section, we will show you a couple of handy methods to fix the ‘Your phone doesn’t meet security requirements’ error in Google Wallet when your device is rooted and/or its bootloader is unlocked. So without any further ado, let’s get started.
FIX 1: Via Magisk Alpha
You may download the Magisk Alpha app from any third-party site of your choice. As of now, we are using it from the Magisk Alpha Telegram group.
- First off, launch Magisk Alpha > go to Settings > Hide the Magisk app.
- Now go to Configure Denylist and enable the toggle next to these apps Google Play Services Google Play Store Google Services Framework Banking App Name
- Now create a blacklist using Hide My Applist and apply it to desired bank app.
- Then pass at least the Device Integrity , though the Strong will be the best.
- Also, create a custom.pif.json file .
- Now, delete the data of Google Play Service, Google Play Store, Google Service Framework, and the bank app.
- Finally, restart your device and check out the result. If it’s still not working, then proceed with the below steps.
- Now go to the below location and open the target.txt file: data/adb/tricky_store/target.txt
- Then add its app package name in that text file and save it
- Again, delete the data of Google Play Service, Google Play Store, Google Service Framework, and the bank app.
- Now, restart your device and check if it fixes the ‘Your phone doesn’t meet security requirements’ error in Google Wallet.
FIX 2: Via KernelSU/Next
- To begin with, it’s recommended to root your device using KernelSU / KernelSU Next app.
- Then launch it, go to Modules, and flash the SUSFS module [if supported by your kernel].
- Now create a blacklist using Hide My Applist and apply it to the bank app.
- Then pass at least the Device Integrity , though the Strong will be the best.
- Also, create a custom.pif.json file .
- Now go to the below location and open the target.txt file: data/adb/tricky_store/target.txt
- Then add its app package name in that text file and save it
- Now delete the data of Google Play Service, Google Play Store, Google Service Framework, and the banking app.
- Now, restart your device and check if it fixes the ‘Your phone doesn’t meet security requirements’ error in Google Wallet.
Guide for Non-Rooted Devices
In this guide, we will show you various methods to fix the ‘Your phone doesn’t meet security requirements’ error on Google Pay. When it comes to mobile payment services, then it’s the offering from the Search engine ain’t that is among the popular players in town. Whether it’s in-app, online, or contactless payments, it beholds all these functionalities under its arsenal. However, in spite of all the goodies attached, it isn’t free from its fair share of issues either.
As of now, numerous users have voiced their concern that they are getting the ‘Your phone doesn’t meet security requirements’ error whenever they are trying to make a payment via Google Pay. As of now, the issue is widely affecting Samsung devices, though a few reports from Pixel users are also emerging as of late. For the unaware, this issue usually arises when your device’s bootloader is unlocked and it is rooted via Magisk.
In such cases, the Knox counter gets tripped or the Safetynet flag gets triggered , thereby resulting in the inability of the banking and payment apps to function properly. However, all the affected users have their devices neither bootloader unlocked nor rooted, so this makes the matter all the more concerning. With that said, there does exist a couple of nifty workarounds that shall help you rectify this bug. So without further ado, let’s check them out.
While most users were able to rectify this issue after deleting the device’s cache, a few of them had to opt for the nuclear route of factory resetting their device. we have listed both these fixes below, you should first start off with the cache deletion and if it doesn’t work out, then opt for a device reset. But please take a complete device backup before trying out any of the below-listed fixes.
FIX 1: Wipe Cache Partition
- Power off your device. Then press and hold the Power and Volume Up keys for a few seconds.
- Your device will now boot to Stock Recovery.
- Use the Volume keys to select Wipe Cache Partition and hit the Power key to confirm it.
- Then select Yes using the Volume key and press the Power key to confirm it.
- Once done, highlight Reboot System now using the Volume key and press the Power key to confirm it.
FIX 2: Delete Device Data
- Head over to Settings > General management > Reset.
- Then go to the Factory Data Reset section and tap on Reset.
- Finally, tap on Delete All and wait for the process to complete.
- Once done, set up your device and the issue should be rectified.
That’s it. These were the two different methods to fix the ‘Your phone doesn’t meet security requirements’ error on Google Pay. As far as the official stance on this matter is concerned, the developers are aware of this issue, but they haven’t given out any ETA for the rollout of a fix. As and when that happens, we will update this guide accordingly. In the meantime, the aforementioned workarounds are your best bet.
- NFC Payment in Google Pay not working on Pixel devices [Fix]
- How to Use Google Pay [GPay] in Rooted Android
- Google Pay rooted or running uncertified software on Android 12L [Fixed]
- Install Google Pay/Wallet in Galaxy Watch 5/Pro in Unsupported Country
- Tariq Butt 3 years ago Reply I made the mistake of joining the Android 13 beta programme on Samsung S21. My build number starts with a TP1A which denotes it is STILL beta. Samsung think I am on the official Android 13 but when I re boot my phone I do receive a message explaining that I am on the Beta and some apps may not work. Now Google Wallet doe NOT work. I tried your instructions what wiped the cache partition, deleted everything & reset my phone again to no avail. So perhaps you could suggest what I can try ? Your help is much appreciated. My email is tariqfbutt@outlook.com Many Thanks
(Cancel Reply)
Δ
How to Root any OnePlus via KernelSU Next and SUSFS
In this guide, we will show you the steps to root your OnePlus device using KernelSU Next and SUSFS. When it comes to gaining administrative privileges over your device, Magisk has long been the go-to choice for tech enthusiasts. However, over the last few months, we have witnessed a slight change in this trend, with many people moving towards KernelSU.
One major reason for the same is the issues with hiding the root when it comes to Magisk. Even if you end up passing the Basic and Device test [well, in some cases, even the Strong Test] and hide the Magisk app, the banking and payment apps will still end up identifying that your device is rooted via Magisk, and hence they will refuse to function.
Fortunately, at least for now, that isn’t the case with KernelSU. This, when combined with the SUSFS, gives you the most stringent root hiding environment along with a slew of additional advanced-level tweaks. So, without any further ado, let’s make you aware of the steps to root your OnePlus device using the combination of KernelSU Next and SUSFS. Follow along.
- How to Root any OnePlus Phone via KernelSU Next and SUSFS SUPPORTED DEVICE LIST INSTALLATION STEPS
- How to Install OnePlus Kernel with KernelSU Next without TWRP
How to Root any OnePlus Phone via KernelSU Next and SUSFS

Before starting, take a backup of all the data on your device, just to be on the safe side. Droidwin and its members wouldn’t be held responsible in case of a thermonuclear war, your alarm doesn’t wake you up, or if anything happens to your device, and data by performing the below steps.
SUPPORTED DEVICE LIST
As of now, these are the supported devices, though more devices will be added in the near future, so stay tuned!
OP ACE 2 PRO

OP ACE 2

OP ACE 3V

OP ACE 5

OP ACE 5 PRO

OP NORD 4

OP OPEN

OP PAD 2

OP 10 PRO

OP 10T

OP 11R

OP 11

OP 12

OP 12R

OP 13

OP 13R

OP 13S
INSTALLATION STEPS

- First off, download the required files from below: OnePlus Kernel with KernelSU Next and SUSFS Support KernelSU Next App SUSFS Module
- Then install the TWRP Recovery onto your device.
- Now reboot your device to TWRP Recovery using: adb reboot recovery // from the OS fastboot reboot recovery // from Fastboot Mode
- Now go to Install > select the OnePlus Kernel > flash it.
- Then go to Reboot and select System to boot to the OS.
- Next up, install the KernelSU Next app. Then launch it.
- Go to Modules, tap Install, and flash the SUSFS Module.
- Now, hit Reboot. Once it boots up, tap Open next to SUSFS.
- Then tap on Custom SUSFS Settings and customize it as per your liking.
- How to Root OnePlus 13 via KernelSU Next and SUSFS
- How to Root OnePlus 11 using KernelSU Next and SUSFS
- Detailed Guide to Hide Root via KernelSU on Rooted Android
- How to Install OTA Updates on Rooted Device via KernelSU
How to Install OnePlus Kernel with KernelSU Next without TWRP

Some OnePlus devices might not have a working TWRP Recovery. So in such cases, here’s what you need to do:
- First off, download the required files from below: OnePlus Kernel with KernelSU Next and SUSFS Support KernelSU Next App SUSFS Module
- Download the same firmware which is installed on your device.
- Then extract the init_boot.img from it using Fastboot Enhance.
- Now transfer the file to your device. Then install KernelSU Next.
- Launch it, tap on the downward arrow > select a file > init_boot.
- File will now be patched. Transfer it to the platform-tools folder.
- Now open the Command Prompt inside the platform-tools folder.
- Then type in the below command to boot your device to Fastboot. adb reboot bootloader
- Now type in the below command to flash this patched init_boot: fastboot flash init_boot patched_init_boot.img
- Then type the below command to boot the device to the rooted OS fastboot reboot
- Install the Kernel Flasher app , launch it, and tap View next to both slots.
- Then note down the Slot name [A or B] that gives you the Flash option.
- Now tap on Flash > Flash AK3 ZIP > select the OnePlus Kernel.
- Once done, restart the device for the kernel to be up and running.
- Next up, install the KernelSU Next app. Then launch it.
- Go to Modules, tap Install, and flash the SUSFS Module.
- Now, hit Reboot. Once it boots up, tap Open next to SUSFS.
- Then tap on Custom SUSFS Settings and customize it as per your liking.
- ae 3 months ago Reply does it not work on oxygenos 16 because the apps are no longer being granted root access
- Akash 5 months ago Reply Need kernal su file for oneplus 8 pro running 13
(Cancel Reply)
Δ
