How to Convert EEA to Global on Nothing Phone 1
In this guide, we will show you the steps to convert your Nothing Phone 1 from EEA to Global. The OEM has quickly upscaled the popularity charts in no time whatsoever. Moreover, the device itself is available in numerous regions. Owing to this, you will come across two different firmware versions for Nothing Phone 1- EEA for European Countries [named SpacewarEEA] and Global for Asian and Australian regions [code named Spacewar].
In this regard, some users have voiced their concern that they mistakenly ended up cross-flashing the firmware [flashing firmware of a different region] and are now stuck with a few region-specific features not working along the expected lines. If you are also in the same boat, then this guide will show you the steps to rectify this issue, in other words, convert your Nothing Phone 1 from EEA to Global. So without further ado, let’s get started.
- How to Convert EEA to Global on Nothing Phone 1 STEP 1: Install Android SDK STEP 2: Enable USB Debugging and OEM Unlocking STEP 3: Download Nothing Phone 1 Firmware STEP 4: Extract Nothing Phone 1 Payload.bin STEP 5: Unlock Bootloader on Nothing Phone 1 STEP 6: Boot Nothing Phone 1 to Fastboot Mode STEP 7: Format Device via Fastboot STEP 8: Flash Global Firmware on Nothing Phone 1 via Fastboot Commands
How to Convert EEA to Global on Nothing Phone 1
This process will wipe off all the data from your device, so take a complete device backup beforehand. Droidwin and its members wouldn’t be held responsible in case of a thermonuclear war, your alarm doesn’t wake you up, or if anything happens to your device and data by performing the below steps.
STEP 1: Install Android SDK

First and foremost, you will have to install the Android SDK Platform Tools on your PC. This is the official ADB and Fastboot binary provided by Google and is the only recommended one. So download it and then extract it to any convenient location on your PC. Doing so will give you the platform-tools folder, which will be used throughout this guide to unbrick your Nothing Phone 1 via Fastboot commands.
STEP 2: Enable USB Debugging and OEM Unlocking
Next up, you will also have to enable USB Debugging and OEM Unlocking on your device. The former will make your device recognizable by the PC in ADB mode. This will then allow you to boot your device to Fastboot Mode. On the other hand, OEM Unlocking is required to carry out the bootloader unlocking process.

So head over to Settings > About Phone > Tap on Build Number 7 times > Go back to Settings > System > Advanced > Developer Options > Enable USB Debugging and OEM Unlocking.
STEP 3: Download Nothing Phone 1 Firmware
Next up, download the stock firmware for your device from the below link. Nothing provides its firmware in payload.bin, which you need to extract in order to get hold of the partition files. I have already done that for a few firmware versions. So if your device has the same firmware/build installed, then you could directly download the Fastboot ROM [extracted payload] instead of the payload.bin
NOTHING PHONE 1 STOCK FIRMWARE
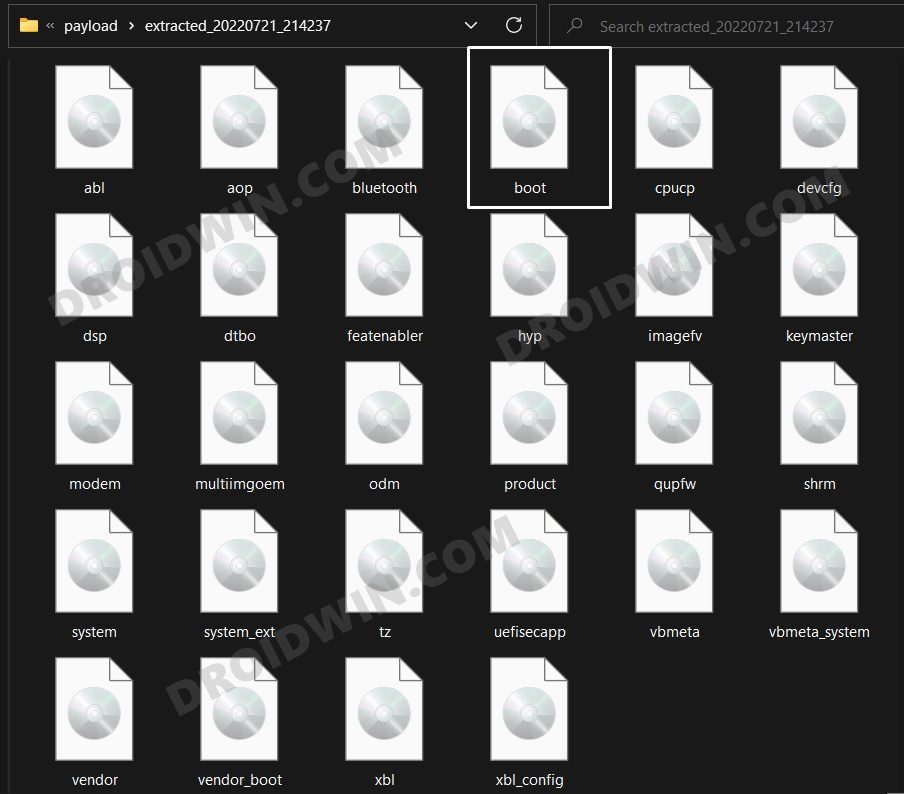
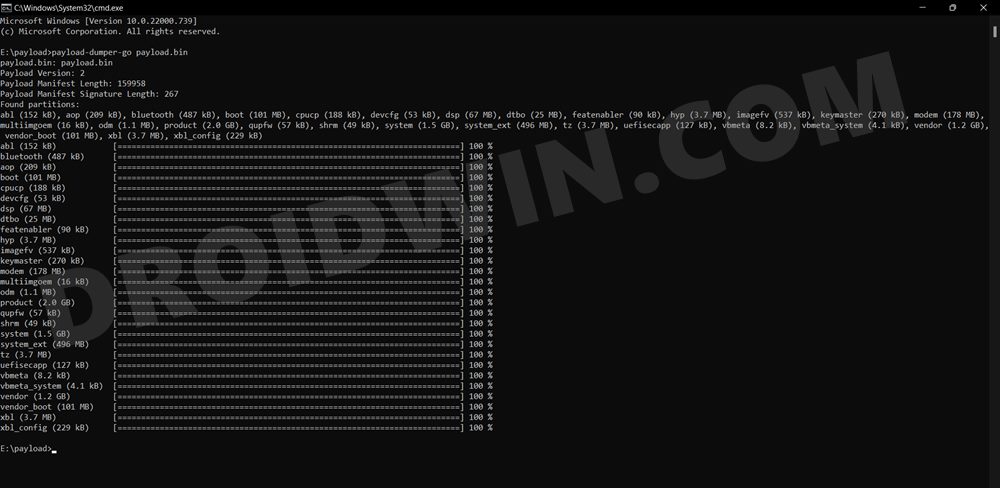
STEP 4: Extract Nothing Phone 1 Payload.bin
If you have downloaded the Fastboot ROM, then you could skip this step. On the other hand, if you have a payload.bin firmware, then you will have to extract it first and get the resultant IMG files. To do so, you may refer to our guide on How to Extract Payload.bin file. Once done, make sure to transfer all the extracted files to the platform-tools folder.
STEP 5: Unlock Bootloader on Nothing Phone 1
Since you are going through this unbrick guide, chances are you might have already unlocked the device’s bootloader. However, if you haven’t done so, then you may refer to our guide on Unlock Bootloader on Nothing Phone 1 [and its Critical Partition] . [Do note that for the unlocking process, you should have enabled OEM Unlock from the Settings menu beforehand].
STEP 6: Boot Nothing Phone 1 to Fastboot Mode
- Now connect your device to the PC via a USB cable. Make sure USB Debugging is enabled.
- Then head over to the platform-tools folder, type in CMD in the address bar, and hit Enter. This will launch the Command Prompt.
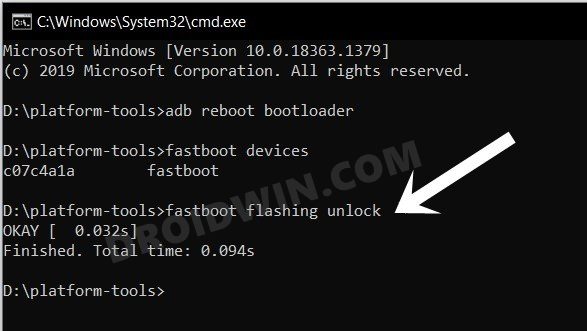
- Type in the following command in the CMD window to boot your device to Fastboot Mode adb reboot bootloader
- To verify the Fastboot connection, type in the below command and you should get back the device ID. fastboot devices
STEP 7: Format Device via Fastboot
- Head over to the platform-tools folder where the extracted ROM is present.
- Then go to its address bar, type in CMD in its address, and hit Enter. This will launch the CMD window.
- Now execute the below command to perform a factory reset (optional but recommended) fastboot -w
STEP 8: Flash Global Firmware on Nothing Phone 1 via Fastboot Commands
Execute the below commands in the CMD window [that is opened in the platform-tools folder] to flash all the partition file. Make sure to execute one command at a time. Furthermore, if you get an error, then don’t leave the process mid-way, rather move over to the next flashing command.
fastboot --set-active=a


fastboot reboot fastboot


fastboot flash super super.img


fastboot flash abl_a abl.img


fastboot flash aop_a aop.img


fastboot flash bluetooth_a bluetooth.img


fastboot flash boot_a boot.img


fastboot flash cpucp_a cpucp.img


fastboot flash devcfg_a devcfg.img


fastboot flash dsp_a dsp.img


fastboot flash dtbo_a dtbo.img


fastboot flash featenabler_a featenabler.img


fastboot flash hyp_a hyp.img


fastboot flash imagefv_a imagefv.img


fastboot flash keymaster_a keymaster.img


fastboot flash modem_a modem.img


fastboot flash multiimgoem_a multiimgoem.img


fastboot flash odm_a odm.img


fastboot flash product_a product.img


fastboot flash qupfw_a qupfw.img


fastboot flash shrm_a shrm.img


fastboot flash system_a system.img


fastboot flash system_ext_a system_ext.img


fastboot flash tz_a tz.img


fastboot flash uefisecapp_a uefisecapp.img


fastboot flash vbmeta_a vbmeta.img


fastboot flash vbmeta_system_a vbmeta_system.img


fastboot flash vendor_a vendor.img


fastboot flash vendor_boot_a vendor_boot.img


fastboot flash xbl_a xbl.img


fastboot flash xbl_config_a xbl_config.img


fastboot reboot bootloader


fastboot --set-active=b


fastboot reboot fastboot


fastboot flash abl_b abl.img


fastboot flash aop_b aop.img


fastboot flash bluetooth_b bluetooth.img


fastboot flash boot_b boot.img


fastboot flash cpucp_b cpucp.img


fastboot flash devcfg_b devcfg.img


fastboot flash dsp_b dsp.img


fastboot flash dtbo_b dtbo.img


fastboot flash featenabler_b featenabler.img


fastboot flash hyp_b hyp.img


fastboot flash imagefv_b imagefv.img


fastboot flash keymaster_b keymaster.img


fastboot flash modem_b modem.img


fastboot flash multiimgoem_b multiimgoem.img


fastboot flash odm_b odm.img


fastboot flash product_b product.img


fastboot flash qupfw_b qupfw.img


fastboot flash shrm_b shrm.img


fastboot flash system_b system.img


fastboot flash system_ext_b system_ext.img


fastboot flash tz_b tz.img


fastboot flash uefisecapp_b uefisecapp.img


fastboot flash vbmeta_b vbmeta.img


fastboot flash vbmeta_system_b vbmeta_system.img


fastboot flash vendor_b vendor.img


fastboot flash vendor_boot_b vendor_boot.img


fastboot flash xbl_b xbl.img


fastboot flash xbl_config_b xbl_config.img


fastboot reboot bootloader


fastboot --set-active=a


fastboot reboot
- Nothing OS 1.5 Beta: CTS Profile & SafetyNet Fail [Fix]
- How to Restore Nothing Phone 1 from Custom ROM to Stock
- Enable Hidden Music Visualization Glyph Easter Egg in Nothing Phone 1
- Install various Android 13 Custom ROMs on Nothing Phone 1

(Cancel Reply)
Δ
