How to Convert OnePlus 12 from ColorOS to OxygenOS
This guide will show you the steps to convert your OnePlus 12 from ColorOS 14 to OxygenOS 14. The newest addition to the OnePlus family beholds quite a power-packed specs sheet. With the powerful Snapdragon 8 Gen 3 chipset, LTPO AMOLED display with 120 Hz refresh rate, and an impressive Hasselblad camera setup, there’s a lot to look forward to. If we talk about the software, then the global variant has the OxygenOS 14 whereas in China you’ll get the ColorOS 14.
While both of them are based on the latest iteration of the OS, however, there are a few noticeable differences between the two. The major issue with ColorOS to this date is the fact that it has quite a few bloatware preinstalled. Moreover, even the UI/UX is not at par with its global counterpart. If you also echo this sentiment, then you’ll be glad to know that you can now convert your OnePlus 12 from ColorOS 14 to OxygenOS 14. So without further ado, let’s get started.
- How to Convert OnePlus 12 from ColorOS to OxygenOS STEP 1: Install Android SDK STEP 2: Enable USB Debugging and OEM Unlocking STEP 3: Unlock Bootloader on OnePlus 12 STEP 4: Download OxygenOS 14 for OnePlus 12 STEP 5: Boot OnePlus 12 to Fastboot Mode STEP 6: Convert OnePlus 12 from ColorOS 14 to Oxygen OS 14
- Fix OnePlus 12 Fingerprint not working on OxygenOS 14
How to Convert OnePlus 12 from ColorOS to OxygenOS
The below process will wipe off all the data from your device, so please take a complete device backup beforehand. Droidwin and its members wouldn’t be held responsible in case of a thermonuclear war, your alarm doesn’t wake you up, or if anything happens to your device and data by performing the below steps. Moreover, make sure to backup the persist [highly re and ocdm [optional] partitions beforehand.
STEP 1: Install Android SDK

First and foremost, you will have to install the Android SDK Platform Tools on your PC. This is the official ADB and Fastboot binary provided by Google and is the only recommended one. So download it and then extract it to any convenient location on your PC. Doing so will give you the platform-tools folder, which will be used throughout this guide to convert OnePlus 12 from ColorOS 14 to OxygenOS 14.
STEP 2: Enable USB Debugging and OEM Unlocking
Next up, you will also have to enable USB Debugging and OEM Unlocking on your device. The former will make your device recognizable by the PC in ADB mode. This will then allow you to boot your device to Fastboot Mode. On the other hand, OEM Unlocking is required to carry out the bootloader unlocking.
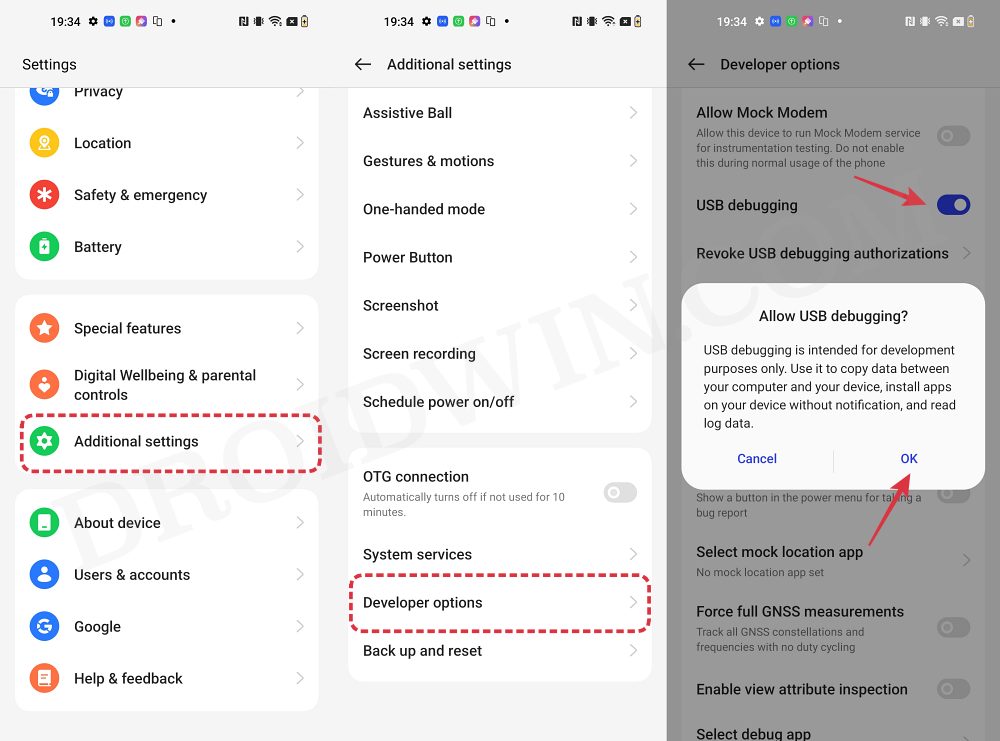
So head over to Settings > About Phone > Tap on Build Number 7 times > Go back to Settings > System > Advanced > Developer Options > Enable USB Debugging and OEM Unlocking.
STEP 3: Unlock Bootloader on OnePlus 12
Next up, you will also have to unlock the device’s bootloader. Do keep in mind that doing so will wipe off all the data from your device and could nullify its warranty as well. So if that’s all well and good, then please refer to our detailed guide on How to Unlock Bootloader on OnePlus 12 .
STEP 4: Download OxygenOS 14 for OnePlus 12
- Grab hold of the OxygenOS 14 ROM for your device from the below link. ColorOS 14 to OxygenOS 14 GLOBAL: CPH2581GDPR_11_14.0.0.232 ColorOS 14 to OxygenOS 14 USA: US_CPH2583export_11_14.0.0.232 Password: FTH Credits: XDA Senior Member Canuck Knarf
- Once downloaded, extract the ZIP to any convenient location on your PC.
STEP 5: Boot OnePlus 12 to Fastboot Mode
- Now connect your device to the PC via a USB cable. Make sure USB Debugging is enabled.
- Then head over to the platform-tools folder, type in CMD in the address bar, and hit Enter. This will launch the Command Prompt.
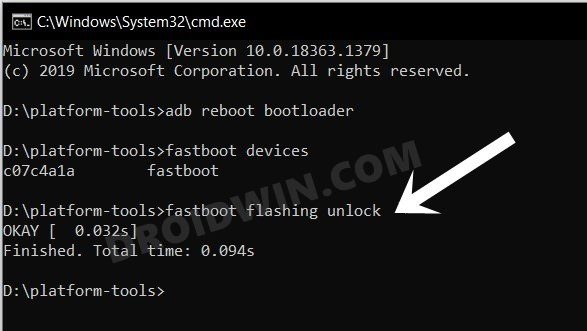
- Type in the following command in the CMD window to boot your device to Fastboot Mode adb reboot bootloader
- To verify the Fastboot connection, type in the below command and you should get back the device ID. fastboot devices
- If you are not getting any serial ID, then install the Fastboot Drivers on your PC.
STEP 6: Convert OnePlus 12 from ColorOS 14 to Oxygen OS 14
- To begin with, head over to the extracted ROM folder.
- Then double-click on the Flash_All_SupperZIP.bat file.
- The flashing will now start.
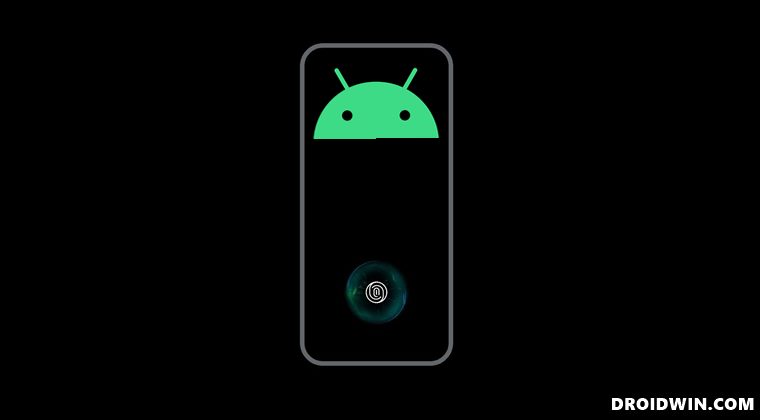
- Your device will auto-boot to FastbootD Mode during the flashing.
- Wait for the flashing to complete. Once done, it will ask you to select English language [see note].
- So go to your device, select English language > then choose Format Data.
- Now type in the provided code and wait for the reset to complete.
- Once done, select Reboot System. Your device will now boot to OxygenOS!
NOTE: In some cases, as soon as the flashing gets completed, you might not get the option to choose language, instead your device might boot to the OS directly [to the “Hello” screen]. In that case, here’s what you need to do:
- Press the Volume Up and Power buttons to bring up the Power menu. Then use it to power off your device.
- Now press and hold the Volume Down and Power buttons to boot your device to Fastboot Mode.
- Then use the Volume Keys to bring up the Recovery Option and press the power key to confirm it.
- Now select English language and choose Format Data. Then type in the code displayed there > OK.
- The data formatting will now start. Once done, tap OK in the prompt and then select Reboot System.
Fix OnePlus 12 Fingerprint not working on OxygenOS 14
In case the fingerprint is not working, then it is due to the persist partition getting corrupted. So in that case, you should restore the backup that you had earlier taken. However, if for some reason, you didn’t take the backup, then there exists a nifty yet risky workaround that might help you rectify this issue.
According to the initial findings, flashing the OnePlus 11 persist file from the same model onto your OnePlus 12 PJD110 will fix the persist/fingerprint issue. So download it from here and then flash it onto your device [Credits: XDA Senior Member MartyMan]. However, do note that this file will only work on the PJD110 variant of the OnePlus 12.

- razr 2 years ago Reply ” According to the initial findings, flashing the OnePlus 11 persist file from the same model onto your OnePlus 12 PJD110 will fix the persist/fingerprint issue. So download it from here and then flash it onto your device [Credits: XDA Senior Member MartyMan]. However, do note that this file will only work on the PJD110 variant of the OnePlus 12. ” Flash it how ?
- Mik 2 years ago Reply The file “ColorOS 14 to OxygenOS 14 GLOBAL: CPH2581GDPR_11_14.0.0.232” seems not available anymore. Could you reupload it? Thanks!
(Cancel Reply)
Δ
How to Convert OnePlus 12 from ColorOS to OxygenOS
This guide will show you the steps to convert your OnePlus 12 from ColorOS 14 to OxygenOS 14. The newest addition to the OnePlus family beholds quite a power-packed specs sheet. With the powerful Snapdragon 8 Gen 3 chipset, LTPO AMOLED display with 120 Hz refresh rate, and an impressive Hasselblad camera setup, there’s a lot to look forward to. If we talk about the software, then the global variant has the OxygenOS 14 whereas in China you’ll get the ColorOS 14.
While both of them are based on the latest iteration of the OS, however, there are a few noticeable differences between the two. The major issue with ColorOS to this date is the fact that it has quite a few bloatware preinstalled. Moreover, even the UI/UX is not at par with its global counterpart. If you also echo this sentiment, then you’ll be glad to know that you can now convert your OnePlus 12 from ColorOS 14 to OxygenOS 14. So without further ado, let’s get started.
- How to Convert OnePlus 12 from ColorOS to OxygenOS STEP 1: Install Android SDK STEP 2: Enable USB Debugging and OEM Unlocking STEP 3: Unlock Bootloader on OnePlus 12 STEP 4: Download OxygenOS 14 for OnePlus 12 STEP 5: Boot OnePlus 12 to Fastboot Mode STEP 6: Convert OnePlus 12 from ColorOS 14 to Oxygen OS 14
- Fix OnePlus 12 Fingerprint not working on OxygenOS 14
How to Convert OnePlus 12 from ColorOS to OxygenOS
The below process will wipe off all the data from your device, so please take a complete device backup beforehand. Droidwin and its members wouldn’t be held responsible in case of a thermonuclear war, your alarm doesn’t wake you up, or if anything happens to your device and data by performing the below steps. Moreover, make sure to backup the persist [highly re and ocdm [optional] partitions beforehand.
STEP 1: Install Android SDK
First and foremost, you will have to install the Android SDK Platform Tools on your PC. This is the official ADB and Fastboot binary provided by Google and is the only recommended one. So download it and then extract it to any convenient location on your PC. Doing so will give you the platform-tools folder, which will be used throughout this guide to convert OnePlus 12 from ColorOS 14 to OxygenOS 14.
STEP 2: Enable USB Debugging and OEM Unlocking
Next up, you will also have to enable USB Debugging and OEM Unlocking on your device. The former will make your device recognizable by the PC in ADB mode. This will then allow you to boot your device to Fastboot Mode. On the other hand, OEM Unlocking is required to carry out the bootloader unlocking.
So head over to Settings > About Phone > Tap on Build Number 7 times > Go back to Settings > System > Advanced > Developer Options > Enable USB Debugging and OEM Unlocking.
STEP 3: Unlock Bootloader on OnePlus 12
Next up, you will also have to unlock the device’s bootloader. Do keep in mind that doing so will wipe off all the data from your device and could nullify its warranty as well. So if that’s all well and good, then please refer to our detailed guide on How to Unlock Bootloader on OnePlus 12 .
STEP 4: Download OxygenOS 14 for OnePlus 12
- Grab hold of the OxygenOS 14 ROM for your device from the below link. ColorOS 14 to OxygenOS 14 GLOBAL: CPH2581GDPR_11_14.0.0.232 ColorOS 14 to OxygenOS 14 USA: US_CPH2583export_11_14.0.0.232 Password: FTH Credits: XDA Senior Member Canuck Knarf
- Once downloaded, extract the ZIP to any convenient location on your PC.
STEP 5: Boot OnePlus 12 to Fastboot Mode
- Now connect your device to the PC via a USB cable. Make sure USB Debugging is enabled.
- Then head over to the platform-tools folder, type in CMD in the address bar, and hit Enter. This will launch the Command Prompt.
- Type in the following command in the CMD window to boot your device to Fastboot Mode adb reboot bootloader
- To verify the Fastboot connection, type in the below command and you should get back the device ID. fastboot devices
- If you are not getting any serial ID, then install the Fastboot Drivers on your PC.
STEP 6: Convert OnePlus 12 from ColorOS 14 to Oxygen OS 14
- To begin with, head over to the extracted ROM folder.
- Then double-click on the Flash_All_SupperZIP.bat file.
- The flashing will now start.
- Your device will auto-boot to FastbootD Mode during the flashing.
- Wait for the flashing to complete. Once done, it will ask you to select English language [see note].
- So go to your device, select English language > then choose Format Data.
- Now type in the provided code and wait for the reset to complete.
- Once done, select Reboot System. Your device will now boot to OxygenOS!
NOTE: In some cases, as soon as the flashing gets completed, you might not get the option to choose language, instead your device might boot to the OS directly [to the “Hello” screen]. In that case, here’s what you need to do:
- Press the Volume Up and Power buttons to bring up the Power menu. Then use it to power off your device.
- Now press and hold the Volume Down and Power buttons to boot your device to Fastboot Mode.
- Then use the Volume Keys to bring up the Recovery Option and press the power key to confirm it.
- Now select English language and choose Format Data. Then type in the code displayed there > OK.
- The data formatting will now start. Once done, tap OK in the prompt and then select Reboot System.
Fix OnePlus 12 Fingerprint not working on OxygenOS 14
In case the fingerprint is not working, then it is due to the persist partition getting corrupted. So in that case, you should restore the backup that you had earlier taken. However, if for some reason, you didn’t take the backup, then there exists a nifty yet risky workaround that might help you rectify this issue.
According to the initial findings, flashing the OnePlus 11 persist file from the same model onto your OnePlus 12 PJD110 will fix the persist/fingerprint issue. So download it from here and then flash it onto your device [Credits: XDA Senior Member MartyMan]. However, do note that this file will only work on the PJD110 variant of the OnePlus 12.
- razr 2 years ago Reply ” According to the initial findings, flashing the OnePlus 11 persist file from the same model onto your OnePlus 12 PJD110 will fix the persist/fingerprint issue. So download it from here and then flash it onto your device [Credits: XDA Senior Member MartyMan]. However, do note that this file will only work on the PJD110 variant of the OnePlus 12. ” Flash it how ?
- Mik 2 years ago Reply The file “ColorOS 14 to OxygenOS 14 GLOBAL: CPH2581GDPR_11_14.0.0.232” seems not available anymore. Could you reupload it? Thanks!
(Cancel Reply)
Δ
Take a Backup of Persist Partition: Fix Fingerprint Not Working
In this guide, we will show you the steps to take a backup of the persist partition on your Android device. Stepping into the custom development brings in a plethora of goodies with itself. Right after you have unlocked the bootloader, you will be in a position to dive deep into the custom ROMs, custom recoveries, or gain administrative privileges by rooting the device via Magisk. However, this is just one side of the coin. Carrying out these tweaks could prove to be a risky bet as well.
For OnePlus users, it is usually issues with the fingerprint sensor that seems to be bugging quite a few users. As a result of which, they are unable to register or enroll their fingerprint or use the already registered ones to unlock their device. So right before you step into the modding domain, your first course of action should be to take a backup of the persist partition. In case you end up messing with the fingerprint, then you could easily fix it by restoring the backed up persist. On that note, let’s get started with the steps to take a backup of the persist partition.
- How to Take a Backup of Persist Partition STEP 1: Root your Device STEP 2: Install Android SDK STEP 3: Enable USB Debugging STEP 4: Grant SuperUser Request STEP 5A: Backup Persist Partition via ADB [Automated Method] STEP 5B: Backup Persist Partition via SU [Manual Method]
- How to Restore Persist Partition
How to Take a Backup of Persist Partition

The below instructions are listed under separate sections for ease of understanding. Make sure to follow the same sequence as mentioned. Droidwin and its members wouldn’t be held responsible in case of a thermonuclear war, your alarm doesn’t wake you up, or if anything happens to your device and data by performing the below steps.
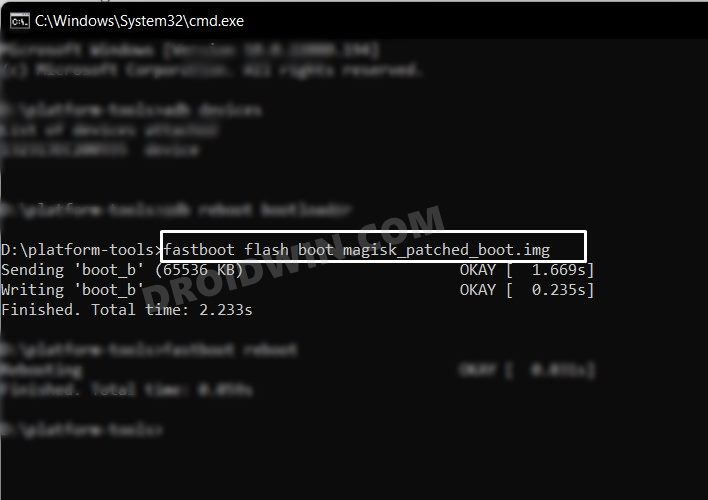
STEP 1: Root your Device
First and foremost, your device needs to be rooted. If you haven’t done so, then you may refer to our guide on How to Root Android via Magisk Patched Boot.img .
STEP 2: Install Android SDK
First and foremost, you will have to install the Android SDK Platform Tools on your PC. This is the official ADB and Fastboot binary provided by Google and is the only recommended one. So download it and then extract it to any convenient location on your PC. Doing so will give you the platform-tools folder, which will be used throughout this guide.
STEP 3: Enable USB Debugging
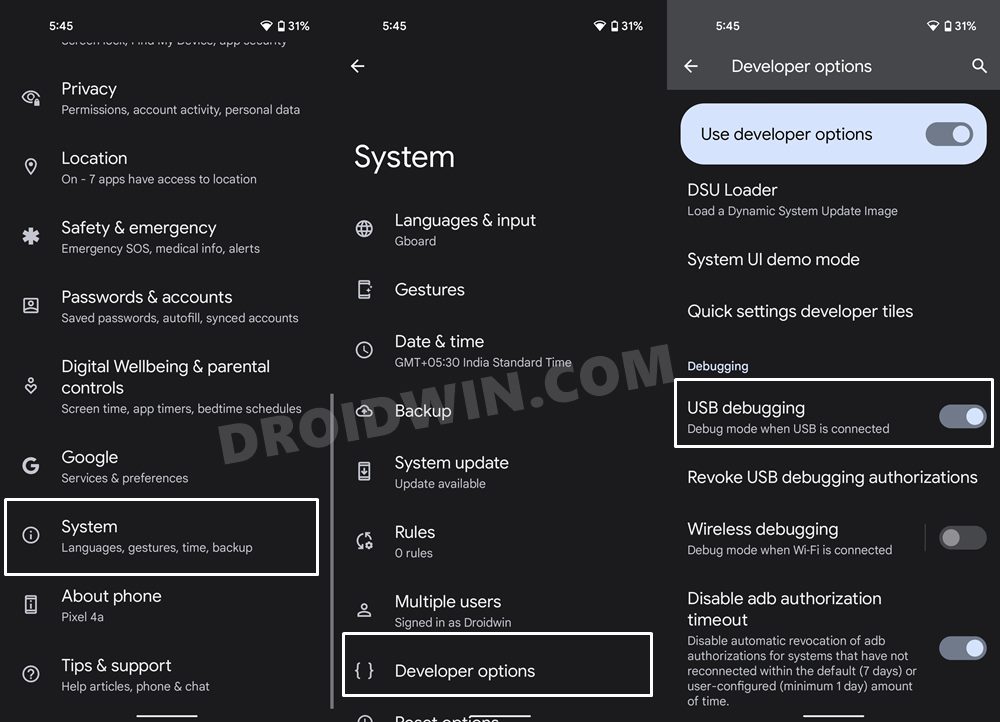
Next up, you will have to enable USB Debugging so that your device is recognizable by the PC in ADB mode. This will then allow you to execute the ADB Shell and henceforth the su command . So head over to Settings > About Phone > Tap on Build Number 7 times > Go back to Settings > System > Advanced > Developer Options > Enable USB Debugging.
STEP 4: Grant SuperUser Request
- Connect your device to the PC via USB cable. Make sure USB Debugging is enabled.
- Then head over to the platform-tools folder, type in CMD in the address bar, and hit Enter.
- This will launch the Command Prompt. Now type in the below command to open the shell environment. adb shell
- After that, execute the following command to invoke the superuser request su
- You will now get a prompt on your device, tap on Allow/Grant.
STEP 5A: Backup Persist Partition via ADB [Automated Method]
- Now execute the below command in the CMD window to take a backup of the persist partition su -c dd if=/dev/block/bootdevice/by-name/persist of=/sdcard/Download/persist.img
- The persist partition will now be backed up in the Downloads folder on your device. It is recommended to transfer it to your PC.
STEP 5B: Backup Persist Partition via SU [Manual Method]
- To begin with, type in the below command to open the shell environment: adb shell
- Then type in the below command. You’ll get a Magisk request, tap on Grant. su
- Now type in the below command to bring a list of all partitions on your device ls -la /dev/block/by-name
- Check out the sda address for your persist partition. In our case, it is sda8.
- Now use the below command, replacing location with the sda address: dd if= location of=/sdcard/persist.img bs=4096
- In our case, the aforementioned command will transform to: dd if= /dev/block/sda8 of=/sdcard/persist.img bs=4096
- The persist.img will be placed in your device’s Internal Storage. Transfer it to your PC.
How to Restore Persist Partition
So you have messed up the fingerprint on your device? Well, not an issue as you could easily fix it just by flashing the backed-up persist.img file.
- To begin with, carry out steps 1 to 4 as mentioned above.
- Then transfer the persist.img file to the platform tools folder on your PC.
- Next up, connect your device to the PC via USB cable. Make sure USB Debugging is enabled.
- Now head over to the platform-tools folder, type in CMD in the address bar, and hit Enter.
- This will launch the Command Prompt. So type in the below command to boot your device to Fastboot Mode adb reboot bootloader
- Finally, execute the below command to flash the persist.img file fastboot flash persist persist.img
- That’s it. You may now reboot your device to the OS via the below command- fastboot reboot
So these were the steps to take a backup of the persist partition on your Android device. If you hadn’t taken the persist backup beforehand and your device is currently facing fingerprint issues, then there’s no point in taking the backup of the persist partition and flashing it. This is because the said partition has already been corrupted. Moreover, you cannot use the persist partition image from another user, even if they have the same device and belong to the same region.
- How to Fix Loss Of Fingerprint Sensor Issue on any OnePlus Device
- How to Enable Google Call Screening on any Android Phone
- Pixel 6 Fingerprint Sensor Not Working: How to Fix
- Pixel 6/Pro Device was locked manually: Enter PIN instead of Fingerprint
(Cancel Reply)
Δ
Take a Backup of Persist Partition: Fix Fingerprint Not Working
In this guide, we will show you the steps to take a backup of the persist partition on your Android device. Stepping into the custom development brings in a plethora of goodies with itself. Right after you have unlocked the bootloader, you will be in a position to dive deep into the custom ROMs, custom recoveries, or gain administrative privileges by rooting the device via Magisk. However, this is just one side of the coin. Carrying out these tweaks could prove to be a risky bet as well.
For OnePlus users, it is usually issues with the fingerprint sensor that seems to be bugging quite a few users. As a result of which, they are unable to register or enroll their fingerprint or use the already registered ones to unlock their device. So right before you step into the modding domain, your first course of action should be to take a backup of the persist partition. In case you end up messing with the fingerprint, then you could easily fix it by restoring the backed up persist. On that note, let’s get started with the steps to take a backup of the persist partition.
- How to Take a Backup of Persist Partition STEP 1: Root your Device STEP 2: Install Android SDK STEP 3: Enable USB Debugging STEP 4: Grant SuperUser Request STEP 5A: Backup Persist Partition via ADB [Automated Method] STEP 5B: Backup Persist Partition via SU [Manual Method]
- How to Restore Persist Partition
How to Take a Backup of Persist Partition
The below instructions are listed under separate sections for ease of understanding. Make sure to follow the same sequence as mentioned. Droidwin and its members wouldn’t be held responsible in case of a thermonuclear war, your alarm doesn’t wake you up, or if anything happens to your device and data by performing the below steps.
STEP 1: Root your Device
First and foremost, your device needs to be rooted. If you haven’t done so, then you may refer to our guide on How to Root Android via Magisk Patched Boot.img .
STEP 2: Install Android SDK
First and foremost, you will have to install the Android SDK Platform Tools on your PC. This is the official ADB and Fastboot binary provided by Google and is the only recommended one. So download it and then extract it to any convenient location on your PC. Doing so will give you the platform-tools folder, which will be used throughout this guide.
STEP 3: Enable USB Debugging
Next up, you will have to enable USB Debugging so that your device is recognizable by the PC in ADB mode. This will then allow you to execute the ADB Shell and henceforth the su command . So head over to Settings > About Phone > Tap on Build Number 7 times > Go back to Settings > System > Advanced > Developer Options > Enable USB Debugging.
STEP 4: Grant SuperUser Request
- Connect your device to the PC via USB cable. Make sure USB Debugging is enabled.
- Then head over to the platform-tools folder, type in CMD in the address bar, and hit Enter.
- This will launch the Command Prompt. Now type in the below command to open the shell environment. adb shell
- After that, execute the following command to invoke the superuser request su
- You will now get a prompt on your device, tap on Allow/Grant.
STEP 5A: Backup Persist Partition via ADB [Automated Method]
- Now execute the below command in the CMD window to take a backup of the persist partition su -c dd if=/dev/block/bootdevice/by-name/persist of=/sdcard/Download/persist.img
- The persist partition will now be backed up in the Downloads folder on your device. It is recommended to transfer it to your PC.
STEP 5B: Backup Persist Partition via SU [Manual Method]
- To begin with, type in the below command to open the shell environment: adb shell
- Then type in the below command. You’ll get a Magisk request, tap on Grant. su
- Now type in the below command to bring a list of all partitions on your device ls -la /dev/block/by-name
- Check out the sda address for your persist partition. In our case, it is sda8.
- Now use the below command, replacing location with the sda address: dd if= location of=/sdcard/persist.img bs=4096
- In our case, the aforementioned command will transform to: dd if= /dev/block/sda8 of=/sdcard/persist.img bs=4096
- The persist.img will be placed in your device’s Internal Storage. Transfer it to your PC.
How to Restore Persist Partition
So you have messed up the fingerprint on your device? Well, not an issue as you could easily fix it just by flashing the backed-up persist.img file.
- To begin with, carry out steps 1 to 4 as mentioned above.
- Then transfer the persist.img file to the platform tools folder on your PC.
- Next up, connect your device to the PC via USB cable. Make sure USB Debugging is enabled.
- Now head over to the platform-tools folder, type in CMD in the address bar, and hit Enter.
- This will launch the Command Prompt. So type in the below command to boot your device to Fastboot Mode adb reboot bootloader
- Finally, execute the below command to flash the persist.img file fastboot flash persist persist.img
- That’s it. You may now reboot your device to the OS via the below command- fastboot reboot
So these were the steps to take a backup of the persist partition on your Android device. If you hadn’t taken the persist backup beforehand and your device is currently facing fingerprint issues, then there’s no point in taking the backup of the persist partition and flashing it. This is because the said partition has already been corrupted. Moreover, you cannot use the persist partition image from another user, even if they have the same device and belong to the same region.
- How to Fix Loss Of Fingerprint Sensor Issue on any OnePlus Device
- How to Enable Google Call Screening on any Android Phone
- Pixel 6 Fingerprint Sensor Not Working: How to Fix
- Pixel 6/Pro Device was locked manually: Enter PIN instead of Fingerprint
(Cancel Reply)
Δ
