How to Disable Display Timeout on Android [3 Methods]
In this guide, we will show you various methods to disable the display timeout duration on Android. Usually, when I am writing a guide, I keep my device right in front of me because I carry out the same tweak on my device for which the guide is being written. Apart from that, having the display awake also helps in keeping a tab on all the notifications that are coming to my device; there’s no need to leave my work, unlock the device, and have a look at them.
However, here’s just one issue in all of this- the maximum time for which the display can remain awake without any interaction is 30 minutes. Once the said time is reached, you’ll again have to manually wake up the device. While in most cases, 30 minutes is more than sufficient, but that isn’t always the case.

Moreover, some OEMs have added a ‘Never’ option under Display Timeout, but there are still quite a lot of them that haven’t. So if you also own a device that doesn’t have this option, then this guide will help you completely disable the display timeout on your Android device. Follow along.
- How to Disable Display Timeout on Android Using ADB Shell Command [Without Root] Using Third-Party Apps [Without Root]
How to Disable Display Timeout on Android
Before starting, please take a complete device backup, just to be on the safe side. Droidwin and its members wouldn’t be held responsible in case of a thermonuclear war, your alarm doesn’t wake you up, or if anything happens to your device, and data by performing the below steps.
Using ADB Shell Command [Without Root]
This tweak usually comes in handy if you want to increase the display timeout value beyond 30 minutes. But we can also make use of it by typing in an extremely large value that will keep the display awake for ages. To carry out this method, do check out our guide below.
Increase Screen Timeout Duration Beyond 30 Minutes on Android
Using Third-Party Apps [Without Root]
Keep Screen On: It is an open-source app that allows you to add a quick settings tile, with which you can easily disable screen timeout and then restore the previous timeout value as well, as and when required. You may download it from its GitHub page .

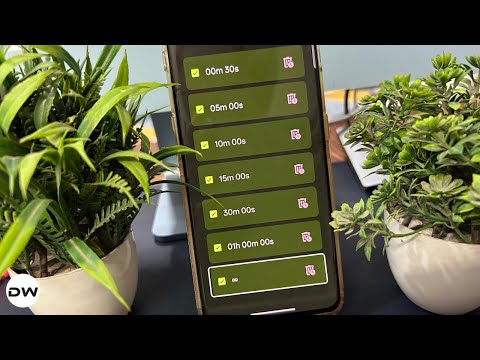
Caffeinate: You can disable the screen timeout right from the app or using a Quick Settings toggle that it creates. It has the following values: 30 seconds, 05 minutes, 10 minutes, 15 minutes, 30 minutes, 60 minutes, Ꝏ. Just second the last one [infinite] and your task stands complete. You may download it from its F-Droid page .

- Pixel Device Stuck on ‘Shutting Down’ Screen: How to Fix
- Remove Lock Screen Password without Formatting Data
- How to Remove Fingerprint Icon from Lock Screen on Android
- How to Remove Adding Screenshots Notifications on Pixel

(Cancel Reply)
Δ
How to Remove Fingerprint Icon from Lock Screen on Android
In this guide, we will show you the steps to remove the fingerprint icon from the lock screen on your Android device. Thanks to the open-source nature of the OS, you can carry out a plethora of tweaks on your device. While most of them tend to add new features or remove the unnecessary ones, there are a few that might leave some of your heads scratching. And the one which we are discussing here is just that.
There’s no use case or benefit as such for removing the fingerprint icon from the lock screen on your Android device [well, apart from giving you a cleaner lock screen!], but after all, not every tweak deserves an explanation, and some are done just for fun. And the one which we are discussing here falls in this category. So, on that note, let’s hop onto this intriguing journey and show you the steps to get this job done right away!
- How to Remove the Fingerprint Icon from the Lock Screen on Android
- How to Remove the Fingerprint Icon from the AOD Screen on Android
- How to Bring Back the Fingerprint Icon
How to Remove the Fingerprint Icon from the Lock Screen on Android
This tweak has been tested on Samsung devices, including the latest S25 series. It may or may not work on other Android devices, though you may still give it a try because there’s nothing to lose!
- First off, download and install the SetEdit app from the Play Store.
- Now download & extract Android SDK Platform Tools on your PC.
- Then enable USB Debugging on your device and connect it to your PC.
- Now open Command Prompt inside the platform-tools folder and type: adb shell pm grant by4a.setedit22 android.permission.WRITE_SECURE_SETTINGS
- Now launch SetEdit and select Secure Table from the right-hand side.
- Finally, set the value of the “fingerprint_screen_on_icon_lock” to 0.
How to Remove the Fingerprint Icon from the AOD Screen on Android
Change the value of “fingerprint_screen_off_icon_aod” to 0 from 2 to remove the fingerprint icon from the AOD screen.
How to Bring Back the Fingerprint Icon
Change the value of “fingerprint_screen_on_icon_lock” back to its default value, which is 2, and the fingerprint icon will be back in the lock screen. Likewise, change the value of “fingerprint_screen_off_icon_aod” to 2 to bring back the icon on the AOD screen.
- WhatsApp Fingerprint Lock not working [Fixed]
- How to Add Genshin Fingerprint Animation on OnePlus
- Google Wallet crashes via Fingerprint on Lock Screen [Fixed]
- Fix Fingerprint Sensor not working on Pixel Android 14
(Cancel Reply)
Δ
