How to Enable All LTE Bands on any Chinese OnePlus [Non Root]
Many users are now inclined to get their hands on the Chinese variant of OnePlus as opposed to the international version. While the devices come with ColorOS, however, many traders are selling the devices after flashing OxygenOS, so that the users get the best usage experience right out of the box. While it does stand true from the software side, there are still a few rough edges on those devices that need polishing.
One such limitation is the lack of support for some 4G/5G bands on the network spectrum. While this proves to be a real deal breaker for most of the users who are planning to get their hands on the Chinese variant, the great part is that the limitation is only on the software side. Using a few tweaks, you can easily bypass those roadblocks and add support for all 4G bands. And that’s not it.
By modifying the global_policies.xml file [apart from the policies.xml], you can even add support for a new country [we will show you how that can be done as well]. The best part? The entire process does not require root whatsoever! It will be carried out on a locked bootloader, non-rooted device. So without any further ado, let’s get started.
- Unique Characteristics of this Guide
- Country Codes
- How to Enable All LTE Bands on the Chinese OnePlus STEP 1: Boot to Qualcomm Diag Mode STEP 2: Install DIAG Mode Drivers STEP 3: Install QPST Tool STEP 4: Copy policies.xml and Global_defines.xml STEP 5: Enable All LTE Bands on Chinese OnePlus
Unique Characteristics of this Guide
- The instructions shown here should work on all OnePlus devices. It has been tested to work on OnePlus 9 Pro, OnePlus 11, OnePlus 13, and even the latest OnePlus 15!
- This process does not require root or an unlocked bootloader. All the steps shown here will work on non-rooted and locked bootloader devices.
- It works across both the International and China variants of OnePlus, i.e,. for both OxygenOS and ColorOS.
Country Codes
| Mobile Country Code | Country |
|---|---|
| 289 | Abkhazia |
| 412 | Afghanistan |
| 276 | Albania |
| 603 | Algeria |
| 544 | American Samoa |
| 213 | Andorra |
| 631 | Angola |
| 365 | Anguilla |
| 344 | Antigua and Barbuda |
| 722 | Argentina |
| 283 | Armenia |
| 363 | Aruba |
| 505 | Australia |
| 232 | Austria |
| 400 | Azerbaijan |
| 364 | Bahamas |
| 426 | Bahrain |
| 470 | Bangladesh |
| 342 | Barbados |
| 257 | Belarus |
| 206 | Belgium |
| 702 | Belize |
| 616 | Benin |
| 350 | Bermuda |
| 402 | Bhutan |
| 736 | Bolivia |
| 218 | Bosnia and Herzegovina |
| 652 | Botswana |
| 724 | Brazil |
| 348 | British Virgin Islands |
| 528 | Brunei |
| 284 | Bulgaria |
| 613 | Burkina Faso |
| 642 | Burundi |
| 456 | Cambodia |
| 624 | Cameroon |
| 302 | Canada |
| 625 | Cape Verde |
| 346 | Cayman Islands |
| 623 | Central African Republic |
| 622 | Chad |
| 730 | Chile |
| 460 | China |
| 732 | Colombia |
| 654 | Comoros |
| 629 | Congo |
| 548 | Cook Islands |
| 712 | Costa Rica |
| 219 | Croatia |
| 368 | Cuba |
| 280 | Cyprus |
| 230 | Czech Republic |
| 630 | Democratic Republic of the Congo |
| 238 | Denmark |
| 638 | Djibouti |
| 366 | Dominica |
| 370 | Dominican Republic |
| 514 | East Timor |
| 740 | Ecuador |
| 602 | Egypt |
| 706 | El Salvador |
| 627 | Equatorial Guinea |
| 657 | Eritrea |
| 248 | Estonia |
| 636 | Ethiopia |
| 288 | Faroe Islands |
| 244 | Finland |
| 208 | France |
| 547 | French Polynesia |
| 262 | Germany |
| 620 | Ghana |
| 266 | Gibraltar |
| 202 | Greece |
| 290 | Greenland |
| 352 | Grenada |
| 704 | Guatemala |
| 454 | Hong Kong |
| 216 | Hungary |
| 274 | Iceland |
| 404 | India |
| 405 | India |
| 510 | Indonesia |
| 432 | Iran |
| 418 | Iraq |
| 272 | Ireland |
| 425 | Israel |
| 222 | Italy |
| 338 | Jamaica |
| 440 | Japan |
| 441 | Japan |
| 416 | Jordan |
| 401 | Kazakhstan |
| 639 | Kenya |
| 545 | Kiribati |
| 467 | North Korea |
| 450 | South Korea |
| 419 | Kuwait |
| 437 | Kyrgyzstan |
| 457 | Laos |
| 247 | Latvia |
| 415 | Lebanon |
| 651 | Lesotho |
| 618 | Liberia |
| 606 | Libya |
| 295 | Liechtenstein |
| 246 | Lithuania |
| 270 | Luxembourg |
| 455 | Macao |
| 646 | Madagascar |
| 650 | Malawi |
| 502 | Malaysia |
| 472 | Maldives |
| 610 | Mali |
| 278 | Malta |
| 551 | Marshall Islands |
| 340 | Martinique |
| 609 | Mauritania |
| 617 | Mauritius |
| 334 | Mexico |
| 550 | Micronesia |
| 259 | Moldova |
| 212 | Monaco |
| 428 | Mongolia |
| 297 | Montenegro |
| 354 | Montserrat |
| 604 | Morocco |
| 643 | Mozambique |
| 414 | Myanmar |
| 649 | Namibia |
| 536 | Nauru |
| 429 | Nepal |
| 204 | Netherlands |
| 546 | New Caledonia |
| 530 | New Zealand |
| 710 | Nicaragua |
| 614 | Niger |
| 621 | Nigeria |
| 242 | Norway |
| 422 | Oman |
| 410 | Pakistan |
| 552 | Palau |
| 714 | Panama |
| 537 | Papua New Guinea |
| 744 | Paraguay |
| 716 | Peru |
| 515 | Philippines |
| 260 | Poland |
| 268 | Portugal |
| 427 | Qatar |
| 226 | Romania |
| 250 | Russia |
| 635 | Rwanda |
| 549 | Samoa |
| 292 | San Marino |
| 626 | São Tomé and Príncipe |
| 420 | Saudi Arabia |
| 608 | Senegal |
| 220 | Serbia |
| 633 | Seychelles |
| 619 | Sierra Leone |
| 525 | Singapore |
| 231 | Slovakia |
| 293 | Slovenia |
| 540 | Solomon Islands |
| 637 | Somalia |
| 655 | South Africa |
| 214 | Spain |
| 413 | Sri Lanka |
| 634 | Sudan |
| 746 | Suriname |
| 653 | Swaziland |
| 240 | Sweden |
| 228 | Switzerland |
| 417 | Syria |
| 466 | Taiwan |
| 436 | Tajikistan |
| 640 | Tanzania |
| 520 | Thailand |
| 615 | Togo |
| 539 | Tonga |
| 374 | Trinidad and Tobago |
| 605 | Tunisia |
| 286 | Turkey |
| 438 | Turkmenistan |
| 376 | Turks and Caicos Islands |
| 641 | Uganda |
| 255 | Ukraine |
| 424 | United Arab Emirates |
| 234 | United Kingdom |
| 235 | United Kingdom |
| 310 | United States |
| 311 | United States |
| 312 | United States |
| 313 | United States |
| 314 | United States |
| 315 | United States |
| 316 | United States |
| 748 | Uruguay |
| 434 | Uzbekistan |
| 541 | Vanuatu |
| 734 | Venezuela |
| 452 | Vietnam |
| 543 | Wallis and Futuna |
| 421 | Yemen |
| 645 | Zambia |
| 648 | Zimbabwe |
How to Enable All LTE Bands on the Chinese OnePlus

STEP 1: Boot to Qualcomm Diag Mode
- Download and extract Android SDK Platform Tools on your PC.
- Then enable USB Debugging and connect your device to the PC.
- Next, open Command Prompt inside platform tools and type in: adb reboot ftm
- The device will reboot and show one line in Chinese on the screen.
- Now type the two commands below to boot the device to Qualcomm DIAG mode. adb shell setprop sys.usb.config diag,diag_mdm,qdss,qdss_mdm,serial_cdev,dpl,rmnet,adb Ignore adb reboot for now; it is to be used at the end of this guide.
STEP 2: Install DIAG Mode Drivers
Open Device Manager, and your device will be listed under Other Devices. Do note that it might not show your actual device name; it might show the codename of your chipset. For example, I have an OnePlus 11, which has the Snapdragon 8 Gen 2 chipset, whose codename is Kalama, and that same name is shown in the Device Manager as well, see image below.
Moreover, the device name will be listed twice or thrice, and you’ll have to install drivers for each of them as well. don’t know which one the QPST Tool will ultimately end up choosing. So on that note, let’s start off with the driver installation process.
- Download and extract the Diag_Mode_Drivers file on your PC.
- Open Device Manager > Other Devices > Right-click on one of your devices and select Update Drivers.
- Then click on “Browse my computer for drivers” > “Let me pick from a list of available drivers on your computer”.
- Now click on “Show all devices” and click Next > “Have Disk…”.
- Click Browse > navigate to the “Qualcomm_DIAG_Mode_Drivers” folder > select the “qcmdm.inf” file > OK.
- On the left side, select “Qualcomm Incorporated”. On the right, scroll down until you find “Qualcomm HS-USB Android DIAG 9018” select it, and click Next.
- You might get a “Update driver warning” prompt; click Yes. That’s it. The drivers are now installed. Do so for your other device listings under Other Devices.
- Once installed, your device will now be shown under Ports as Qualcomm HS-USB Android Diag 9018 (COMx), where x is a number.
STEP 3: Install QPST Tool
- To begin with, download & extract the QPST Tool on your PC.
- Now extract it and launch the EXE file to start the installation.
- Proceed with the on-screen instructions to complete the setup.
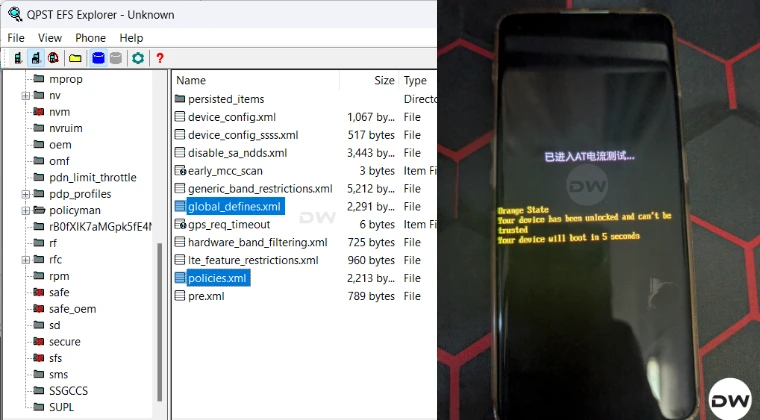
STEP 4: Copy policies.xml and Global_defines.xml
- Launch QPST. The device will be shown as Enabled.
- Now, click on Start Clients and select EFS Explorer.
- Then, click OK in the Phone Selection that appears.
- It will take some time for the tool to load completely.
- Once done, drag the global_defines.xml and policies.xml files to your PC.
We will now make some changes to both these files. Therefore, it is recommended that you take a backup of both these files and place them somewhere else on your PC.
STEP 5: Enable All LTE Bands on Chinese OnePlus
- Open the global_defines.xml file via Notepad++. Scroll down and look for the following value: <rf_band_list ns=“global” name=“global:default_bands”> <gw_bands base=“current” /> <lte_bands base=“current” /> <tds_bands base=“none” /> <nr5g_sa_bands base=“current” /> <nr5g_nsa_bands base=“current” /> <nr5g_nrdc_bands base=“current” /> </rf_band_list> <rf_band_list ns=“global” name=“snpn_bands”> <gw_bands base=“none” /> <lte_bands base=“none” /> <tds_bands base=“none” /> <nr5g_sa_bands base=“hardware” /> <nr5g_nsa_bands base=“none” /> <nr5g_nrdc_bands base=“none” /> </rf_band_list>
- Change all current and none to hardware. The command will now look like this: <rf_band_list ns=“global” name=“global:default_bands”> <gw_bands base=“hardware” /> <lte_bands base=“hardware” /> <tds_bands base=“hardware” /> <nr5g_sa_bands base=“hardware” /> <nr5g_nsa_bands base=“hardware” /> <nr5g_nrdc_bands base=“hardware” /> </rf_band_list> <rf_band_list ns=“global” name=“snpn_bands”> <gw_bands base=“hardware” /> <lte_bands base=“hardware” /> <tds_bands base=“hardware” /> <nr5g_sa_bands base=“hardware” /> <nr5g_nsa_bands base=“hardware” /> <nr5g_nrdc_bands base=“hardware” /> </rf_band_list>
- If you want to add any region [which is optional], refer to the Region Code from the starting section of this guide. Then scroll to this section of the global_defines.xml file: <mcc_list name=“global:dsda_mccs” ns=“global”> 460 001 454 455 404 405 406 525 520 502 515 466</mcc_list>
- Now add your region code here. For example, to add South Africa with the code 655, the above command will look like: <mcc_list name=“global:dsda_mccs” ns=“global”> 460 001 454 455 404 405 406 525 520 502 515 466 655</mcc_list>
- Finally, save the changes via Ctrl+S.
- Now open the policies.xml file via Notepad++, delete the line below, and save the changes via Ctrl+S:
- Now drag and drop both these files back to the QPST Tool. You’ll get a prompt that “these files already exist, you want to replace them?” Just click YES for both of them.
- Once done, you may now close the tool and boot the device to the OS via the below command: adb reboot
- How to Enable 5G & Global RF Bands on Xperia (5G/LTE/CA)
- Enable Band Selection Mode in Samsung [U: S25 Ultra Verizon]
- Cannot Make VoLTE Calls in Unlocked AT&T Devices [Fixed]
- Enable 5GHz/6GHz Hotspot in Xperia in Unsupported Regions

- lolo 2 months ago Reply Hello, OnePlus 13 CN, LineageOS 23 ROM, can I follow this post? Thank you my friend.
(Cancel Reply)
Δ
