How to Enable Call Recording on Samsung Galaxy S21 Ultra
In this guide, we will show you the steps to enable call recording on your Samsung Galaxy S21 Ultra device. The call recording functionality has always been a topic of hot debate. Whereas the users are always inclined towards this functionality, the OEM and in some cases, the regional laws have something else to say.
So to avoid this fiasco, the smartphone manufacturers do tend to add this feature across all their devices but disable it on the variants that are to be shipped to the location where it might lead the company to the hot waters. But in all these complications, it’s the users who have to be the ultimate suffers. There have been numerous instances where users are residing in locations where call recordings are completely legal but they are still not able to use them.
This is because they had exported their device from a region where this feature was disabled due to legal issues. If you are also in the same boat as them, then you will be glad to know that there exists a method through which you could enable call recording on your Samsung Galaxy S21 Ultra device. And this guide will show you how to do just that. So without any further ado, let’s get started.
- Enable Call Recording on Samsung by Changing CSC
- How to Enable Call Recording on Samsung Galaxy S21 Ultra STEP 1: Download Indonesia Firmware STEP 2: Download Odin STEP 3: Boot to Download Mode STEP 4: Flash Indonesia Firmware via Odin
Enable Call Recording on Samsung by Changing CSC
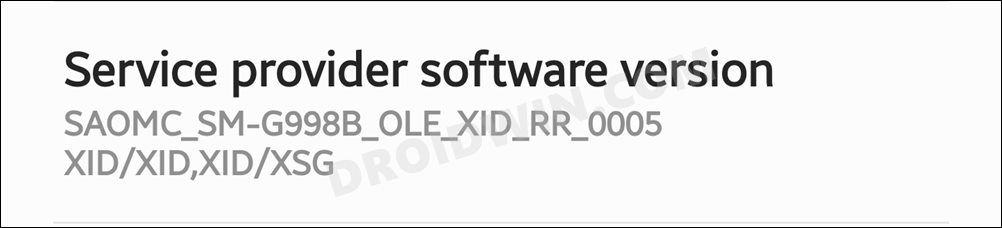
To try out this feature, we will be flashing the XID Home CSC, or in other words, the Home CSS file of the Indonesia region via Odin. The users who have achieved success had their original CSC as OXM, THL, MID, or XSG CSC. Since all of them are Multi OXM CSC, hence users weren’t able to achieve success. However, after flashing the Indonesian firmware, it worked without any issues as it is an OLE CSC.
So with that in mind, here’s are the steps to flash the Indonesian firmware (XID) and hence enable call recording on your Samsung Galaxy S21 Ultra device. [ You should only try these steps if it is legal in your region, Droidwin or any of its members would take no responsibility if legal authorities come knocking at your door in the middle of the night! ].
How to Enable Call Recording on Samsung Galaxy S21 Ultra
The below instructions are listed under separate sections for ease of understanding. Make sure to follow in the exact same sequence as mentioned. [ Credit for this method goes to XDA Senior Member carlitobahsoun ].
STEP 1: Download Indonesia Firmware
To begin with, download the Samsung Galaxy S21 Ultra (SM-G998B) Indonesia Region Firmware. You may use websites like SamMobile [ direct link ], Samloader , or the Frija Tool . Here are a few additional information that could come in handy:
| Country | Indonesia (XID) |
|---|---|
| Product code | XID |
| PDA | G998BXXU1AUAC |
| CSC | G998BOLE1AUAC |
Moving on, once you have downloaded the firmware, extract it to any convenient location on your PC. This shall give you the AP, BL, CP, CSC, and Home CSC files, which we will be using later on.
STEP 2: Download Odin
- Now download the Odin Tool and extract it to any folder.
- Then double-click on the Odin3_v3.14.4 EXE file to launch the tool.
STEP 3: Boot to Download Mode
You will now have to boot your S21 device to Download Mode so that Odin is able to identify it and carry out the flashing of the patched AP file. So refer to our guide to Boot any Samsung Device to Download Mode . Or refer to our below direct instructions:
- To begin with, power off your device.
- Then press and hold the Volume Up and Volume Down keys together.
- While pressing both these keys connect your device to the PC via USB cable.
- Finally, leave both these buttons and hit the Volum Up key to boot to Download Mode.
STEP 4: Flash Indonesia Firmware via Odin
- To begin with, launch the Odin Tool on your PC.
- After that, click on the BL button, go to the extracted firmware folder and select the BL file.
- Then click on the AP button, go to the extracted firmware folder and select the AP file.
- Next up, click on the CP button, go to the extracted firmware folder and select the CP file.
- Now click on the CSC button, go to the extracted firmware folder and select the Home_CSC file (the normal CSC will format your device, if you don’ want that to happen, then load the Home_CSC file itself).
- Once all four files have been loaded, click on the Start button. The flashing process will now begin and could take a few minutes.
- Once done, your device should boot to the OS and the tool will also show you the success message.
- How to Root Samsung One UI 4.0 Android 12 via Magisk
- Manually Install One UI 4.0 Beta Android 12 on Samsung
- OTA Download Link for Samsung One UI 4.0 Android 12 Beta
- Downgrade Samsung One UI 4.0 to One UI 3.1 (Android 12 to 11) via Odin

- Jase 4 years ago Reply Hi I am being notified of a Ph Software update from Samsung – will this overwrite the Indonesia firmware?
(Cancel Reply)
Δ
