How to Enable DIAG Mode in OnePlus when *#801# is not working
In this guide, we will list out the steps to enable DIAG Mode in OnePlus when the code *#801# is not working. The devices from the Chinese OEM behold a slew of nifty codes under the hood. Some of the noteworthy ones include the ability to view Firmware Version, access Engineer Mode, factory reset the device, Make Anonymous Calls, and a plethora of other carrier-related codes.
Moreover, if you are into custom development, then you might have come across the DIAG Mode as well. Short form for Diagnostic Mode, it is used for carrying out some technical tweaks such as enabling “Full-port Switch” to activate WifiCalling/VoLTE with the PDC Tool. Likewise, this mode is also used for restoring the original IMEI or writing a new one onto your device. So how could you access this mode?
Earlier, you only needed to type in *#801# in the dialer and the DIAG Mode will be right in front of you. However, the OEM recently pushed an update that blocked the DIAG Mode from being accessed via the *#801# code. So how could you then access this mode? Well, there exists a nifty workaround through which you could easily bypass this restriction and enable the DIAG Mode on your OnePlus device. Without further ado, let’s check it out.
- How to Enable DIAG Mode in OnePlus when *#801# is not working METHOD 1: Via ADB Shell Command [Recommended] METHOD 2: Via OnePlus Diagnostic App
How to Enable DIAG Mode in OnePlus when *#801# is not working
METHOD 1: Via ADB Shell Command [Recommended]

This method works on all OnePlus devices and is the recommended one.
- Download and extract Android SDK Platform Tools on your PC.
- Then enable USB Debugging and connect your device to the PC.
- Next, open Command Prompt inside platform tools and type in: adb reboot ftm
- The device will reboot and show one line in Chinese on the screen.
- Now type the two commands below to boot the device to Qualcomm DIAG mode. adb shell setprop sys.usb.config diag,diag_mdm,qdss,qdss_mdm,serial_cdev,dpl,rmnet,adb
- Next up, download and extract the Diag_Mode_Drivers file on your PC.
- Open Device Manager > Other Devices > Right-click on one of your devices and select Update Drivers.
- Then click on “Browse my computer for drivers” > “Let me pick from a list of available drivers on your computer”.
- Now, click on “Show all devices” and click Next > “Have Disk…”.
- Click Browse > navigate to the “Qualcomm_DIAG_Mode_Drivers” folder > select the “qcmdm.inf” file > OK.
- On the left side, select “Qualcomm Incorporated”. On the right, scroll down until you find “Qualcomm HS-USB Android DIAG 9018” select it, and click Next.
- You might get a “Update driver warning” prompt; click Yes. That’s it. The drivers are now installed for one of the device listings.
- To verify it, open Device Manager and have a look under Ports. Your device will be shown as Qualcomm HS-USB Android Diag 9018 (COMx), where x is a number.
- However, one or two instances of your device might still be there under Other Devices [in our case, it is one, as can be seen from the above screenshot]. So make sure to install the drivers for all of them using the same steps as discussed above.
- Once done, verify that all your devices are shown under the Ports section and named Qualcomm HS-USB Android Diag 9018 (COMx).
METHOD 2: Via OnePlus Diagnostic App
This is an old method, and the success rate is somewhat lower than the first method above.
- To begin with, download the OnePlus Diagnostic App from APKMirror
- Then open it and proceed with the on-screen instructions to install it.
- The app will be installed but would be hidden from the app drawer.
- So download and install the Quick Shortcut Maker app from the Play Store.
- Now double click in an empty location on your home screen and select Widgets.
- Scroll to Quick Shortcut Maker and drag and drop it to the home screen.
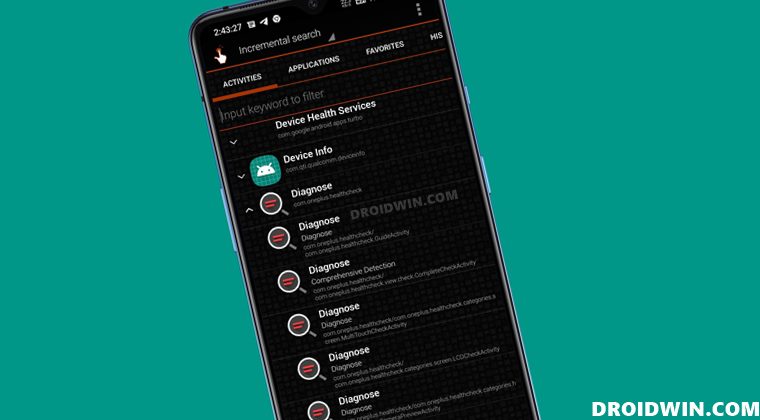
- It will now launch the app. Scroll to Diagnose, and tap on it to further expand it.
- Then tap on the Diagnose activity of your choice and hit Create. If you are unsure, then read the activity name below the shortcut name. For example, I’m planning to carry out the LCD screen test, so I will opt for com.oneplus.health.categories.screen.LCDCheckActivity.
- The widget will now be created on the home screen. Tap it to open and you may then start off with the test.
- How to Boot Qualcomm Device to Diag Mode via ADB Commands
- Change/Repair/Fix IMEI on Qualcomm Snapdragon Devices
- How to Backup and Restore IMEI on Qualcomm using QCN and QFIL
- How to Enable VoLTE and VoWiFi on Xiaomi (Root/Non-Root)

(Cancel Reply)
Δ
