How to Enable the New Windows 11 Start Menu
At the end of last month [October 28], Microsoft released an update version, KB5067036 , which brought the usual performance enhancements and bug fixes. This update went slightly under the radar without much discussion about it. However, this update brought one major change that didn’t catch many eyeballs. As you might have guessed it by now, yes, we are talking about the new Windows 11 Start Menu. So what all has changed? Let’s find out.
- What’s New in Windows 11 KB5067036 Start Menu
- How to Enable the New Windows 11 Start Menu METHOD 1: Via Settings Menu METHOD 2: Via Vivetool
What’s New in Windows 11 KB5067036 Start Menu
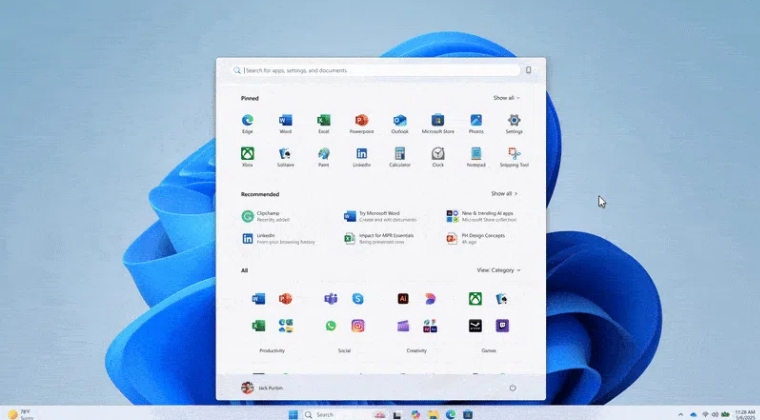
For starters, you can now remove the Pin and Recommended sections, thereby giving you a less cluttered Start Menu. Likewise, you can now also categorize similar apps under one roof. You just need to choose the Category under the View option, and Windows will automatically categorize similar apps together.
For instance, it will create a Productivity folder and add apps like all the Microsoft Office programs, Web Browsers, File Explorers, etc. Likewise, a folder named Social will have apps like Team, Skype, WhatsApp, etc. So without any further ado, let’s make you aware of the steps to welcome abode this change onto your PC right away.
How to Enable the New Windows 11 Start Menu
There are two ways through which you can get the new Start Menu- via the Settings menu and using a third-party app. We have listed both the methods below, you can try out the one that is i sync with your requirement.
METHOD 1: Via Settings Menu
Benefit: No need to take the help of any third-party app.

Drawback: It might take some time for the feature to arrive on your PC.
- Head over to Settings > Windows Update and turn on “Get the latest updates as soon as they’re available.”
- Now check for updates. You’ll soon get the KB5067036 update. Download & install it, and restart your PC.
- Upon the restart, you’ll have the new Windows 11 Start Menu on your PC.
METHOD 2: Via Vivetool
Benefit: You'll get the feature right away, no waiting time required.

Drawback: You'll need to take the help of a third-party app for this.
- Download the latest version of ViveTool from GitHub.
- Then extract it and open the Command Prompt there.
- Now type in the below command in the CMD window vivetool /enable /id:47205210
- Finally, restart your PC for the changes to take effect.
- How to Enable New Emojis 15 in Windows 11
- Guide to Enable the New Share Menu in Windows 11
- How to Enable Home Page in Settings Menu on Windows 11
- How to automatically install Preview Updates in Windows 11

(Cancel Reply)
Δ
