How to Enable Zygisk in KernelSU and APatch
In this guide, we will show you the steps to enable Zygisk in KernelSU and APatch. Back in the day, we had the ever-so-popular SuperSU by Chainfire for gaining administrative access to our device. After its demise, many shady one-click root solutions tried to fill its place and thankfully failed. This is when John Wu stepped in and revolutionized the rooting domain with its offering in the form of Magisk [ironically, he now works in Google in the Android Platform Security team, though it has no major impact on the app].
One of the biggest perks of this app is the fact that it carries out its task systemlessly, i.e. interacting with the system partition of your device, something that cannot be said with its successor. Apart from that, the entire rooting process is a breeze. Not to mention the fact that it allows a one-tap easy flashing of the modules of your choice [initially, it even used to house all the modules within the app itself, though that section has now been removed].

Magisk App in action
While Magisk is still being used by many for rooting purposes, we are also seeing the introduction of a couple of other players in this domain, with KernelSU and APatch being the two most noticeable names. But instead of taking the help of the boot partition, they tend to take the kernel route. Apart from that, there are a slew of other differences between Magisk and KernelSU & APatch, one among which is the ability to enable Zygisk.
For the unaware, Zygisk allows the developers to run their code directly in the app’s process even before it [the process] starts.
In the case of the former, you can easily enable it from its Settings menu but that is not the case with the latter two. Infact Zygisk seems to be altogether absent from both these apps. So if that is the case then how could one enable it in the first place? In this guide, we will make you aware of just that. So without any further ado, let’s check it out.
- What is the Need to Enable Zygisk?
- How to Enable Zygisk in Magisk, KernelSU, and APatch Magisk KernelSU APatch
What is the Need to Enable Zygisk?
While you will still be able to root your device even if you don’t enable Zygisk, however, there are many crucial tasks that will fail if this is not enabled. For instance, Play Integrity Fix is one of the most important modules for any rooted user as it allows you to pass the Basic and Device Integrity , in other words, allows you to use banking and payment apps.

However, you will not be able to use any banking and payment apps [and nowadays, even the likes of MacDonalds and Uber] if you don’t enable Zygisk. So owning to these factors, it is of paramount importance that you enable it on your device. And in this guide, we will show you how to do just that. Follow along.
How to Enable Zygisk in Magisk, KernelSU, and APatch

Before starting, please take a backup of all the data on your device, just to be on the safer side. Droidwin and its members wouldn’t be held responsible in case of a thermonuclear war, your alarm doesn’t wake you up, or if anything happens to your device and data by performing the below steps.
Magisk
As already mentioned before, Magisk comes built-in with Zygisk, so you can directly enable it from within the app itself. Here’s how”
- Launch the Magisk app and tap on the Settings icon at the top right.
- Then enable the toggle next to Zygisk and restart your device once.
- Your device will now reboot and the Zygisk should now be enabled.
- To verify the same, refer to the value next to Zygisk, it should state Yes.
KernelSU

When it comes to KernelSU, there’s no built-in option to enable AZygisk. So you’ll have to take the help of an open-source module to get the job done. Here’s how it could be done:
- irst off, download the Zygisk Next module from its GitHub page.
- Then launch KernelSU, go to Modules, and hit the Install button.
- Select the Zygisk Next module and it will be flashed on your device.
APatch
Similar to KernelSU, APatch also does not have Zygisk built into its app. So, as before, you’ll have to take the help of an open-source module to enable it. Follow along with the steps:
- First off, download the Zygisk Next module from its GitHub page.
- Then launch APatch, go to Modules, and tap on the Load button.
- Select the Zygisk Next module and it will be flashed on your device.
- How to Root Android Devices via KernelSU [GKI and LKM]
- Root Android via APatch: Give SU Access Flash Module Install OTA
- How to pass Meets Device and Basic Integrity via Play Integrity Fix
- List of custom fingerprints/JSON/build prop that pass Play Integrity

(Cancel Reply)
Δ
List of custom fingerprints/JSON/build prop that pass Play Integrity
From this guide, you can get hold of the build prop JSON file having custom fingerprints that pass the Play Integrity tests. Ever since Google laid out an ultimatum for the apps to make a switch from SafetyNet to Play Integrity , things have gotten quite challenging for tech enthusiasts. Gone are the days when you could simply flash a module, pass the test, and run the banking and payment apps with ease.
While the module to pass the Play Integrity still exists, however, it’s the interference from Google that has made things all the worse. Since the module is open source and available on GitHub, Google is able to easily access it and then ends up patching the fingerprint present in that module. The developer then rolls out a new version of the module with a different fingerprint but Google once again does the same- patching it and hence once again nullifying the module.
- Using a Rare Fingerprint/Build Prop
- List of custom fingerprints/JSON/build prop that passes Play Integrity BLU G8 Samsung SM-G950U Pixel 9 Pro
- How to use custom fingerprints/build.prop to Play Integrity
Using a Rare Fingerprint/Build Prop

Well, we can’t just keep on playing this cat-and-mouse game with Google. But what else could be done? As things stand, your best course of action is to manually create a fingerprint from a device that is quite rare and unknown to the masses. If you choose a fingerprint from the likes of Galaxy S23, Pixel 7, or Redmi Note 12, then for sure they would not work as Google would have already patched them.
Likewise, don’t use those fingerprints that come with a high chance of being used by the masses because they will also be patched by the Silicon Valley giant sooner rather than later. All in all, use a build.prop file that comes from a rare device and not many should be aware of the same [you could check out our detailed guide about which type of fingerprints are best suited under this scenario].
So it’s just a hit-and-trial method of getting hold of that perfect build prop JSON file having custom fingerprints that pass the Play Integrity test. Moreover, even if you get hold of the same, it is highly recommended that you don’t share it with others as its usage will skyrocket over time, come under the radar of Google, and you know what will happen next. However, to help you out, we are making an exception to this rule!
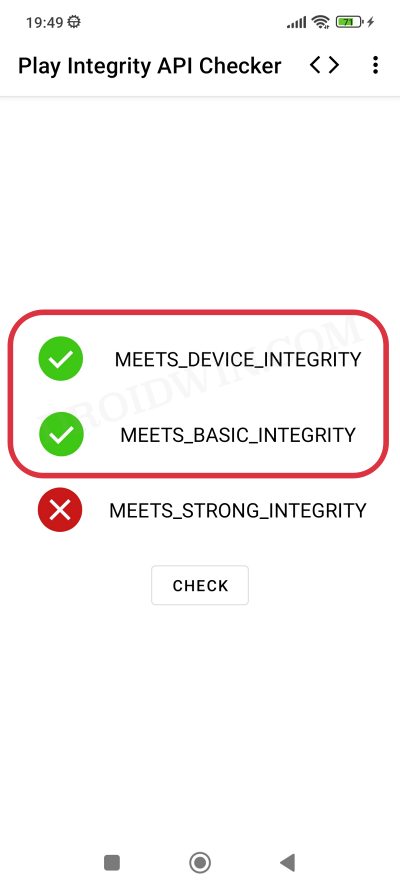
We will be listing out all those build prop JSON file having custom fingerprints that pass the Play Integrity test. It’s just on a first-come-first-serve basis, if you are among the earliest visitors to this site, then your device will end up passing both the MEETS_DEVICE_INTEGRITY and MEETS_BASIC_INTEGRITY tests. On the other hand, if you are late to the party, then the fingerprint would already have been used by the masses and it might not work for your device [still, you may give it a shot!].
List of custom fingerprints/JSON/build prop that passes Play Integrity

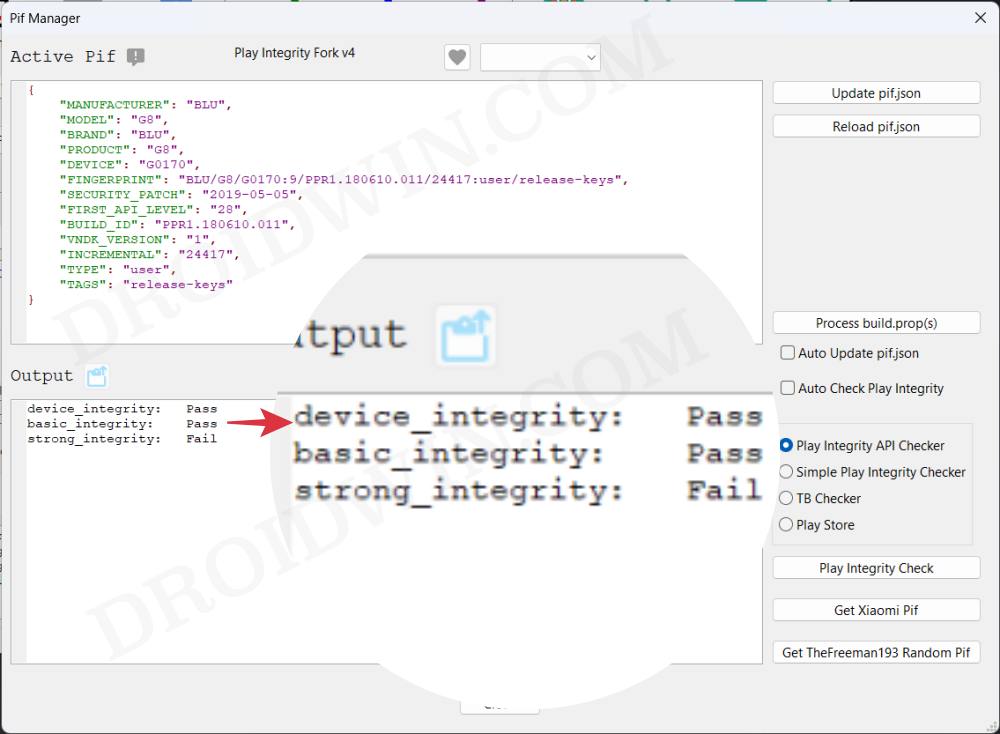
BLU G8
Raw dump of the firmware: G8-user-9-PPR1.180610.011-24417-release-keys [g0170/vendor/build.prop]
{

"MANUFACTURER": "BLU",

"MODEL": "G8",

"BRAND": "BLU",

"PRODUCT": "G8",

"DEVICE": "G0170",

"FINGERPRINT": "BLU/G8/G0170:9/PPR1.180610.011/24417:user/release-keys",

"SECURITY_PATCH": "2019-05-05",

"FIRST_API_LEVEL": "28",

"BUILD_ID": "PPR1.180610.011",

"VNDK_VERSION": "1",

"INCREMENTAL": "24417",

"TYPE": "user",

"TAGS": "release-keys"

}
Samsung SM-G950U
{

"MANUFACTURER": "samsung",

"MODEL": "SM-G950U",

"BRAND": "samsung",

"PRODUCT": "dreamqltesq",

"DEVICE": "dreamqltesq",

"FINGERPRINT": "samsung/dreamqltesq/dreamqltesq:7.0/NRD90M/G950USQU1AQDE:user/release-keys",

"SECURITY_PATCH": "2017-04-01",

"FIRST_API_LEVEL": "24",

"BUILD_ID": "NRD90M",

"VNDK_VERSION": "",

"INCREMENTAL": "G950USQU1AQDE",

"TYPE": "user",

"TAGS": "release-keys"

}
Pixel 9 Pro
{

"ID": "AD1A.240530.047.U1",

"BRAND": "google",

"DEVICE": "caiman",

"FINGERPRINT": "google/caiman/caiman:14/AD1A.240530.047.U1/12150698:user/release-keys",

"MANUFACTURER": "Google",

"MODEL": "Pixel 9 Pro",

"PRODUCT": "caiman",

"SECURITY_PATCH": "2024-08-05"

}
How to use custom fingerprints/build.prop to Play Integrity
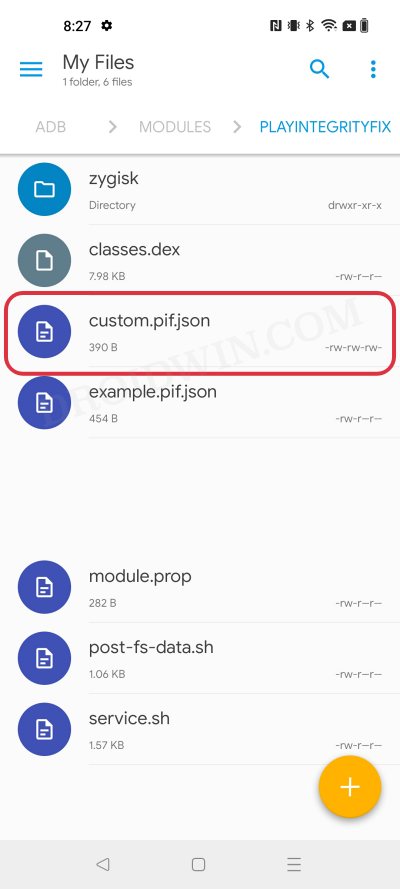
Now that we have got hold of the most important data, you just need to create a JSON file using this data and send this JSON file to your device. You could either do so manually via a File Explorer or via the Pixel Flasher Tool . After that, restart your device and check out the results via an app such as Play Integrity API Checker.
That’s it. This was all from this guide regarding the build prop JSON file having custom fingerprints that pass the Play Integrity tests. We will be continuously updating this section with more fingerprints as and when we get hold of the same. Stay tuned!
- Use Custom Fingerprint/Build.Prop to Pass Play Integrity Test
- Play Integrity Error Getting Token from Google: How to Fix
- Google Pay not working in Xiaomi EU ROM: Play Integrity Fix
- How to pass “Meets Device and Basic Integrity” via Play Integrity Fix
- J 5 months ago Reply Please, send me the keybox
- David 7 months ago Reply Please send me the valid keybox file for OnePlus 13
- sam 9 months ago Reply please send XML.file latest version Nelprime 7 months ago Reply Please send me the keybox file.
(Cancel Reply)
Δ
