How to Extract payload.bin and get stock boot image file
In this tutorial, we will show you how to extract the payload.bin file so that you may get the stock boot image (boot.img) and other firmware files. Earlier, the OEMs used to provide all the stock firmware files inside a single zip file. All you had to do is just extract that stock firmware ZIP and all the necessary files will be right in front of you. While some OEMs still follow this rule, others like the OnePlus don’t. And this is where it might issue trouble for quite a lot of users. Don’t Miss: How to Extract OZIP Realme Stock ROM (Firmware)
The thing is all the important stock firmware files are now bundled inside the payload.bin file. This file cannot be simply extracted using WinZip or WinRAR, etc. They require a specific set of applications in the form of the Payload Dumper Tool and Python. But simply installing both of these tools wouldn’t do any good. There are quite a few steps involved if you wish to extract the contents of the payload.bin file. And in this regard, this guide will come in handy.
Today, we will show you how to extract the payload.bin and get the stock boot image and other important partition files. But before we do so, it is also important to understand why you might need to carry out the aforementioned task. In the below section, we will first discuss the need (importance) to (of) extract this payload.bin file. After which the steps to get hold of the stock boot.img file via Payload Dumper and Python will be mentioned. Follow along.
- The Need to Extract payload.bin File using PC
- METHOD 1: Via Fastboot Enhance Tool
- METHOD 2: Extract payload.bin File via Payload Dumper Prerequisites STEP 1: Install Python on your PC STEP 2: Install Payload Dumper file STEP 3: Extract Payload.Bin
- METHOD 3: Extract Payload.bin Directly on Android Without PC [NEW]
- METHOD 4: Extract Payload.bin Directly on Android Without PC STEP 1: Setup Payload Dumper Tool STEP 2: Get the Payload.Bin File STEP 3: Setup Python on Android STEP 4: Grant Storage Permission STEP 5: Change Termux Directory to Payload.Bin File STEP 6: Install Google APIs Dependencies STEP 7: Extract payload.bin on Android
- METHOD 5: Extract Payload.bin via Payload Dumper Go
The Need to Extract payload.bin File using PC
But it is the boot.img file that might be of interest to a lot of users out there. You see, with an open-source ecosystem like Android, there are a plethora of customizations to try out. Right at the top is the ability o gain administrative-level privileges in the form of the root. And to root your device, there exist two different methods: using TWRP and without TWRP .
As of now, many users prefer to go with the latter method. This is because there is no working TWRP Recovery for a lot of Android devices. Hence if you wish to root without TWRP, the first prerequisite is to get your hands on the device’s stock boot.img file. Once that is done, you could easily patch it via Magisk and then flash it via fastboot commands .
However, as mentioned before, OEM now compiles all these files (including boot.img) inside the payload.bin file. So to root your device, you will anyways have to extract the payload.bin file. In this regard, the best way out is to use the Payload Dumper Tool and Python installed on your PC. Here are the complete instructions set to extract payload.bin and get the stock boot image file.
METHOD 1: Via Fastboot Enhance Tool
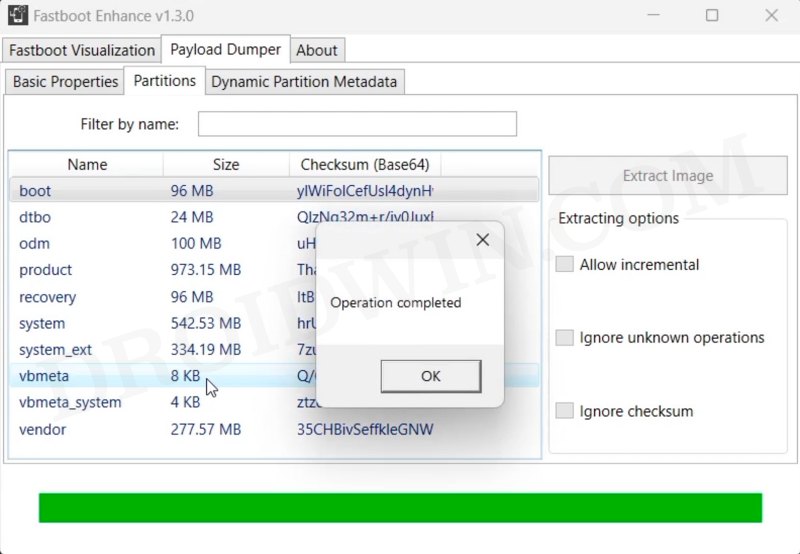
Thsui is the easiest and most recommended method of extracting the boot.img. This is because you don’t need to execute any commands, the entire process will be carried out via an application with an easy-to-use GUI. Moroever, you don’t even need to extract the entire payload.bin, you could simply extract the boot.img from the payload and get the job done, thereby saving your valuable time and resource. So do check out our below-linked guide to carry out this task:
How to Flash ROM & Extract Boot.img via Fastboot Enhance Tool
METHOD 2: Extract payload.bin File via Payload Dumper
Please go through the requirements section and make sure to download all the necessary tools. Once that is done, you may proceed with the steps. We have broken down the instruction steps into separate sections for ease of understanding.
Prerequisites
- To begin with, you will need the payload.bin file. You could get it from the stock firmware for your device. Many OEMs upload the same on their official pages, such as the OnePlus Download and Update page or Google Factory Image page. So just download the firmware, extract it via WinZIP, WinRAR or 7ZIP and get hold of the payload.bin file.
- Now, for extracting the Payload.bin file, you need a Payload Dumper Tool . We would like to thank Gregory Montoir for creating this tool. You could download it from the following link: payload_dumper.zip
- Likewise, you should also have to install Python on your PC. Download Python v3.8.5 (latest version at the time of writing).
STEP 1: Install Python on your PC
- Launch the Python EXE setup file. It will then ask for the installation directory. Click on Install Now if you wish to proceed with the default one, which would make it easier for you to follow this guide. Or you could also click Customize Installation if you want to change the directory.
- Whatever installation directory you end up choosing, make sure to keep a note of it as it will be needed later on. The installation process will be completed within a minute or two. When that is done, hit the Close button to exit the setup wizard.
STEP 2: Install Payload Dumper file
Now that you have installed Python, you could proceed with the extraction of the Payload.bin file and then get the stock boot image file. For that, we will be making use of the Payload Dumper Tool. Follow the below steps for that:
- Extract all the contents of the Payload Dumper Tool inside the folder where you have extracted Python.
- If you have chosen the default directory while installing Python, then the contents should be extracted inside: C:\Users\USER-NAME\AppData\Local\Programs\Python\Python
STEP 3: Extract Payload.Bin
- Now copy the payload.bin file from the ROM and move it to the folder where you have installed Python.
- Hence, this directory will now have the Payload Dumper Tool, the payload.bin file, and the Python software.
- Inside the same folder, type in CMD in the address bar and hit Enter. This will launch the Command Prompt.
- Type in the below command to install the necessary dependencies: python -m pip install -r requirements.txt
- Finally, execute the below command to extract all the contents of the payload.bin file. It will take some time, depending on the size of the package. python payload_dumper.py payload.bin
- In our case, the payload.bin file gave us three files: boot, system, and vendor. In some cases, you could also get dtbo, and a couple of other files as well. That is not an issue. We will show you how to deal with that as well.
- Anyways, moving on, once the process is complete, all the extracted files be placed in a folder named Output. If you have installed python in the default directory, then the location of the output folder will be: C:\Users\USER-NAME\AppData\Local\Programs\Python\Python
/Output
So these were the steps to extract the payload.bin file and get the stock boot.img. Let’s now check out how this could be done directly on your Android device, without using a PC.
METHOD 3: Extract Payload.bin Directly on Android Without PC [NEW]

There exists two different tools that will help you extract the payload.bin without PC, this one and the next one. The biggest advantage with this tool is that it doesn’t eequire you to install Python and execute any commands whatsoever. As a result of which, this is an extremely fast tool and gets the job done within seconds.
- First off, download and install Payload-Dumper-Android .
- Then launch it and give it the file access.
- Now tap on plus and select the payload.bin/OTA ZIP file.
- It will load the firmware. Select the desired files that you need to extract.
- You may choose multiple files at once as well. Once done, hit Extract.
- Th files will be extracted and placed inside the folder named after the firmware.
METHOD 4: Extract Payload.bin Directly on Android Without PC

The below instructions are listed under separate sections for ease of understanding. Make sure to follow in the exact same sequence as mentioned. Droidwin and its members wouldn’t be held responsible in case of a thermonuclear war, your alarm doesn’t wake you up, or if anything happens to your device and data by performing the below steps.
STEP 1: Setup Payload Dumper Tool
- To begin with, download the Payload Dumper Tool on your device.
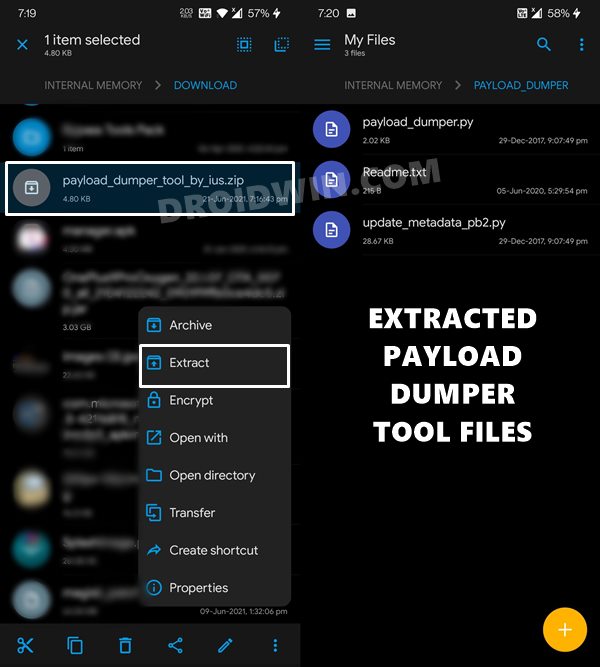
- Then extract it to the root of the Internal Storage, i.e. not inside any folder.
STEP 2: Get the Payload.Bin File
- Now download the ROM/firmware of your choice and extract the payload.bin file from it. If you have downloaded the OnePlus firmware, then it might be in a filename.zip.jar extension.
- You need to rename it and remove the JAR at the end so that it becomes filename.zip. Now extract this ZIP firmware and you will get the payload.bin file.
- Once you have got the payload.bin file, transfer it to the same folder where you have extracted the Payload Dumper Tool.
STEP 3: Setup Python on Android
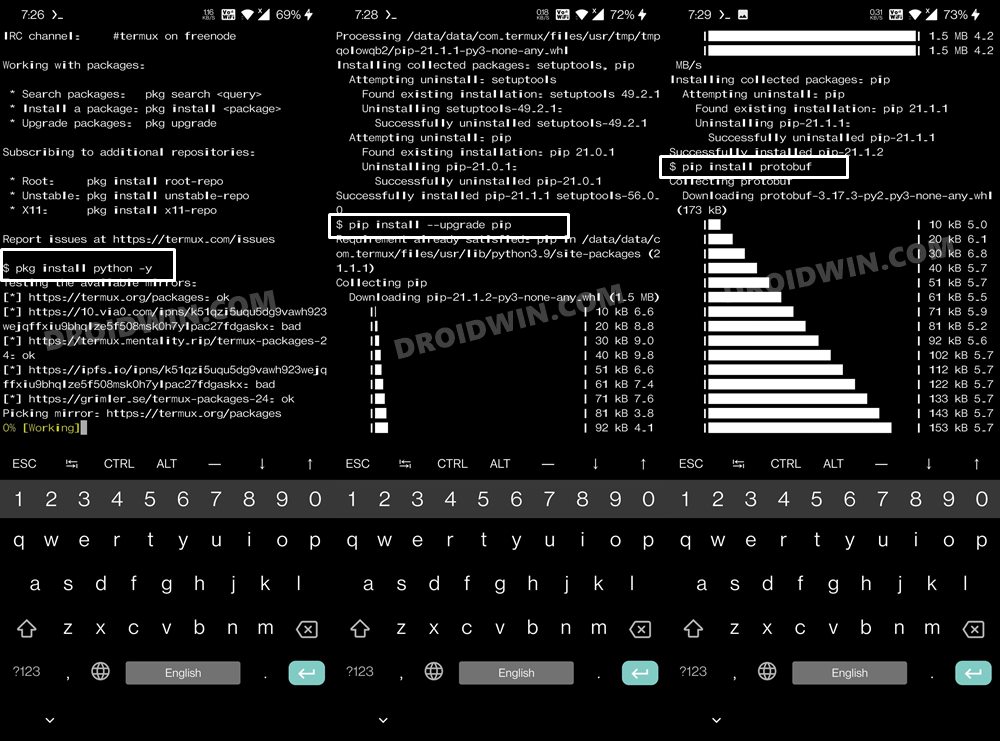
- Next up, download and install the Termux App on your device.
- Then launch the app and execute the below four commands. Type in the first command, hit Enter, type in the next command, and so on. While you do so, it might ask you to install additional dependencies, make sure to type in Y and hit Enter. pkg install python -y pip install –upgrade pip pip install protobuf apt update && apt upgrade -y
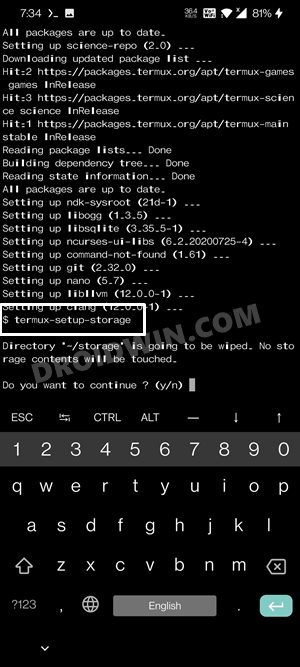
STEP 4: Grant Storage Permission
After this, grant the storage permission to Termux via the below command. You might get a warning from termux that “storage partition is going to be wiped but no storage contents will be touched” . You need to type in Y and hit Enter. Don’t worry, you wouldn’t lose any data. I have personally tried it on my device as well and there was no data loss.
termux-setup-storage
STEP 5: Change Termux Directory to Payload.Bin File
You will now have to change the Termux’s directory to the folder where you have placed the payload.bin file. In our case, that is the Internal Storage’s payload_dumper folder (this folder you would have got after extracting the Payload Dumper Tool). Anyways, the command to change the directory is:
cd storage/shared/payload_dumper
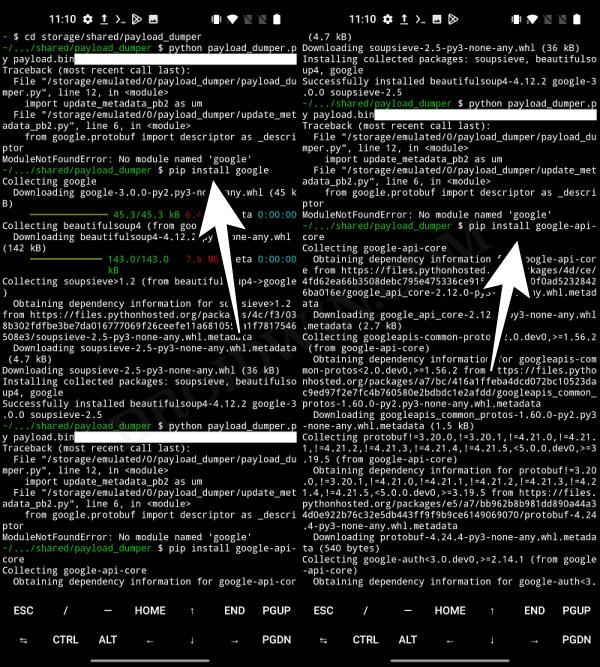
STEP 6: Install Google APIs Dependencies
Next up, you’ll have to install a couple of Google API dependencies in Python. For that, just copy and paste the below two commands in the Termux window:
pip install google

pip install google-api-core
STEP 7: Extract payload.bin on Android
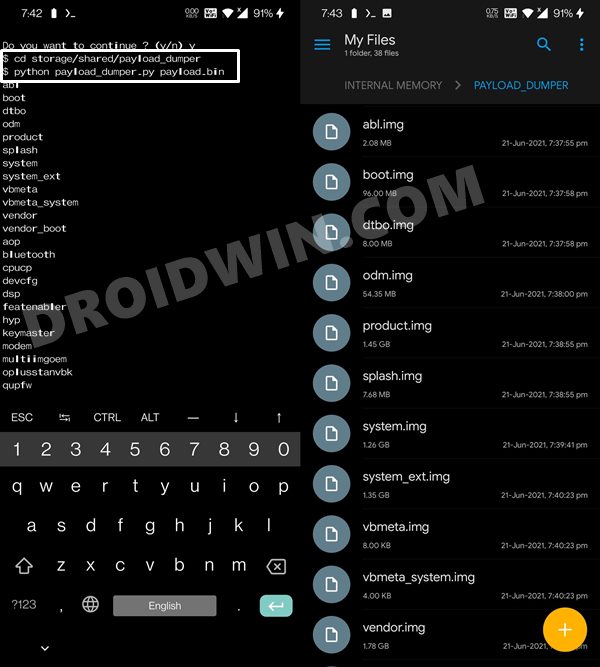
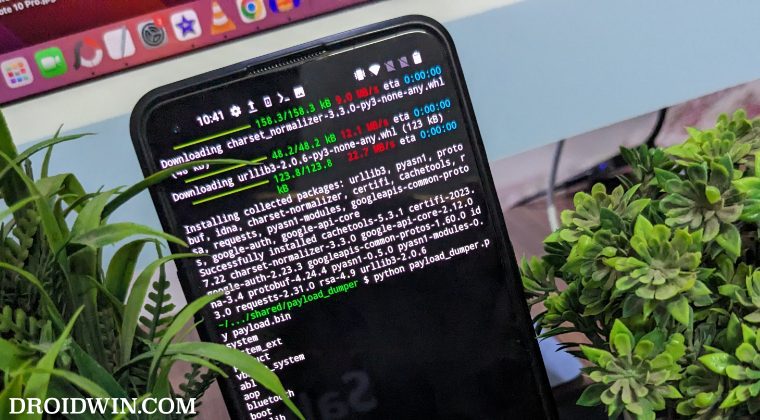
- Finally, execute the below command to extract the payload.bin file directly on your Android device without using PC: python payload_dumper.py payload.bin
- The extraction process will now being and once done, you shall get all the partition files inside the payload_dumper folder.
METHOD 5: Extract Payload.bin via Payload Dumper Go
- To begin with, download the payload-dumper-go 1.0.0 from Github [Credits: XDA Member ssssut ].
- Then extract it to any convenient location on your PC. The name of the file will be something like payload-dumper-go_1.0.0_windows_amd64. Rename it to payload-dumper-go.
- Next up, download the liblzma-5.dll file and transfer it to the same folder where the payload-dumper-go.exe file is present.
- After that, transfer the payload.bin file to this folder as well.
- So as of now, you should have the payload-dumper-go.exe, payload.bin, and liblzma-5.dll files all under one folder.
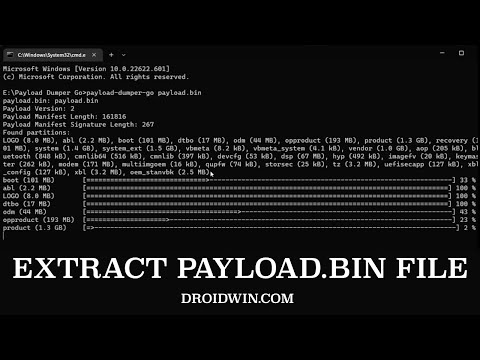
- Now head over to that folder’s address bar, type in CMD, and hit Enter. This shall launch the Command Prompt window.
- Type in the below command to extract the payload.bin file: payload-dumper-go payload.bin
- The extraction process will now begin and would only take a few seconds.
- Once done , all the extracted files will be placed under a folder named extracted_date_time that is created inside that directory.
That is it. With this, you have successfully extracted the payload.bin file and got the stock boot image file via the Payload dumper tool and Python. Along the same lines, we have also shared the steps to do via the Payload Go Tool which as of now, seems to be the best method for this job.

- cbd gummies 10 months ago Reply I’ve started using CBD gummies, and they’ve made a noticeable difference in my routine. They’re easy to make use of, disposition great, and take under one’s wing a simple spirit to incorporate CBD into my day. I’ve rest they advise me moderate and emend my zizz after a long period, which has been a gargantuan benefit. The consistent CBD dosage in each gummy is a mature increased by for managing intake. If you’re considering CBD, gummies are an excellent recourse to start with—ethical obtain infallible you on a steady brand for the benefit of the best results!
- Vladimir 3 years ago Reply Hello sir. I got an error while dumping the payload.bin file with the python script. C:\Users\notad\AppData\Local\Programs\Python\Python311>python payload_dumper.py payload.bin Traceback (most recent call last): File “C:\Users\notad\AppData\Local\Programs\Python\Python311\payload_dumper.py”, line 12, in import update_metadata_pb2 as um File “C:\Users\notad\AppData\Local\Programs\Python\Python311\update_metadata_pb2.py”, line 8, in from google.protobuf import reflection as _reflection File “C:\Users\notad\AppData\Local\Programs\Python\Python311\Lib\site-packages\google\protobuf\reflection.py”, line 58, in from google.protobuf.internal import python_message as message_impl File “C:\Users\notad\AppData\Local\Programs\Python\Python311\Lib\site-packages\google\protobuf\internal\python_message.py”, line 62, in from google.protobuf.internal import containers File “C:\Users\notad\AppData\Local\Programs\Python\Python311\Lib\site-packages\google\protobuf\internal\containers.py”, line 182, in MutableMapping = collections.MutableMapping ^^^^^^^^^^^^^^^^^^^^^^^^^^ AttributeError: module ‘collections’ has no attribute ‘MutableMapping’ Please tell me how i can fix this because i am completely stuck here. Vladimir 3 years ago Reply Nevermind, all that was neede for it to work was python 3.7.4 not .11
- Yograt 3 years ago Reply Traceback (most recent call last): File “C:\Users\user\AppData\Local\Programs\Python\Python310\payload_dumper.py”, line 12, in import update_metadata_pb2 as um File “C:\Users\user\AppData\Local\Programs\Python\Python310\update_metadata_pb2.py”, line 8, in from google.protobuf import reflection as _reflection File “C:\Users\user\AppData\Local\Programs\Python\Python310\lib\site-packages\google\protobuf\reflection.py”, line 58, in from google.protobuf.internal import python_message as message_impl File “C:\Users\user\AppData\Local\Programs\Python\Python310\lib\site-packages\google\protobuf\internal\python_message.py”, line 62, in from google.protobuf.internal import containers File “C:\Users\user\AppData\Local\Programs\Python\Python310\lib\site-packages\google\protobuf\internal\containers.py”, line 182, in MutableMapping = collections.MutableMapping AttributeError: module ‘collections’ has no attribute ‘MutableMapping’ Can somebody help me i ran into this problem Vladimir 3 years ago Reply Use python 3.7.4, worked for me just fine Vladimir 3 years ago Reply Consider installing python 3.7.4, it worked in my case.
- Alex 3 years ago Reply C:\Users\Admin\AppData\Local\Programs\Python\Python311>python payload_dumper.py payload.bin Traceback (most recent call last): File “C:\Users\Admin\AppData\Local\Programs\Python\Python311\payload_dumper.py”, line 12, in import update_metadata_pb2 as um File “C:\Users\Admin\AppData\Local\Programs\Python\Python311\update_metadata_pb2.py”, line 8, in from google.protobuf import reflection as _reflection File “C:\Users\Admin\AppData\Local\Programs\Python\Python311\Lib\site-packages\google\protobuf\reflection.py”, line 58, in from google.protobuf.internal import python_message as message_impl File “C:\Users\Admin\AppData\Local\Programs\Python\Python311\Lib\site-packages\google\protobuf\internal\python_message.py”, line 62, in from google.protobuf.internal import containers File “C:\Users\Admin\AppData\Local\Programs\Python\Python311\Lib\site-packages\google\protobuf\internal\containers.py”, line 182, in MutableMapping = collections.MutableMapping ^^^^^^^^^^^^^^^^^^^^^^^^^^ AttributeError: module ‘collections’ has no attribute ‘MutableMapping’ C:\Users\Admin\AppData\Local\Programs\Python\Python311> Whats wrong? Vladimir 3 years ago Reply Use python 3.7.4, worked for me just fine.
- Venkatesh 4 years ago Reply HI, Actually my Oneplus nord CE OS version is 11.0.17.17.EB13DA and im not getting the firmware anywhere in the official website also its not there. I need boot image for 11.0.17.17.EB13DA for this.. can you please help me.
- Max 4 years ago Reply Hi! None of the methods worked for me. And when I extract using Payload Dumper Go, all the files in the folder have zero size! What should I do? I really hope for your help! https://ibb.co/nRZnzGX
- Renold 4 years ago Reply Once we have all the Images where does each one get flashed to ?
- steps parku 4 years ago Reply payload-dumper-go>payload-dumper-go payload.bin ‘payload-dumper-go’ is not recognized as an internal or external command, operable program or batch file. i keep getting this using the method three.
- Jay 4 years ago Reply Hello Sadique, Thank you for the full explanation on this topic. However whenever i type in the command “python payload_dumper.py payload.bin” i get the following error message: ” AttributeError: module ‘collections’ has no attribute ‘MutableMapping’ ” Do you have any idea what this could be?
- AbdAllah Alatiani 4 years ago Reply u r great
- nazar 4 years ago Reply cant find requirement.txt file after installation of python and extracting payload dumper. After extracting payload dumper zip file i got payload dumper folder, So i copied all the file which is in the payload dumper folder into python “version” folder and copied payload.bin in the same python “version” folder. But when i execute this command “python -m pip install -r requirements.txt” its sales there is no file requirements.txt means requirements.txt file is missing and i too cant see any text file named “requirements” in the python folder
- Mario 4 years ago Reply Hello, I have followed you instructions but nothing working ( A lot of errors ) 1- Installed Python 2- OTA downloaded and extracted 3- Dumper downlloaded and extracted. And copy the extracted files “OTA + Dumper” in C:\Users\Administrator\AppData\Local\Programs\Python\Python37. and run your commands and have this errors ( sreenshot at the below link ) https://ibb.co/T24Bhgs Please your help.
- Mario 4 years ago Reply C:\Users\Administrator\AppData\Local\Programs\Python\Python310>python -m pip install -r requirements.txt Requirement already satisfied: protobuf==3.6.0 in c:\users\administrator\appdata\roaming\python\python310\site-packages (from -r requirements.txt (line 1)) (3.6.0) Requirement already satisfied: six==1.11.0 in c:\users\administrator\appdata\roaming\python\python310\site-packages (from -r requirements.txt (line 2)) (1.11.0) Collecting bsdiff4>=1.1.5 Using cached bsdiff4-1.2.1.tar.gz (11 kB) Preparing metadata (setup.py) … done Requirement already satisfied: setuptools in c:\users\administrator\appdata\local\programs\python\python310\lib\site-packages (from protobuf==3.6.0->-r requirements.txt (line 1)) (58.2.0) Building wheels for collected packages: bsdiff4 Building wheel for bsdiff4 (setup.py) … error ERROR: Command errored out with exit status 1: command: ‘C:\Users\Administrator\AppData\Local\Programs\Python\Python310\python.exe’ -u -c ‘import io, os, sys, setuptools, tokenize; sys.argv[0] = ‘”‘”‘C:\Users\Administrator\AppData\Local\Temp\pip-install-m_3xqtjm\bsdiff4_5e091b422b9a4c129167b6824f76a380\setup.py’”‘”‘; file=’”‘”‘C:\Users\Administrator\AppData\Local\Temp\pip-install-m_3xqtjm\bsdiff4_5e091b422b9a4c129167b6824f76a380\setup.py’”‘”‘;f = getattr(tokenize, ‘”‘”‘open’”‘”‘, open)(file) if os.path.exists(file) else io.StringIO(‘”‘”‘from setuptools import setup; setup()’”‘”‘);code = f.read().replace(‘”‘”‘\r\n’”‘”‘, ‘”‘”‘\n’”‘”‘);f.close();exec(compile(code, file, ‘”‘”‘exec’”‘”‘))’ bdist_wheel -d ‘C:\Users\Administrator\AppData\Local\Temp\pip-wheel-tqynnmc0’ cwd: C:\Users\Administrator\AppData\Local\Temp\pip-install-m_3xqtjm\bsdiff4_5e091b422b9a4c129167b6824f76a380\ Complete output (13 lines): running bdist_wheel running build running build_py creating build creating build\lib.win-amd64-3.10 creating build\lib.win-amd64-3.10\bsdiff4 copying bsdiff4\cli.py -> build\lib.win-amd64-3.10\bsdiff4 copying bsdiff4\format.py -> build\lib.win-amd64-3.10\bsdiff4 copying bsdiff4\test_all.py -> build\lib.win-amd64-3.10\bsdiff4 copying bsdiff4_init_.py -> build\lib.win-amd64-3.10\bsdiff4 running build_ext building ‘bsdiff4.core’ extension error: Microsoft Visual C++ 14.0 or greater is required. Get it with “Microsoft C++ Build Tools”: https://visualstudio.microsoft.com/visual-cpp-build-tools/ —————————————- ERROR: Failed building wheel for bsdiff4 Running setup.py clean for bsdiff4 Failed to build bsdiff4 Installing collected packages: bsdiff4 Running setup.py install for bsdiff4 … error ERROR: Command errored out with exit status 1: command: ‘C:\Users\Administrator\AppData\Local\Programs\Python\Python310\python.exe’ -u -c ‘import io, os, sys, setuptools, tokenize; sys.argv[0] = ‘”‘”‘C:\Users\Administrator\AppData\Local\Temp\pip-install-m_3xqtjm\bsdiff4_5e091b422b9a4c129167b6824f76a380\setup.py’”‘”‘; file=’”‘”‘C:\Users\Administrator\AppData\Local\Temp\pip-install-m_3xqtjm\bsdiff4_5e091b422b9a4c129167b6824f76a380\setup.py’”‘”‘;f = getattr(tokenize, ‘”‘”‘open’”‘”‘, open)(file) if os.path.exists(file) else io.StringIO(‘”‘”‘from setuptools import setup; setup()’”‘”‘);code = f.read().replace(‘”‘”‘\r\n’”‘”‘, ‘”‘”‘\n’”‘”‘);f.close();exec(compile(code, file, ‘”‘”‘exec’”‘”‘))’ install –record ‘C:\Users\Administrator\AppData\Local\Temp\pip-record-ge3lxej1\install-record.txt’ –single-version-externally-managed –compile –install-headers ‘C:\Users\Administrator\AppData\Local\Programs\Python\Python310\Include\bsdiff4’ cwd: C:\Users\Administrator\AppData\Local\Temp\pip-install-m_3xqtjm\bsdiff4_5e091b422b9a4c129167b6824f76a380\ Complete output (13 lines): running install running build running build_py creating build creating build\lib.win-amd64-3.10 creating build\lib.win-amd64-3.10\bsdiff4 copying bsdiff4\cli.py -> build\lib.win-amd64-3.10\bsdiff4 copying bsdiff4\format.py -> build\lib.win-amd64-3.10\bsdiff4 copying bsdiff4\test_all.py -> build\lib.win-amd64-3.10\bsdiff4 copying bsdiff4_init_.py -> build\lib.win-amd64-3.10\bsdiff4 running build_ext building ‘bsdiff4.core’ extension error: Microsoft Visual C++ 14.0 or greater is required. Get it with “Microsoft C++ Build Tools”: https://visualstudio.microsoft.com/visual-cpp-build-tools/ —————————————- ERROR: Command errored out with exit status 1: ‘C:\Users\Administrator\AppData\Local\Programs\Python\Python310\python.exe’ -u -c ‘import io, os, sys, setuptools, tokenize; sys.argv[0] = ‘”‘”‘C:\Users\Administrator\AppData\Local\Temp\pip-install-m_3xqtjm\bsdiff4_5e091b422b9a4c129167b6824f76a380\setup.py’”‘”‘; file=’”‘”‘C:\Users\Administrator\AppData\Local\Temp\pip-install-m_3xqtjm\bsdiff4_5e091b422b9a4c129167b6824f76a380\setup.py’”‘”‘;f = getattr(tokenize, ‘”‘”‘open’”‘”‘, open)(file) if os.path.exists(file) else io.StringIO(‘”‘”‘from setuptools import setup; setup()’”‘”‘);code = f.read().replace(‘”‘”‘\r\n’”‘”‘, ‘”‘”‘\n’”‘”‘);f.close();exec(compile(code, file, ‘”‘”‘exec’”‘”‘))’ install –record ‘C:\Users\Administrator\AppData\Local\Temp\pip-record-ge3lxej1\install-record.txt’ –single-version-externally-managed –compile –install-headers ‘C:\Users\Administrator\AppData\Local\Programs\Python\Python310\Include\bsdiff4’ Check the logs for full command output. C:\Users\Administrator\AppData\Local\Programs\Python\Python310>
- AMaha 5 years ago Reply Hello Sadique, Thanks for taking your time to write the helpful tutorial. I seem to have issues with the output file: it finished extracting several img files with various file sizes ( anywhere from 3.7 GB to 200 KB). The boot.img file came about to be about 96 MB. Isn’t it too small for a recovery image? The original payload.bin file was 2.4 GB. Thanks Sadique Hassan 5 years ago Reply Hi Amaha, the boot.img file size is perfectly fine. Actually, it is the system.img file that takes up most of the file size.
- Steve Fox 5 years ago Reply haha, nevermind. You wanted all the contents of the payload_dumper directory dumped into Python39, just like you said… Feel free to ditch all my comments, and thank you for precise and wonderful tutorial 🙂 Sadique Hassan 5 years ago Reply Sorry for the delay, glad that it worked for you in the end 🙂
- Steve Fox 5 years ago Reply Hi, Now I’m getting the following: python: can’t open file ‘C:\Users\aiiee\AppData\Local\Programs\Python\Python39\payload_dumper.py’: [Errno 2] No such file or directory
- Steve Fox 5 years ago Reply So I moved “requirements.txt” from the payload_dumper folder in Python39 and it seemed to work. Did I miss a step? I wouldn’t be surprised if I did :/
- mohsen2000 5 years ago Reply Hi..I went through all the steps correctly and accessed many files but I can not find the boot.img file, even in the outpot I can not find this file Sadique Hassan 5 years ago Reply Hi Mohsen, was there any file in the output folder? Furthermore. please let me know your device name as well.
- oof 5 years ago Reply first of all, how do i obtain payload.bin because literally all tutorials on the internet assume you already have payload.bin which is ultra annoying Sadique Hassan 5 years ago Reply Hi, the payload.bin file is present inside the stock firmware itself. Edit: I have also updated the prerequisites section with the same information
- Kiran Gadge 5 years ago Reply Could you rectify the typo in command “python paylod_dumper.py payload.bin” it should be “payload”. Thanks for the useful guide. Sadique Hassan 5 years ago Reply Apologies for the mistake and thank you so much for pointing it out.
- Hope 5 years ago Reply Thanks for tutorial I’m so helpful. Sadique Hassan 5 years ago Reply Thanks for the encouraging words.
- Hope Elifala 5 years ago Reply You are really doing a great job. I really appreciate all the help you have given on this website. Keep up the recommendable work. 😊 Sadique Hassan 5 years ago Reply Thank you so much for your valuable feedback 🙂 These are the type of comments that motivate me to keep on going ahead 😀 smudger 2 years ago Reply Incredibly useful topic for how to restore Magisk root after OTA Rom updates. Great job. However, though this is great info for ROM distributed in zip for installation from stock recovery, isn’t an easier alternative to download the Fastboot ROM versions OEM’s provide in .tgz format for fastboot flashing? Zip Archiver app (unlike others I tested) successfully unpacked all the archive and revealed the boot.img file inside the images folder of the archive! Then iirc Magisk can patch it. After which I transferred the patch boot img to laptop for fastboot flashing of the boot img over the unpatched stock. Rhob 5 years ago Reply Thanks so much for yours tutorials, very nice by you I leraning a lot them, please dont stop, thanks Sadique Hassan 5 years ago Reply Hi Rhob, thanks for the appreciation 🙂
(Cancel Reply)
Δ
