How to Fix ‘App Was Denied Access’ Permission Issue on Android
In this guide, we will show you a couple of handy methods that should help you fix the “App Was Denied Access” permission issue on your Android device. Google has recently tightened up the screws when it comes to the security aspect. While it was never a fan of sideloading third-party apps, it has now taken a step ahead and given us the best example of the same.
While installing some third-party apps, especially those requiring accessibility permissions or system-level access [such as making a dialer or messaging app the default one], you might be greeted with the App was denied permission pop-up. This is because the OS believes using this app can put “our personal and financial info at risk.”

While warning of a risk is always welcomed, however, what we don’t like is putting unnecessarily stringent measures on it. Rather than giving us the option to accept the risk and proceed ahead, it would simply block any further steps that we could take. Fortunately, there are a couple of handy workarounds that should help you address this bug. So without further ado, let’s check them out.
- How to Fix App Was Denied Access Permission Issue on Android FIX 1: Via App Info Page FIX 2: Via Shizuku
How to Fix App Was Denied Access Permission Issue on Android
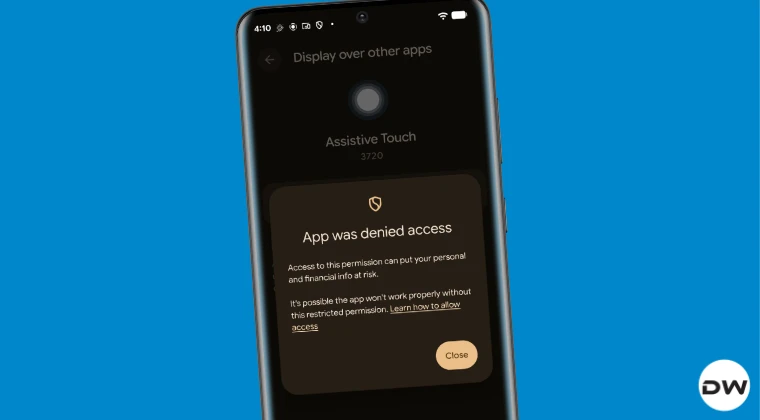
It is recommended that you try out each of the below-mentioned workarounds and then see which one spells out success. For the sake of reference, we will be installing the Assistive Touch app [it’s an accessibility app, which Google hates sideloading to the core!]. With that said, the steps will remain the same for all the apps. So with that in mind, let’s get started.

FIX 1: Via App Info Page
Benefit: It is the easier and shorter of the two methods and doesn't require any help from a third-party app.

Drawback: Might not work for some apps.
- Long-press the app’s icon and select App Info.
- Then tap on the overflow icon at the top right.
- Once done, select “Allow Restricted Settings”.
- Now, try giving it the accessibility permission.
NOTE: If there’s no overflow icon at the top right, then this method will not work, and you’ll have to try out the next one.
FIX 2: Via Shizuku
Benefit: Will work for all Android apps.

Drawback: Lengthier of the two methods and requires installing a couple of apps.
- To begin with, download, install, and set up the Shizuku app.
- Now, download and install InstallWithOptions from its GitHub.
- Then launch it and tap Allow all the time in the Shizuku prompt.
- Next, check Allow Restricted Permissions and tap Choose Files.
- Select the desired APK file and hit Install. It will now be installed.
- So, launch it and try giving it the accessibility permission now.
- You have disabled a required permission on Android: How to Fix
- Fix Android 14 Photo Picker Permission dialog box not appearing
- Android App Permissions not being saved: How to Fix This Issue?
- How to Remove Fingerprint Icon from the Lock Screen on Android

(Cancel Reply)
Δ
How to Remove Fingerprint Icon from Lock Screen on Android
In this guide, we will show you the steps to remove the fingerprint icon from the lock screen on your Android device. Thanks to the open-source nature of the OS, you can carry out a plethora of tweaks on your device. While most of them tend to add new features or remove the unnecessary ones, there are a few that might leave some of your heads scratching. And the one which we are discussing here is just that.
There’s no use case or benefit as such for removing the fingerprint icon from the lock screen on your Android device [well, apart from giving you a cleaner lock screen!], but after all, not every tweak deserves an explanation, and some are done just for fun. And the one which we are discussing here falls in this category. So, on that note, let’s hop onto this intriguing journey and show you the steps to get this job done right away!
- How to Remove the Fingerprint Icon from the Lock Screen on Android
- How to Remove the Fingerprint Icon from the AOD Screen on Android
- How to Bring Back the Fingerprint Icon
How to Remove the Fingerprint Icon from the Lock Screen on Android
This tweak has been tested on Samsung devices, including the latest S25 series. It may or may not work on other Android devices, though you may still give it a try because there’s nothing to lose!
- First off, download and install the SetEdit app from the Play Store.
- Now download & extract Android SDK Platform Tools on your PC.
- Then enable USB Debugging on your device and connect it to your PC.
- Now open Command Prompt inside the platform-tools folder and type: adb shell pm grant by4a.setedit22 android.permission.WRITE_SECURE_SETTINGS
- Now launch SetEdit and select Secure Table from the right-hand side.
- Finally, set the value of the “fingerprint_screen_on_icon_lock” to 0.
How to Remove the Fingerprint Icon from the AOD Screen on Android
Change the value of “fingerprint_screen_off_icon_aod” to 0 from 2 to remove the fingerprint icon from the AOD screen.
How to Bring Back the Fingerprint Icon
Change the value of “fingerprint_screen_on_icon_lock” back to its default value, which is 2, and the fingerprint icon will be back in the lock screen. Likewise, change the value of “fingerprint_screen_off_icon_aod” to 2 to bring back the icon on the AOD screen.
- WhatsApp Fingerprint Lock not working [Fixed]
- How to Add Genshin Fingerprint Animation on OnePlus
- Google Wallet crashes via Fingerprint on Lock Screen [Fixed]
- Fix Fingerprint Sensor not working on Pixel Android 14
(Cancel Reply)
Δ
