How to Flash Custom Kernel on Nothing Phone 2
This guide will show you the steps to flash the custom kernel on your Nothing Phone 2. The second iteration in the Nothing lineup does behold quite an impressive list of features on paper. And for generic users, this should be more than enough. However, for power-hungry users like us, it might not be able to checkmark all our requirements. More so when we are using an open source OS like Android, why not exploit and extract maximum potential out of it.
Well, this is where the role of custom kernels comes into the picture. In this regard, one of the most reputed XDA developers arter97 has just ported a custom kernel for our beloved Nothing Phone 2. As a result of this, you could welcome abode a slew of intriguing tweaks, including the likes of Power optimizations, Memory management optimizations, I/O schedules, Optimized ZRAM, and a plethora of other goodies. So without any further ado, let’s get started with the installation steps.
- How to Flash Custom Kernel on Nothing Phone 2 STEP 1: Install Android SDK STEP 2: Enable USB Debugging and OEM Unlocking STEP 3: Unlock Bootloader on Nothing Phone 2 STEP 4: Download Custom Kernel for Nothing Phone 2 STEP 5: Boot to Fastboot Mode STEP 6A: Using Fastboot Command STEP 6B: Using Kernel Flasher App STEP 6C: Via Custom Recovery
How to Flash Custom Kernel on Nothing Phone 2

Before starting with the below process, please take a backup of the stock boot.img file from the stock firmware that is currently installed on your device [you could verify the same from Build Number]. In case something goes wrong while or after flashing the custom kernel, you just need to flash the stock kernel, and your device will be up and running. Apart from that, it’s also recommended to take a data backup, just to be on the safer side.
Droidwin and its members wouldn’t be held responsible in case of a thermonuclear war, your alarm doesn’t wake you up, or if anything happens to your device and data by performing the below steps.
STEP 1: Install Android SDK

First and foremost, you will have to install the Android SDK Platform Tools on your PC. This is the official ADB and Fastboot binary provided by Google and is the only recommended one. So download it and then extract it to any convenient location on your PC. Doing so will give you the platform-tools folder, which will be used throughout this guide.
STEP 2: Enable USB Debugging and OEM Unlocking
Next up, you will also have to enable USB Debugging and OEM Unlocking on your device. The former will make your device recognizable by the PC in ADB mode. This will then allow you to boot your device to Fastboot Mode. On the other hand, OEM Unlocking is required to carry out the bootloader unlocking.
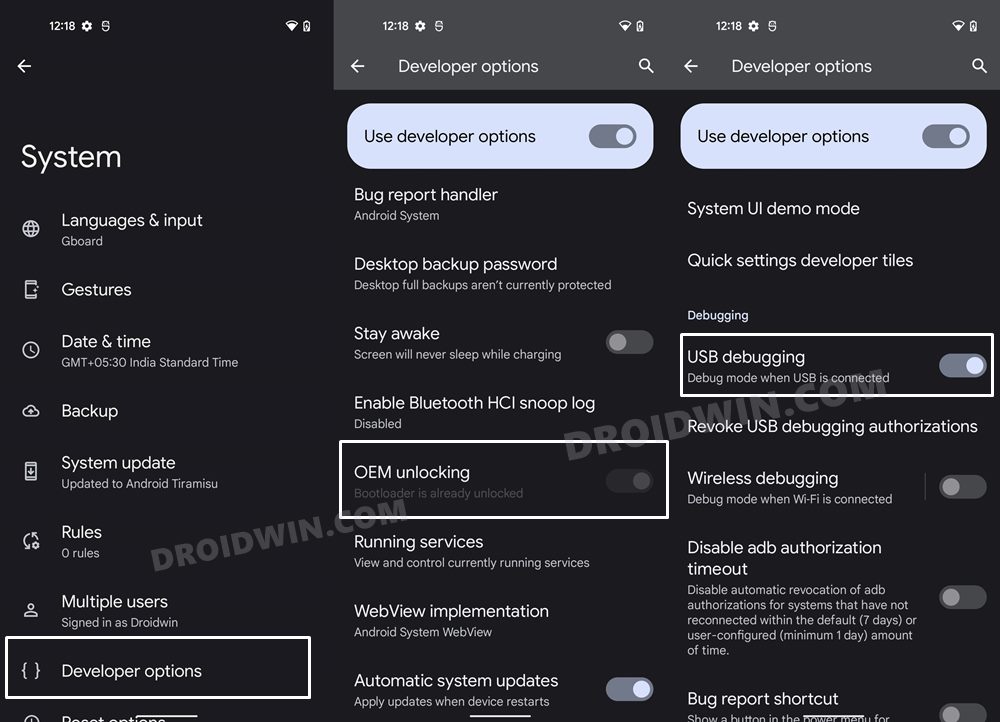
So head over to Settings > About Phone > Tap on Build Number 7 times > Go back to Settings > System > Advanced > Developer Options > Enable USB Debugging and OEM Unlocking.
STEP 3: Unlock Bootloader on Nothing Phone 2
Next up, you will also have to unlock the device’s bootloader. Do keep in mind that doing so will wipe off all the data from your device and could nullify its warranty as well. So if that’s all well and good, then please refer to our detailed guide on How to Unlock Bootloader on Nothing Phone 2 .
STEP 4: Download Custom Kernel for Nothing Phone 2
- You can now grab hold of the custom kernel for your device from below arter97 kernel: DOWNLOAD LINK
- Once downloaded, rename the file to kernel.img and transfer it to the platform-tools folder.
STEP 5: Boot to Fastboot Mode
- Now connect your device to the PC via a USB cable. Make sure USB Debugging is enabled.
- Then head over to the platform-tools folder, type in CMD in the address bar, and hit Enter. This will launch the Command Prompt.
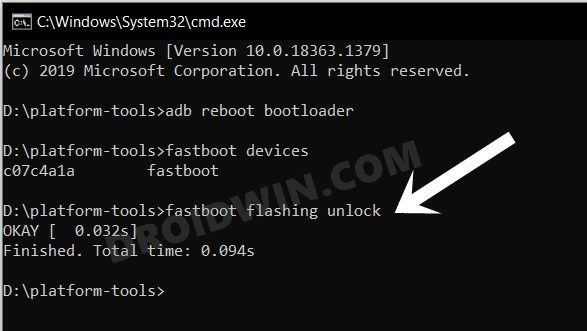
- Type in the following command in the CMD window to boot your device to Fastboot Mode adb reboot bootloader
- To verify the Fastboot connection, type in the below command and you should get back the device ID. fastboot devices
- If you don’t get any serial ID, then install Fastboot Drivers on your PC.
STEP 6A: Using Fastboot Command
The easiest and most straightforward out of the three kernel flashing methods, this is usually the go-to choice for the masses.
- Type in the below command to flash the custom kernel onto your device: fastboot flash boot kernel.img
- Now type in the below command to boot your device to the OS: fastboot reboot
STEP 6B: Using Kernel Flasher App
You can also flash the kernel using a kernel flasher app, however, that would require your device to be rooted beforehand [ How to Root Nothing Phone 2 via Magisk ]. If that’s all well and good, then here’s how you can get this job done
- Install the Kernel Flasher App from GitHub.
- Launch it and grant it the SuperUser request.
- Choose Slot A > Flash partition image > boot.
- Once flashed, restart your device and that’s it.
STEP 6C: Via Custom Recovery
If you don’t want to root your device, then you can also take the help of a custom recovery to get this job done. Here’s how:
- First off, install a custom recovery onto your device.
- Then boot your device to it via the below command: adb reboot recovery
- Now go to Install > Install Image > select boot.img.
- Then choose the boot partition and swipe to flash it.
- Finally, head to Reboot > System to boot to the OS.
- How to Install Custom ROMs on Nothing Phone 2
- How to Install TWRP Recovery on Nothing Phone 2
- Nothing Phone 2 Refresh Rate might be on 120Hz even on AOD
- How to Unbrick Nothing Phone 2 via EDL Firmware and Flash Tool

(Cancel Reply)
Δ
