How to Install Android 12 ROM on OnePlus 6
In this guide, we will show you the steps to install the Android 12 AOSP Custom ROM onto your OnePlus 6 device. The devices from this Chinese OEMhave always been known to be quite an active player in custom development. And their sixth iteration is a perfect example of the same. While it has been close to four years since this device first made its way, but even today it is among the most talked-about devices by the tech enthusiast.
Moreover, these devices were the first in the lineup to introduce us to the A/B partition scheme. As a result of which, there was always an element of anticipation involved whole flashing any custom binaries. While the device has made its course for the official OS upgrades, but you could still welcome the latest OS build, via the custom ROM route. And in this guide, we will help you traverse that path. Given here are the steps to install the Android 12 AOSP Custom ROM onto your OnePlus 6 device. Follow along.
- How to Install Android 12 ROM on OnePlus 6 STEP 1: Install Android SDK STEP 2: Enable USB Debugging and OEM Unlocking STEP 3: Unlock Bootloader on OnePlus 6 STEP 4: Download Android 12 ROM for OnePlus 6 Features Bugs Screenshots Download Link STEP 5: Boot to TWRP Recovery STEP 6: Flash Android 12 ROM on OnePlus 6 via TWRP
How to Install Android 12 ROM on OnePlus 6

The below process will wipe off all the data from your device. So please take a complete device backup beforehand and only then proceeding with the installation steps. Droidwin and its members wouldn’t be held responsible in case of a thermonuclear war, your alarm doesn’t wake you up, or if anything happens to your device and data by performing the below steps.
STEP 1: Install Android SDK

First and foremost, you will have to install the Android SDK Platform Tools on your PC. This is the official ADB and Fastboot binary provided by Google and is the only recommended one. So download it and then extract it to any convenient location on your PC. Doing so will give you the platform-tools folder, which will be used throughout this guide.
STEP 2: Enable USB Debugging and OEM Unlocking
Next up, you will have to enable USB Debugging and OEM Unlocking on your device. The former will make your device recognizable by the PC in ADB mode. This will then allow you to boot your device to Fastboot Mode. On the other hand, OEM Unlocking is required to carry out the bootloader unlocking process.
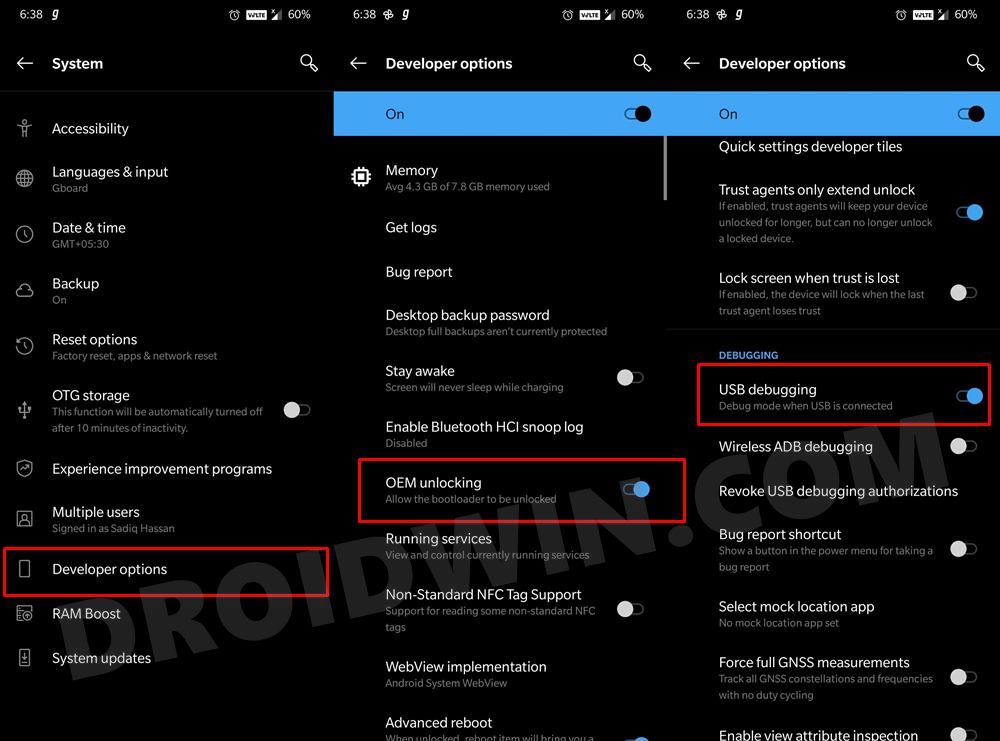
So head over to Settings > About Phone > Tap on Build Number 7 times > Go back to Settings > System > Advanced > Developer Options > Enable USB Debugging and OEM Unlocking.
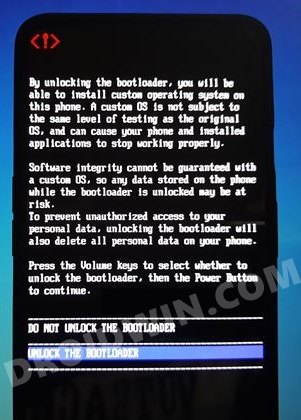
STEP 3: Unlock Bootloader on OnePlus 6
Next up, you will also have to unlock the device’s bootloader. Do keep in mind that doing so will wipe off all the data from your device and could nullify its warranty as well. So if that’s all well and good, then please refer to our detailed guide on How to Unlock Bootloader of Oneplus 6/6T
STEP 4: Download Android 12 ROM for OnePlus 6
Let’s first make you aware of all the features that this ROM has to offer, as well as the underlying bugs that are present:
Features
Monet

VoLTE, VoWiFi

LineageOS LiveDisplay

MicroG support

Pocket Judge

Call recording

Statusbar items switches

Three finger swipe to screenshot

Extended powermenu

Scramble pin layout option

Quick pin unlock option

PowerOff torch on power button

Volume rocker wakup option

Volume key music controll

More VoLTE/VoWifi statusbar icons

Advanced gesture navigation options

Lockscreen charging information

DataSwitch tile

Volume keys cursor control

Statusbar clock/date customization

Lockscreen visualizer

Lockscreen media art toggle with blur options

Statusbar battery styles

Flipendo (extreme battery saver) tile

Brightness slider in QS options

Reboot QS tile

Separate wifi/data QS tiles

Caffein QS tile

Sound tile

Flash on call waiting option

Network traffic monitor

Battery/Notification LED lights customization

NavBar inverse option

Features will be gradually added.
Bugs
Encryption may not work
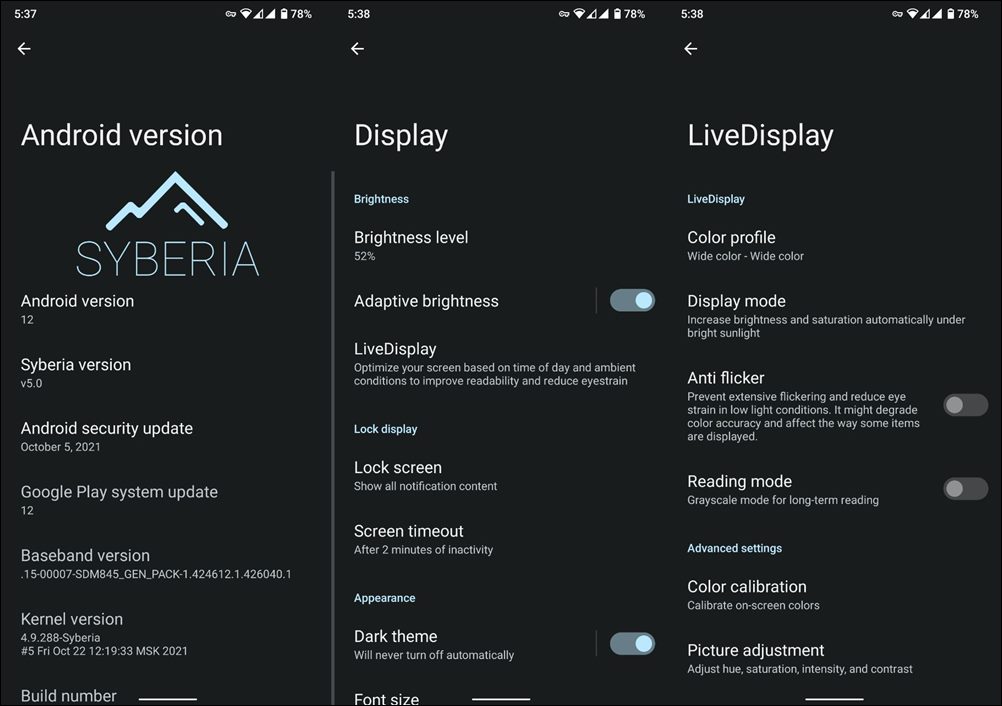
Screenshots
Download Link
You may now get a hold of the ROM file from the below link. Google Apps (GApps) is not included and you will have to flash it separately (optional). Moreover, once you have downloaded the ROM ZIP, OxygenOS 11 Firmware, Magisk (optional), and GApps (optional), transfer all of them to your device.
- ROM Name: Syberia Project
- Version: Android 12
- Download: ROM | OxygenOS 11 Firmware | TWRP | GApps (optional) | Magisk (optional)
- Credits: XDA Senior Member dennyspb
STEP 5: Boot to TWRP Recovery
- Connect your device to the PC via USB cable. Make sure USB Debugging is enabled.
- Then head over to the platform-tools folder, type in CMD in the address bar, and hit Enter. This will launch the Command Prompt.
- Now if you have already installed TWRP Recovery, then use the below command to boot your device to the TWRP Recovery adb reboot recovery
- On the other hand, if you don’t have TWRP installed, then download it from the official site and rename it to twrp so that the complete name becomes twrp.img.
- Now transfer this twrp.img to the platform-tools folder and execute the below command to boot your device to TWRP: fastboot boot twrp.img
STEP 6: Flash Android 12 ROM on OnePlus 6 via TWRP
- To begin with, head over to the Install section of TWRP.
- Then select the ROM.ZIP file and perform a right swipe to flash it.
- After that, go to Reboot and select Recovery. Your device will reboot to TWRP.
- Now go to Install, select the OxygenOS firmware ZIP and perform a right swipe to flash it.
- After that, you may flash any other mods if you want, such as GApps, Magisk, etc.
- Once that is done, go to Wipe and perform a right swipe to factory reset.
- Then tap on the Format Data button, type in YES, and hit Enter. This will wipe the data partition.
- Once done, you may now reboot the device to the newly installed OS via Reboot > System.

- Sandresh 3 years ago Reply Oneplus 6 update Android 12
(Cancel Reply)
Δ
