How to Install Android 13 Custom ROM on Xiaomi [Mi/Redmi/Poco]
In this guide, we will show you the steps to install the latest Android 13 Custom ROM onto your Xiaomi: Redmi, Poco, or Mi device. One of the major USP of the devices from Xiaomi is its ability to provide a truckload of features at a price that is affordable to the masses. Whether it’s Mi, Poco, or Redmi, all of them abide by this rule and it seems to have worked out quite effectively for them. However, the same might not be said about its underlying OS skin.
There has been a general notion that MIUI offers a bloated UI experience with tons of unnecessary apps pre-installed. So although many users end up buying the device from this OEM the first thing they do is to break this MIUI ecosystem. If you are also in the same boat, then you will be glad to know that the latest OS build is now available for numerous Mi, Poco, or Redmi devices.
These are AOSP-based ROMs, so apart from giving you all the goodies that Android 13 has to offer, it also provides a clean stock OS experience with just the right amount of features. Moroever, if you own an older Xiaomi device that has reached the end of its life cycle, then installing this ROM would be your only way to still get a taste of the latest OS upgrades. So on that note, let’s get started with the steps to install the latest Android 13 Custom ROM onto your Xiaomi: Redmi, Poco, or Mi device.
- What’s New in Android 13?
- How to Install Android 13 on Xiaomi: Redmi, Mi, and Poco STEP 1: Install Android SDK STEP 2: Enable USB Debugging and OEM Unlocking STEP 3: Unlock Bootloader on Xiaomi STEP 4: Install TWRP Recovery STEP 5: Download the Required Files Download Android 13 ROM Download Firmware Download Force Encryption Disabler Download GApps STEP 6: Boot to TWRP Recovery STEP 7: Format Data via TWRP STEP 8: Transfer Files to the Device STEP 9: Install Android 13 on Xiaomi
What’s New in Android 13?
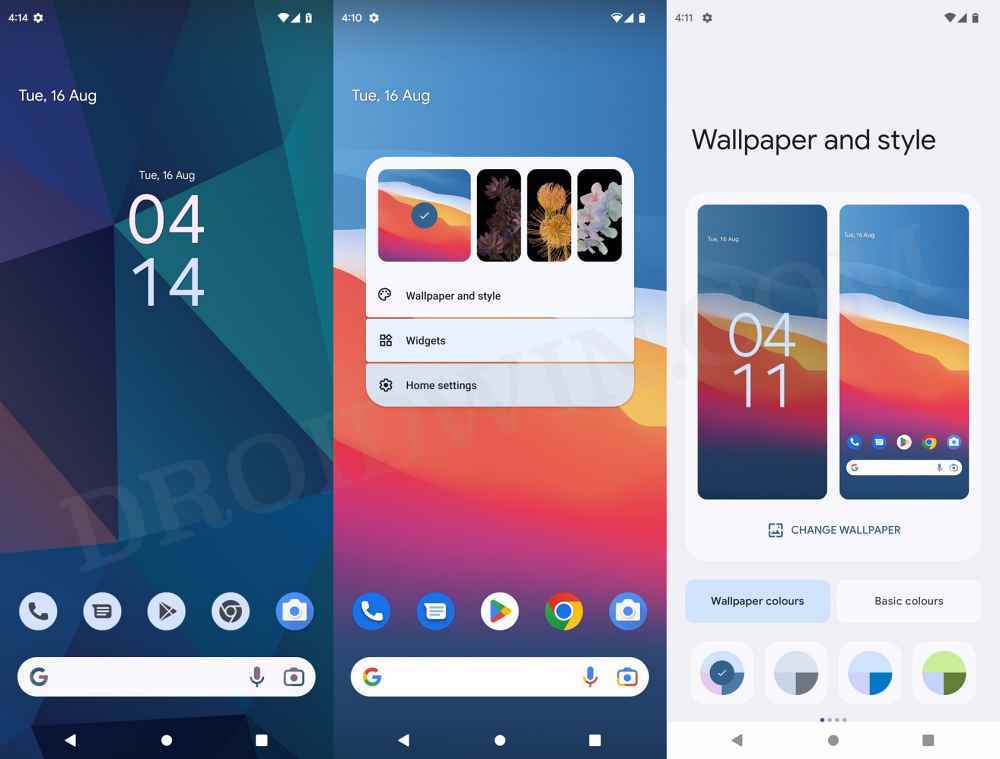
With Android 13, you get a slew of new and intriguing features. To begin with, there are now 16 themed icon sets, as opposed to 4 in its predecessor. Talking about which, you will now also be able to implement these themed icons on various third-party apps as well. Apart from that, there’s now the ability to interact and edit the contents that are copied on the clipboard.

Credits: Google
Then the addition of a QR Code scanner in the Quick Setting and the per-app language change [without affecting the overall system language] is also worthy of praise. Moreover, the latest OS build has done a great job in polishing the rough corners that were present in Android 12 and hence has made it even more stable and user-friendly. So on that note, let’s make you aware of the steps to install Android 13 onto your Xiaomi: Redmi, Mi, or Poco right away.
How to Install Android 13 on Xiaomi: Redmi, Mi, and Poco

The below instructions are listed under separate sections for ease of understanding. Make sure to follow the same sequence as mentioned. Droidwin and its members wouldn’t be held responsible in case of a thermonuclear war, your alarm doesn’t wake you up, or if anything happens to your device and data by performing the below steps.
STEP 1: Install Android SDK
First and foremost, you will have to install the Android SDK Platform Tools on your PC. This is the official ADB and Fastboot binary provided by Google and is the only recommended one. So download it and then extract it to any convenient location on your PC. Doing so will give you the platform-tools folder, which will be used throughout this guide to install Android 13 ROM onto your Xiaomi, Redmi, Mi, or Poco device.

STEP 2: Enable USB Debugging and OEM Unlocking
Next up, you will also have to enable USB Debugging and OEM Unlocking on your device. The former will make your device recognizable by the PC in ADB mode. This will then allow you to boot your device to Fastboot Mode. On the other hand, OEM Unlocking is required to carry out the bootloader unlocking process.
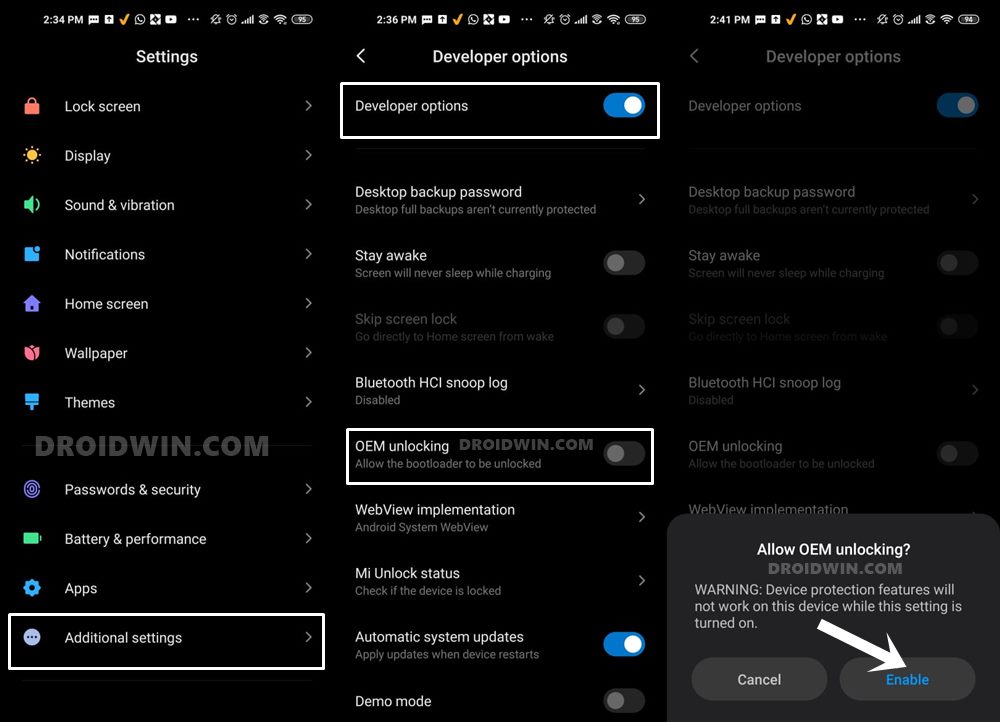
So head over to Settings > About Phone > Tap on Build Number 7 times > Go back to Settings > System > Advanced > Developer Options > Enable USB Debugging and OEM Unlocking.
STEP 3: Unlock Bootloader on Xiaomi
next up, you will have to unlock the bootloader on your device. Do keep in mind that doing so will wipe off all the data and might make the device’s warranty null and void as well. So if that’s well and good, then refer to our guide on How to Unlock Bootloader on any Xiaomi Device
![How to Install Android 13 Custom ROM on Xiaomi [Mi/Redmi/Poco] - 9](https://droidwin.com/wp-content/uploads/2022/08/unlock-bootloader-redmi-k20-pro-android-13.jpeg)
STEP 4: Install TWRP Recovery
You will also need to install the TWRP Recovery onto your Xiaomi device as it will help you to flash the latest Android13 ROM. So refer to our guide on How to Install TWRP Recovery on Android .
STEP 5: Download the Required Files
You may now grab hold of all the required files from below. These include the Android 13 ROM itself, the GApps, Force Encryption Disabler, and the Firmware file for your Xiaomi, Redmi, Mi, and Poco devices.
Download Android 13 ROM
XDA is the best place to get hold of the desired ROM. This is because the developer posts device-specific updates and beta updates there first. Moroever, you will also be able to read what other users have to say about that ROM. This will then help you in molding your decision accordingly. However, if you don’t wish to carry out that much effort, then you may grab hold of the Android 13 ROM for your Xiaomi device from the official ROM site.
Do note that these sites usually update their pages once the stable build is out. Till the ROM is in the alpha/beta stage they usually don’t reflect it on their official page, although they keep their XDA page up to date. So if the below link only shows Android 12 ROMs, then it’s just because the Android 13 ROM is still in the works for your device.
- XDA Developers
- Pixel Experience/Plus
- LineageOS
- EvolutionX
- ArrowOS
- ProjectElixir
- PixysOS
- VoltageOS
- AwakenOS
- SyberiaOS
- IronOS
Once you have downloaded the ROM, transfer it to the platform-tools folder on your PC. Likewise, rename it to rom, so that the complete name becomes rom.zip.
Download Firmware
Some Android 13 Custom ROMs require you to flash the Android 11 firmware as well. So if that is the case with your chosen ROM as well, then grab hold of the firmware for your device from below. Once downloaded, make sure to transfer it to the platform-tools folder on your PC.
Download: Xiaomi Firmware
Download Force Encryption Disabler
If your ROM is encrypted and you wish to decrypt it, then download the Force Encryption Disabler from below and transfer it the platform-tools folder on your PC.
Download: Force Encryption Disabler
Download GApps
While some ROMs like Pixel Expeirnce already coms with Google Apps, Services, and Framework, there are a few ROMs out there that doesn’t have the GApps package. So if your ROM falls in the latter domain, then download the GApps package from below and transfer it the platform-tools folder on your PC..
Download: GApps for Android 13
STEP 6: Boot to TWRP Recovery
- Connect your device to the PC via USB cable. Make sure USB Debugging is enabled.
- Then head over to the platform-tools folder, type in CMD in the address bar, and hit Enter. This will launch the Command Prompt.
- After that, type in the following command in the CMD window to boot your device to Fastboot Mode adb reboot recovery
STEP 7: Format Data via TWRP
- Go to the Wipe section of TWRP and tap on Format Data.
- Then type in YES in the space provided.
- Finally, hit the checkmark situated at the bottom right.
- Once that is done, go to Wipe and tap on Advanced Wipe.
- Then select Data and Dalvik Cache and perform a right swipe to erase the data.
STEP 8: Transfer Files to the Device
- To begin with, go to Mount and tap on the Enable MTP button.
- Then open File Explorer on your PC. If your device is listed there, then transfer the ROM, GApps, Firmware, and DFE files to your device.
- However, if it is not there, then execute the below commands to transfer the ROM to your device. adb push filename.zip /sdcard
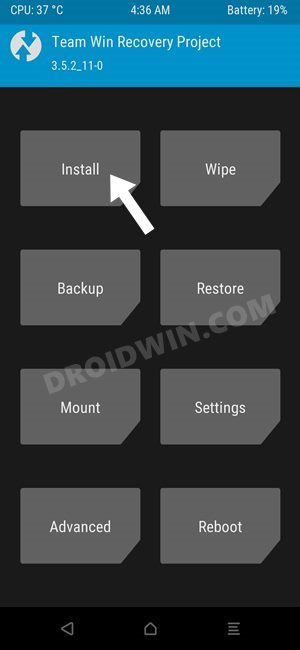
STEP 9: Install Android 13 on Xiaomi
- Go to the Install section of TWRP, navigate to the rom.zip file, and select it.
- Then perform a right swipe to flash it and wait for the process to complete.
- After that, flash the Firmware, Disable Force Encrypt, and GApps files, if required.
- Now, it is recommended to reset your device once again via Wipe > Format Data >YES.
- Once done, you may now reboot your device to the OS via Reboot > System.
- Haptic Feedback not working in Gboard after Android 13 Update [Fix]
- Accessing the Recent Menu in Android 13 freezes the device [Fix]
- Android 13 Restricted Settings for Sideloaded Apps: How to Bypass
- How to Pass SafetyNet on Rooted Android 12/Android 13

(Cancel Reply)
Δ
