How to Install Android 16 Custom ROMs on Moto G54/G64
In this guide, we will show you the steps to flash various Android 16 Custom ROMs onto your Moto G54/Moto G64 [codename: cancunf]. While Motorola is perhaps the worst OEM when it comes to providing OS upgrades [forget the 7 years that Pixel and Samsung do, some Motorola devices only get one single year of OS update!]. And the fate for our device isn’t too good either.
Fortunately, that might not be a great cause of concern for us, as the device is quite an active player in the custom development. As a result of which, it has already been blessed with quite a lot of custom ROMs, all of which are based on the latest iteration of the OS. And in this guide, we will show you how to welcome abode these ROMs onto your device. So without any further ado, let’s get started.
- How to Flash Android 16 Custom ROMs on Moto G54/Moto G64 STEP 1: Install Android SDK STEP 2: Enable USB Debugging and OEM Unlocking STEP 3: Unlock Bootloader on Moto G54/Moto G64 STEP 4: Download Android 16 ROM for Moto G54/Moto G64 STEP 5: Boot to FastbootD Mode STEP 6: Install Android 16 Custom ROMs on Moto G54/Moto G64
- How to Update Android 16 Custom ROMs on Moto G54/Moto G64 Via Updater App Via Recovery What About Factory Reset when Updating a ROM?
- Flash Project Matrixx ROM Android 16 on Moto G54/G64
- Flash The Clover Project Android 16 on Moto G54/G64
- Flash YAAP Android 16 on Moto G54/G64
- Flash DerpFest Android 16 on Moto G54/G64
- How to Flash Axion AOSP Android 16 on Moto G54/G64
- Flash Project Infinity X Android 16 on Moto G54/G64
How to Flash Android 16 Custom ROMs on Moto G54/Moto G64

Before starting, please take a complete device backup. Droidwin and its members wouldn’t be held responsible in case of a thermonuclear war, your alarm doesn’t wake you up, or if anything happens to your device and data by performing the below steps.
STEP 1: Install Android SDK

First off, you will have to install the Android SDK Platform Tools on your PC. This is the official ADB and Fastboot binary provided by Google and is the only recommended one. So download it and then extract it to any convenient location on your PC. Doing so will give you the platform-tools folder, which will be used in this guide to install custom ROMs on the Moto G54 5G/Moto G64.
STEP 2: Enable USB Debugging and OEM Unlocking
Next up, you will also have to enable USB Debugging and OEM Unlocking on your device. The former will make your device recognizable by the PC in ADB mode. This will then allow you to boot your device to Fastboot Mode. On the other hand, OEM Unlocking is required to carry out the bootloader unlocking.

So head over to Settings > About Phone > Device Identifier > Tap on Build Number 7 times > Go back to Settings > System > Developer Options > Enable USB Debugging and OEM Unlocking.
STEP 3: Unlock Bootloader on Moto G54/Moto G64
Next up, you will also have to unlock the device’s bootloader. Do keep in mind that doing so will wipe off all the data from your device and could nullify its warranty as well. So if that’s all well and good, then please refer to our detailed guide on How to Unlock Bootloader on any Motorola Device

STEP 4: Download Android 16 ROM for Moto G54/Moto G64
- You may now grab hold of the ROM file from the below link. MOTO G54 5G Project Matrixx: GApps [ IMG Files ] | Vanilla [ IMG Files ] Project Infinity: GApps [ IMG Files ] | Vanilla [ IMG Files ] Axion AOSP: GMS [ IMG Files ] | Vanilla [ IMG Files ] DerpFest: DOWNLOAD [ IMG Files ] The Clover Project: GApps [ IMG Files ] YAAP: GApps [ IMG Files ] | Vanilla [ IMG Files ] MOTO G64 5G Project Matrixx: GApps [ IMG Files ] | Vanilla [ IMG Files ] Project Infinity: GApps [ IMG Files ] | Vanilla [ IMG Files ] Axion AOSP: GMS [ IMG Files ] | Vanilla [ IMG Files ] DerpFest: DOWNLOAD [ IMG Files ] The Clover Project: GApps [ IMG Files ] YAAP: GApps [ IMG Files ] | Vanilla [ IMG Files ]
- Rename the file to rom.zip and transfer it to the platform tools.
- Likewise, also transfer the ZIP having the IMG files to the platform tools folder [do not extract that ZIP file].
- Also, rename that ZIP file to img, so that the complete name becomes img.zip
STEP 5: Boot to FastbootD Mode
- Connect your device to the PC via a USB cable. Make sure USB Debugging is enabled.
- Then head over to the platform-tools folder, type in CMD in the address bar, and hit Enter. This will launch the Command Prompt.
- Type in the following command in the CMD window to boot your device to FastbootD Mode adb reboot fastboot
- To verify the FastbootD connection, type in the below command and you should get back the device ID. fastboot devices
- If you are not getting any serial ID, then please install the Fastboot Drivers on your PC.
NOTE: Updates can be found in my Channel : DroidwinTech: t.me/droidwintech . Discussions can be carried out in my Telegram Group: DroidwinGroup: t.me/droidwingroup
STEP 6: Install Android 16 Custom ROMs on Moto G54/Moto G64
The flashing steps are universal, meaning they will work for all the Android 16-based ROMs.
- Boot your device to FastbootD via either of the two commands: adb reboot fastboot //From the OS fastboot reboot fastboot //From Fastboot Mode
- Now flash the ZIP file having the IMG files via the below command: fastboot –skip-reboot update img.zip
- Now boot your device to the newly flashed recovery via the below command: fastboot reboot recovery
- Choose Wipe data / Factory reset to do the reset.
- Once done, select Apply update from ADB > Apply update/Install Update > ADB Sideload.
- Then type in the below command to flash the ROM: adb sideload rom.zip
- Once flashed, it is recommended to do a factory reset once again.
- Finally, select Reboot System Now to boot to the newly flashed OS.
How to Update Android 16 Custom ROMs on Moto G54/Moto G64
If you are on an older build of a ROM and wish to update to its newer version, then there are two ways of doing so:
Via Updater App
Head over to Settings > System > Download the available update > Install it > Restart your device.
Via Recovery
- Download the update ZIP file and transfer it to the platform-tools folder.
- Then boot your device to the recovery mode via the below command: adb reboot recovery
- Select Apply update from ADB > Apply update/Install Update > ADB Sideload.
- Now type in the below command to flash the ROM: adb sideload rom.zip
- Finally, select Reboot System Now to boot to the newly flashed OS.
What About Factory Reset when Updating a ROM?
Till you are installing updates within the same OS version [for example, Android 16 October 2025 build to Android 16 January 2026 build], no factory reset is required [unless specifically requested by the developer to do so]. However, if there’s an increment in the OS version [for instance, updating from the Android 15 version of a ROM to Android 16], then a factory reset is a must.
Flash Project Matrixx ROM Android 16 on Moto G54/G64

Flash The Clover Project Android 16 on Moto G54/G64

Flash YAAP Android 16 on Moto G54/G64

Flash DerpFest Android 16 on Moto G54/G64

How to Flash Axion AOSP Android 16 on Moto G54/G64

Flash Project Infinity X Android 16 on Moto G54/G64

- What is New A13+ Play Integrity Check and How to Pass It
- How to Pass Strong Integrity Using Revoked/Banned Keybox File
- How to Get Fingerprint PIF.JSON File using Play Integrity Fork
- Play Integrity Fix is No More! So What’s Next?
- How to Check Play Integrity Test from the Play Store

- Ashu 3 months ago Reply Can u share the Keybox file for Moto G54?
- Akhil 3 months ago Reply https://cyberknight777.dev/instructions/cancunf/#flashing-roms Custom rom Flashing instructions for moto g54 5G/G64 5G
(Cancel Reply)
Δ
How to Get Fingerprint PIF.JSON File using Play Integrity Fork
In this guide, we will show you the steps to get the fingerprint PIF.JSON file using Play Integrity Fork. A week back or so, we got the unfortunate news that the Play Integrity Fix module has been discontinued by the developer chiteroman. We can’t thank him enough for the invaluable work he has done for this community. But going forward, what can be our next course of action?
Well, while this module was up and running, another developer [osm0sis] was also running a fork of this module, which goes by the name Play Integrity Fork. While we wouldn’t say that it was under the shadow of Fix, but it wasn’t being used that much when compared to its counterpart.

However, all that is about to change now, and so there are a few queries that might pop up in your minds. In this regard, one of the most common questions that I have been asked for the past week is how to get the fingerprint PIF.JSON file in the Play Integrity Fork module.
As you might already be aware, the Fix module already has this embedded in its module; you just need to launch it via KSUWebUI, hit the Fetch PIF.JSON option, and you’ll get the file. But that’s not possible via the Fork module via the direct route. Why? Let’s find out, and after that, we will list the plausible steps through which you can get this file using this module. Follow along.
- Why is the PIF JSON Fingerprint File Missing in Play Integrity Fork
- How to Get the Fingerprint PIF.JSON File using Play Integrity Fork
- Direct Download PIF JSON Files
Why is the PIF JSON Fingerprint File Missing in Play Integrity Fork
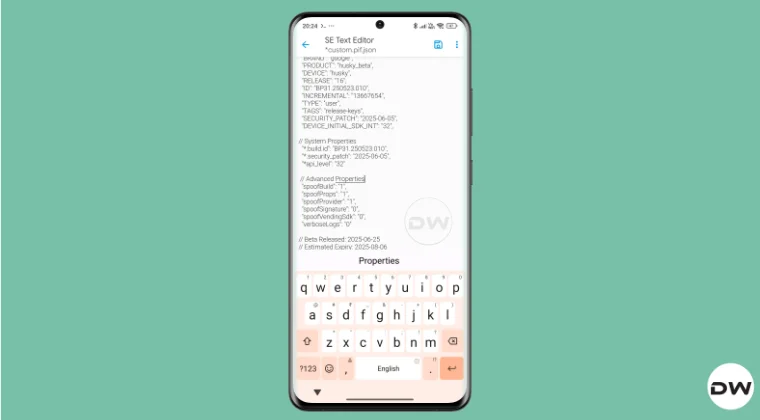
By default, the module comes with a template of a PIF JSON file that you need to fill in manually. You can get this file from /data/adb/modules/playintegrityfix. Once you fill in the values, simply rename it to custom.pif.json, and your task stands complete. But why hasn’t the dev simply added this file, as was the case with the Fix module? Here’s what he has to say regarding this:
There’s intentionally no pif.json in the module because the goal remains to be futureproof, and including something that may be banned and obsolete within days would be contrary to that goal.

However, finding these files might not be everyone’s cup of tea. Not only are a few of these remains, but finding them is also quite an effort taking task. The developer acknowledges this, and hence, he has added a script to extract the latest Pixel Beta fingerprint along with the module. The script is named autopif2, which generates a random device fingerprint from the latest Pixel Beta. So let’s have a look at the steps to make full use of this file.
How to Get the Fingerprint PIF.JSON File using Play Integrity Fork

Before starting, please take a backup of all the data on your device, just to be on the safe side. Droidwin and its members wouldn’t be held responsible in case of a thermonuclear war, your alarm doesn’t wake you up, or if anything happens to your device, and data by performing the below steps.
NOTE: There are quite a few ways of getting this job done, however, I personally found Termux to be the easiest among all of them. But if you want to try out any other method, then run the generation script from a root manager app that supports the module Action button or from a file explorer app that supports script execution.
- To begin with, flash the wget2 module via Magisk / KernelSU / APatch .
- Then, flash the Play Integrity Fork CI module from GitHub Actions .
- Now, download and install the Termux app from F-Droid.
- Then launch it and execute the following three commands: su //you’ll get a SU request, hit Grant cd /data/adb/modules/playintegrityfix //to change the directory to the module’s sh autopif2.sh –preview // this will give you the fingerprint file
- You can also add a few other parameters to the above command, namely: su -c sh /data/adb/modules/playintegrityfix/autopif2.sh -a -m -p -s -a Advanced -m Match -p Preview -s Strong
- Once done, head over to the below location to access the custom.pif.json /data/adb/modules/playintegrityfix
Direct Download PIF JSON Files
If you don’t want to manually carry out the aforementioned steps, then you may directly get the PIF JSON file from our below guide:
Download PIF JSON File from Here
- How to Pass Strong Integrity Using Revoked/Banned Keybox File!
- How to Pass Play Integrity in New Android 13+ Checks
- Guide to Pass Strong Integrity on Unlocked Bootloader & Root!
- How to Spoof/Fake/Hide Bootloader Unlock Status
- How to Pass Play Integrity Test on any Custom ROM [Video]
- Drw 6 months ago Reply Problem solved. Termux wasn’t prompting me to grant su user access. Found where to enable it in the KSU Next GUI under Superuser.
- Drw 6 months ago Reply I’m getting “su program not found.” Rooted with ksu and susfs. Modules installed are BKI, Play integrity fork, shamiko, susfs for ksu, tricky store, wget2, zygisk lsposed, and zygisk next. Nothing tweaked.
- mario 7 months ago Reply sorry, what do you mean with “Then, flash the Play Integrity Fork CI module from GitHub Actions.” ? i have pif v13 flashed in magisk
- Mohamed 7 months ago Reply Hi, can you please help me with a vaild keybox pleaaase 🙏
- Antonis 7 months ago Reply 1) “Then, flash the Play Integrity Fork CI module from GitHub Actions” https://github.com/osm0sis/PlayIntegrityFork/actions what do i download? 2) and then what do i do with custom.pif.json ?
- Antonis 7 months ago Reply “Then, flash the Play Integrity Fork CI module from GitHub Actions” https://github.com/osm0sis/PlayIntegrityFork/actions what do i download?
(Cancel Reply)
Δ
Play Integrity Fix is No More! So What’s Next?
So I was strolling the lanes of GitHub when I stumbled upon the Play Integrity Fix page , and to my absolute astonishment, I was greeted with the error 404 Page Not Found. Since the module was up and running the last time I checked, and there was no sign of any stopping of this project from the developer itself, this all came as a shock to me. So I then went to the developer’s profile on XDA and my worst fears indeed came true, Here’s what the developer of this module, chiteroman, had to say:
I’ve decided to discontinue the PIF project. Google is increasingly putting up more obstacles, and I no longer have as much time to dedicate to this as I used to. It’s been a very interesting journey, and I’ve learned a lot. I thank everyone who has accompanied me and contributed to the project. But things seem to be getting worse, and Google is going to make it even harder to use its services (GMS) on devices with an unlocked bootloader.
So all this begs an important question- what’s next? How can we now pass the Play Integrity Test, and is it even possible to pass this test now? Well, we are here to answer all your queries. Follow along.
- Play Integrity Fix is No More! So What’s Next?
- The Flashing Steps?
- Some Useful Resources
Play Integrity Fix is No More! So What’s Next?

Alongside the Play Integrity Fix module from chiteroman, there is also a fork along the same lines by the developer osm0sis. And it’s not that it’s a newcomer, it has been going pretty strong for the last year and a half, it’s just that since the Fix was getting the job done, most of the users didn’t find the need to jump over to the Fork.
But now that the former is no longer there, you’ll have to make a switch to this. For the unaware, osm0sis is a Senior Recognized Developer / Contributor on XDA and has been doing some great work there, so he is a reputed player in this domain, and his module is also performing well and good, without any issues as such.
Moreover, if there’s an iota of a doubt, then the module is completely open-source; you can have a look at all of its files over at GitHub. Even chiteroman [developer of Play Integrity Fix] says “As an alternative, you can use PlayIntegrityFork”, so this should put all doubts to rest.
The Flashing Steps?

Well, it’s all the same as before- simply download the module ZIP file from its GitHub page [refer to the link below] and then flash it via Magisk/KernelSU/APatch. There’s no additional requirement whatsoever.
Download: Play Integrity Fork from GitHub
Rounding off, here’s what osm0sis [the developer of Play Integrity Fork] had to say to chiteroman [the developer of Play Integrity Fix]:
I know we’ve had our differences, but thank you for all your work, especially for carrying on PIF from kdrag0n and Displax when they lost interest, and all the truly groundbreaking work you did on FrameworkPatch and BootloaderSpoofer, without which we might not have TrickyStore today. I wish you all the best.
So that’s all for this guide regarding Play Integrity Fix’s sad demise. We can only say thank you, chiteroman, for developing such a valuable module and helping us pass the Play Integrity Tests with ease. Until next time, it’s goodbye from us and see you on the Play Integrity Fork’s GitHub page now!
Some Useful Resources
- What is New A13+ Play Integrity Check
- How to Pass Play Integrity in New Android 13+ Checks
- How to Pass Strong Integrity on Unlocked Bootloader & Root! [Legacy Checks]
- Get your Unrevoked Keybox XML File Here | Pass Strong Integrity
- How to Check Play Integrity Test from the Play Store
- Mijing 8 months ago Reply Keybox for Xiaomi 14 please
- Kacper 8 months ago Reply Sir, I kindly ask for a keybox link please.
- Stanley 8 months ago Reply key box request please
(Cancel Reply)
Δ
