How to OEM/Bootloader Unlock and Root in One UI 8 [All Samsung]
In this guide, we will show you the steps to OEM/Bootloader Unlocking and root your Samsung device running One UI 8. When the South Korean OEM rolled out the latest iteration of its OS, there were quite a few intriguing features to look forward to. However, for the tech enthusiasts, this OS build came as a shocker.
As soon as they head over to Developer Options, they found out the OEM Unlock toggle was missing ! Initially, it was attributed to a bug in the Beta build; however, our worst fear came true when we found out that it was infact missing from the stable build as well. As a result of this, you wouldn’t be able to unlock the device’s bootloader, which in turn will prevent you from carrying out any tweaks, whether rooting, flashing custom ROMs, or installing modules.
But the developers wouldn’t let the OEM take an upper hand in this battle. They have found a nifty workaround using which you can easily get the OEM/Bootloader Unlocking option in One UI 8 on your Samsung device. So without any further ado, let’s show you how this could be carried out.
- How to OEM/Bootloader Unlock and Root in One UI 8 [All Samsung] METHOD 1 Check Firmware BIT Version Instruction Steps METHOD 2
How to OEM/Bootloader Unlock and Root in One UI 8 [All Samsung]
Before starting, please take a complete device backup. We have added two different methods to get this job done. Go through both of them and then try out the one that is in sync with your requirement. Droidwin and its members wouldn’t be held responsible in case of a thermonuclear war, your alarm doesn’t wake you up, or if anything happens to your device and data by performing the below steps.
METHOD 1
Check Firmware BIT Version
One UI 8 FW is: F956BXXU2CYI7

One UI 7 FW is: F956BXXS2BYGB
The Update Bit version is always the 5th digit from the end, which in both the One UI 8 and One UI 7 firmware is 2. So we can easily flash the One UI 7 bootloader on One UI 8 in this case. So let’s get going!
Instruction Steps
- Download both the One UI 7 and One UI 8 firmware for your device [ link ].
- Then extract them to your PC. Now, go to the extracted One UI 7 folder and extract the BL_xxxx.tar.md5 file.
- Now copy the abl.elf.lz4 file from there. This is the One UI 7 bootloader file.
- You can delete the rest of the One UI 7 files; this is the only file from the One UI 7 firmware that you’ll need.
- Now, go to the One UI 8 folder and extract the BL_xxxx.tar.md5 file.
- Then remove this abl.elf.lz4 file and replace it with the One UI 7 one.
- Next, extract the One UI 8 AP_*.tar.md5 file to a separate directory.
- Then move the vbmeta.img.lz4 file from the One UI 8 BL folder over to this One UI 8 AP folder.
- Now TAR all files here into a new AP_*.tar file. Don’t TAR the entire folder; instead, choose all the files inside the AP folder and then TAR them.
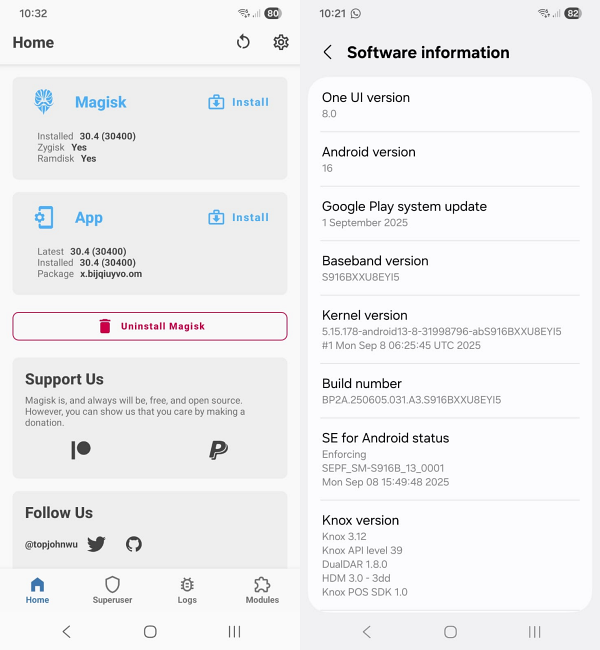
- Transfer this AP file to a device that is already rooted via Magisk. Then launch Magisk, tap on Install next to Magisk, select this AP file, and hit Let’s Go.
- Magisk will now patch this AP file as well as the vbmeta.img file, which we had placed from the BL folder over to this AP folder.
- Now extract the patched AP file. Then move the patched vbmeta.img file back to the One UI 8 BL folder.
- Now select the rest of the files present in AP and TAR them [Let’s call it the new AP file].
- Likewise, TAR all the files present in the BL folder [Let’s call it the new BL file].
- After that, download and extract Odin on your PC. Then launch it and load the files: The new BL file in the BL slot. The new AP file in the AP slot. CP to the CP slot Home_CSC to the CSC slot
- Then, boot your device to Download Mode and start flashing in the Odin tool.
- Once done, your device will boot to the rooted One UI 8 with the OEM Unlocking toggle!
METHOD 2
- Download and extract the following files on your PC [check posts 1, 2, and 3 of this XDA post for download links]. S931BXXS6BYIF_BIT_5_SAFE_FIRMWARE (unzipped -> BL / AP / CP / CSC / HOME_CSC) BL_S931B_UI_7_KEEP_OEM_UNLOCK_UI_8.tar USERDATA_AIO_S931B_UI_8_V7.7z (contains USERDATA_AIO – use FULL WIPE for clean install) Patched Odin: Odin3_v3.14.1_3B_PatcheD.exe Now, boot your device to Download Mode and launch the Odin Tool.
- Then load the following files in Odin: BL slot: BL_S931B_UI_7_KEEP_OEM_UNLOCK_UI_8.tar (use this instead of stock BL). AP slot: AP_S931B_… (from the SAFE_FIRMWARE folder — the AP file). CP slot: CP_S931B_… (from firmware). CSC slot: Use regular CSC_OXM_… (not HOME_CSC as we want to format data). USERDATA slot: USERDATA_AIO_S931B_UI_8_V7_FULL_WIPE.tar (the userdata AIO – Must use the file that says FULL WIPE).
- Now hit Start. The flashing will now begin. Once you get Pass, press and hold the Power and Volume Down keys for 7-8 seconds until the device is about to undergo a restart.
- As soon as that happens, let go of the keys and then press and hold the Power and Volume Up keys for a few seconds. The device will now boot to TWRP Recovery.
- In TWRP, do not attempt to decrypt. If asked for a password, press Cancel or Mount. Then go to Wipe > Format Data, type yes, and hit check. This will remove the encryption.
- After formatting, TWRP will reboot back into recovery. From TWRP, go to Advanced Settings, which is provided by userdata AIO.
- Select Convert System RW. Confirm and let it run. Wait until it finishes and TWRP reboots back into recovery.
- You can now also install Magisk from Advanced Settings if you want. Once done, format the data once again if asked. Then do a Reboot > Recovery.
- Finally, select Reboot > System to boot to the OS.
- Samsung Removes OEM Unlocking from One UI 8!
- How to Enable Full Screen Mode in Samsung Dex One UI 8
- Battery Information Missing from Samsung One UI 8: How to Fix
- Secure Folder Lock will not work when you leave an app [One UI 8]

- Nurokhim 1 month ago Reply The method 1 and 2 not work on Galaxy S24 FE
- Ahror 2 months ago Reply Hello, I read the article and came to the conclusion that this doesn’t work with all firmware versions. I want to unlock the bootloader on an A25 (A256EXXS9DYK2) and the binary version is 9. I’ve read several articles, and it seems the OEM in the device can no longer be unlocked. Can you suggest an alternative?
- mohamed hassan 3 months ago Reply samsung A066B I extracted the BL file but couldn’t find the ABL file.
- Naveen 3 months ago Reply Hi , I have did all steps as mentioned but while flashing BL in Odin. Error occurred ” Security check fail – vbmeta(1)”. How to fix this. Details: Device: s25 Ultra (SM-S9830) OS: OneUI 8 Bootloader Locked
- burg 3 months ago Reply i’m using a samsung A25 5G, and the content of BL_xxxx.tar.md5 seem to be completely different, what are the files needed to swap out the bootloader?
- Coogs 3 months ago Reply Thank you for these detailed instructions. My device is SM-S926B with One UI 8 (S926BXXU9CYI5_S926BOXM9CYI5_EUX), but unfortunately there is no abl.elf.lz4 file in BL_xxx.tar.md5. Neither in One UI 7 nor in One UI 8. Therefore, I cannot unlock the bootloader and the OEM Unlock option is missing in developer options after flashing. On another website, I read the following: “replace tzar.img, tzsw.img, uh.bin.” When I do that, I get the error “Odin Mode (SVB Fail)” after restarting. What can I do? Is there a solution that will allow me to root my smartphone, and what does it look like?
- Ali 3 months ago Reply Thank you so much for the tutorial it worked and i have successfully re-rooted my A73 after updating to One UI 8, Thank you 🙌😘
- Eduardo Jesús 4 months ago Reply Hello. I followed the steps indicated but I could only extract the BL files for each firmware. The abl.elf.lz4 files mentioned in the instructions do not appear in any of the Android 15 and Android 16 firmwares. My device is a Galaxy A54 and I downloaded the following firmwares from https://samfw.com : A546EXXSFDYI1 (Android 15) A546EXXUFEYI4 (Android 16). How could I send you screenshots so I know which files to use and be able to continue? I request your attention and response. Regards.
- Jake 4 months ago Reply Thank you for this amazing guide. It’s trully needed after what samsung pulled. I have a few questions that I’d be really thankful if you could answer… I noticed the guide instructs using home_csc, does that mean data will be preserved during this whole process? Even if it’s on stock one ui 8? And is the patching with an already rooted phone necessary? Can’t an unrooted magisk app perform this? Thank you in advance
(Cancel Reply)
Δ
