How to Pass Play Integrity Test on any Custom ROM [Video]
In this guide, we will show you various methods through which you can pass the Play Integrity Test on any custom ROM. The custom development has seen quite a massive change in recent months. Gone are the days when you just needed to pass the SafetyNet Test to use banking and payment apps in a modified environment. Instead of that, you’ll now have to pass Play Integrity, which is proving to be quite a challenging task with each passing day.
The reason for the same is the fact that this time around, there is direct involvement from Google. As soon a developer manages to find a custom build.prop/fingerprint that passes this test and releases it in the form of a module, the Silicon Valley giant tends to patch it right away [since the module is open source, the tech giant could easily get hold of all the required information].

Passing Play Integrity Without Keybox XML File
Therefore, as of now, your best bet is to manually find a fingerprint from one of the least popular devices out there in the market, grab hold of its build,prop, create a JSON file using it, and then flash the resultant module. However, finding such a device is in itself quite a tough job, as Google has already patched most of the devices. So if you manage to get hold of one, make sure to keep it with you and implement it only on your device.

Passing Play Integrity Using Keybox XML File
If shared with others, then it will be patched by Google sooner rather than later. If we talk about this in the custom ROM domain, then most ROMs tend to fail both the Basic and Device Integrity Tests, even if you haven’t rooted it. As a result, you wouldn’t be able to use any banking and payment apps with your preferred ROM. To overcome these roadblocks, this guide will show you various methods to pass the Play Integrity Test on your custom ROM. So without further ado, let’s get started.
- Pass Strong Integrity using Component Spoofing [No Root]
- How to Pass Play Integrity Test [Strong] on Custom ROM Via Keybox XML
- Pass Strong Integrity on Custom ROM using Banned/Revoked Keybox
- How to Pass Play Integrity Test on Custom ROM Without Keybox XML UPDATE: Check Test Keys and Kernels Strings Via APK Via Module Via Pixel Flasher Manual Method
Pass Strong Integrity using Component Spoofing [No Root]

Nowadays, most custom ROMs have added a Spoofing section, using which you can easily pass the Play Integrity Test [even Strong]. While this method would also require an unrevoked keybox XML file, however, you don’t need to root your ROM! And that is the reason why it has become my go-to choice. So, on that note, let’s make you aware of the instructions steps:

- First, get an unrevoked keybox file and transfer it to your device.
- Now go to Settings, search Spoofing, and select it from the result.
- Then enable the toggle next to Play Integrity Fix and Update Play Integrity Fix.
- Now tap on Select keybox XML File to spoof and select your keybox.xml file. Once loaded, restart your device.
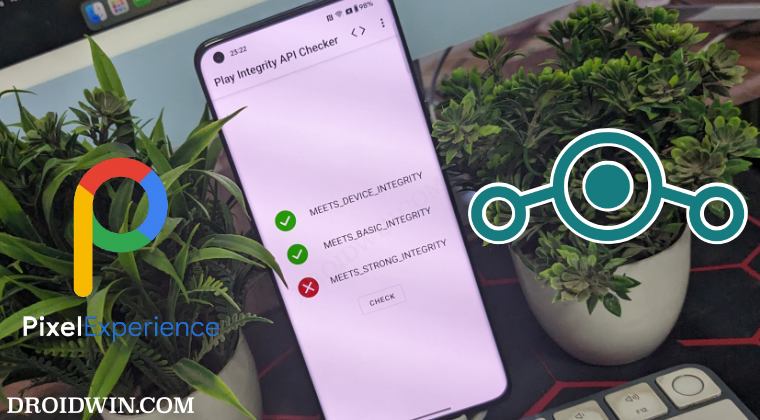
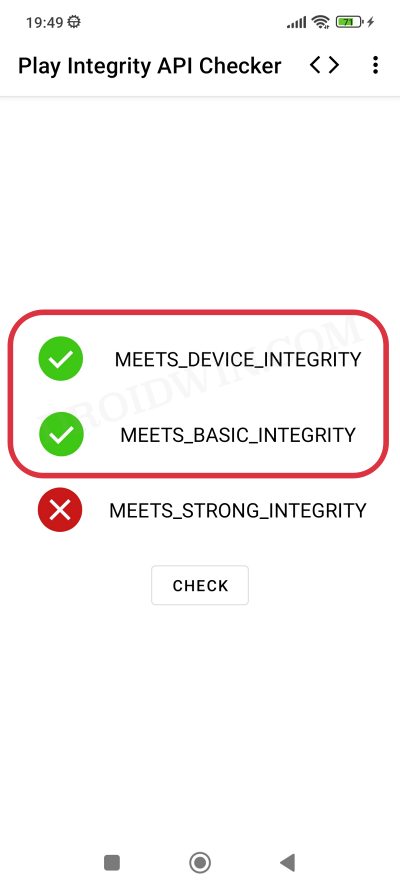
- Then install Play Integrity API Checker, launch it, and verify the result. You should pass all the three tests now.
How to Pass Play Integrity Test [Strong] on Custom ROM Via Keybox XML

This method does require an unrevoked keybox XML file [which is quite hard to find], but once you get hold of it, whether from my guide [linked below] or one of your trusted sites, then you can easily pass all three tests- Basic, Device, and Strong. So, just refer to the below steps and get the job done right away:
- First up, root your custom ROM , preferably via Magisk.
- Next up, download all the below-listed files: Magisk Canary [For Root] LSPosed Framework [For Shamiko] Shamiko Module Play Integrity [For Spoofing Device] Zygisk Assistant [For Hiding Zygisk] Tricky Store [For modifying the certificate chain generated for Android key attestation] Unrevoked keybox.xml [For passing Strong Integrity] Root Supported File Manager [For accessing the /data directory] Play Integrity API Checker [To test the Play Integrity result]
- Once you have downloaded all the files, launch Magisk > go to Settings > enable Zygisk.
- Then go to Modules > Install from Storage > flash the following modules: LSPosed Framework Shamiko Module Play Integrity Zygisk Assistant Tricky Store
- Once done, extract manager.apk from the LSPosed ZIP and install it.
- Now install a root-supported file manager app like Solid File Explorer.
- Then launch it, tap on the hamburger menu, and select Root. You’ll get an SU request, tap Grant.
- Now go to the below directory. There will already be a keybox.xml file present there. data/adb/tricky_store
- Replace it with the unrevoked one that you have downloaded [select New in the prompt that appears].
- Finally, restart your device and then install the Play Integrity API Checker app.
- Launch the app [make sure you’re connected to the Internet] and tap Check.
- You should now be passing all three tests, including the Meets_Strong_Integrity.
Pass Strong Integrity on Custom ROM using Banned/Revoked Keybox
There exists a loophole using which you can pass the Strong Integrity using a banned/revoked keybox file as well. Refer to the below guide to know how this could be done:
How to Pass Strong Integrity Using Revoked/Banned Keybox File
How to Pass Play Integrity Test on Custom ROM Without Keybox XML
While this method does not require any Keybox XML file, but on the flip side, you’ll only pass the Basic and Device Test, not the Strong Test.

Before starting with any of these methods, please take a complete device backup beforehand. Moreover, you’ll have to root your custom ROM , or else none of the below-listed methods will work. So make sure to checkmark that requirement before proceeding ahead. Droidwin and its members wouldn’t be held responsible in case of a thermonuclear war, your alarm doesn’t wake you up, or if anything happens to your device and data by performing the below steps.
UPDATE: Check Test Keys and Kernels Strings

Google has further tightened the screws and has introduced a new stringent measure that will impact quite a lot of devices out there when it comes to passing the Play Integrity Test. As per the latest development, your ROM must be signed with a Private Key [releasekey.x509.pem] from the developer, if it is signed with a Test Key [testkey.x509.pem], then your device will not be able to pass the Play Integrity Test, irrespective of whatever fingerprint or build.prop file you end up choosing.
Apart from that, the kernel should also don’t have any banned strings, or else, the aforementioned drawback will once again come into the picture. So without any further ado, let’s make you aware of the steps to perform these checks on your device. Follow along.
- To begin with, download and install Termux on your device.
- Then launch it and type in su, you’ll get a SuperUser request.
- Tap Grant. Now type in the below command to check the key: unzip -l /system/etc/security/otacerts.zip
- If you get releasekey.x509.pem, then your device has a Private Key and it might pass the test.
- However, if you get testkey.x509.pem, your device has a Test Key and it will not pass the test.
- Moving on, now type in the below command to perform the kernel test [They are case sensitive] uname -r
- If the kernel localversion contains any of the banned strings listed below, then your device will not pass the Play Integrity test [even if it had a Private Key]. -AICP -arter97 -blu_spark -CAF -cm- -crDroid -crdroid -CyanogenMod -Deathly -EAS- -eas- -ElementalX -Elite -franco -hadesKernel -Lineage- -lineage- -LineageOS -lineageos -mokee -MoRoKernel -Noble -Optimus -SlimRoms -Sultan -sultan
NOTE: If you don’t wish to take the CLI [Command Line Interface] route, then you could also take the help of a root-supported File Explorer app such as Solid File Manager. Here’s how:
- Download, install, and launch Solid File Manager.
- Then tap on the hamburger menu and select Root.
- You will now get a SuperUser request, tap on Grant.
- Once that is done, head over to the below location: /system/etc/security/otacerts.zip
- Transfer the otacerts.zip file to the Internal Storage.
- Now extract it. You should get either of the two files: releasekey.x509.pem testkey.x509.pem
- If you get releasekey, your device might pass the test.
- However, devices with a testkey will not pass the test.
- Now go to Settings menu and search “kernel version”
- Check if it has any banned strings from above or not.
- If it does not, your device will pass the Play Integrity.
Via APK
Some custom ROMs like the Evolution X provide an APK that comes with a custom fingerprint that passes the Play Integrity Test out of the box! We will be keeping track of those ROMs and uploading their APKs below. Moreover, after installing the APK, restart your device, delete the data of Play Store, and once again do a reboot. Also, keep in mind that similar to other methods, this APK is also only valid until Google ends up patching it.
APK Version 1

APK Version 2 [NEW]
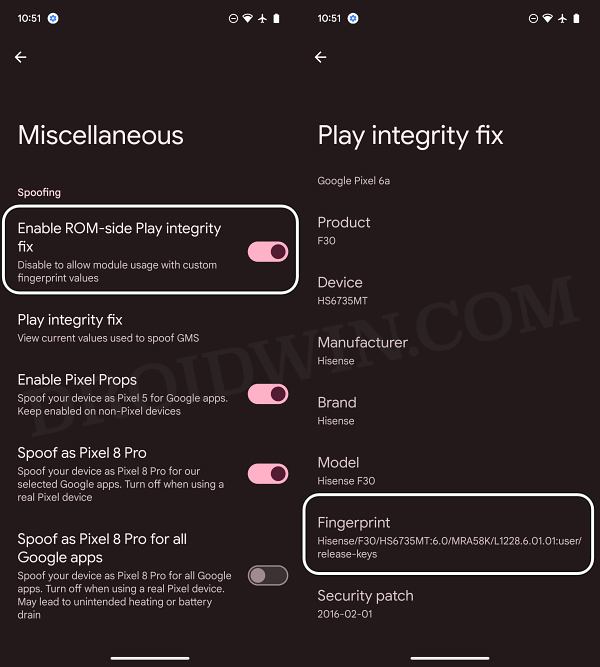
You can verify which fingerprint the APK is using by heading over to Settings > Miscellaneous > Play Integrity Fix section.
Via Module
This is the easiest of all the methods, however since this module is open source, the fingerprints might end up being patched sooner than later. In that case, it’s completely up to the developer when he releases a new build [if the existing one gets patched]. Keeping that in mind, here’s what you need to do:
- Launch the Magisk App and tap on the settings icon situated at the top right.
- Then enable the toggle next to Zygisk.
- Now tap on Hide the Magisk App > Enable the toggle next to Allow apps from this source.
- Assign a new random name to this Magisk app and hit OK.
- It will now ask for a home-screen shortcut, tap OK [recommended].
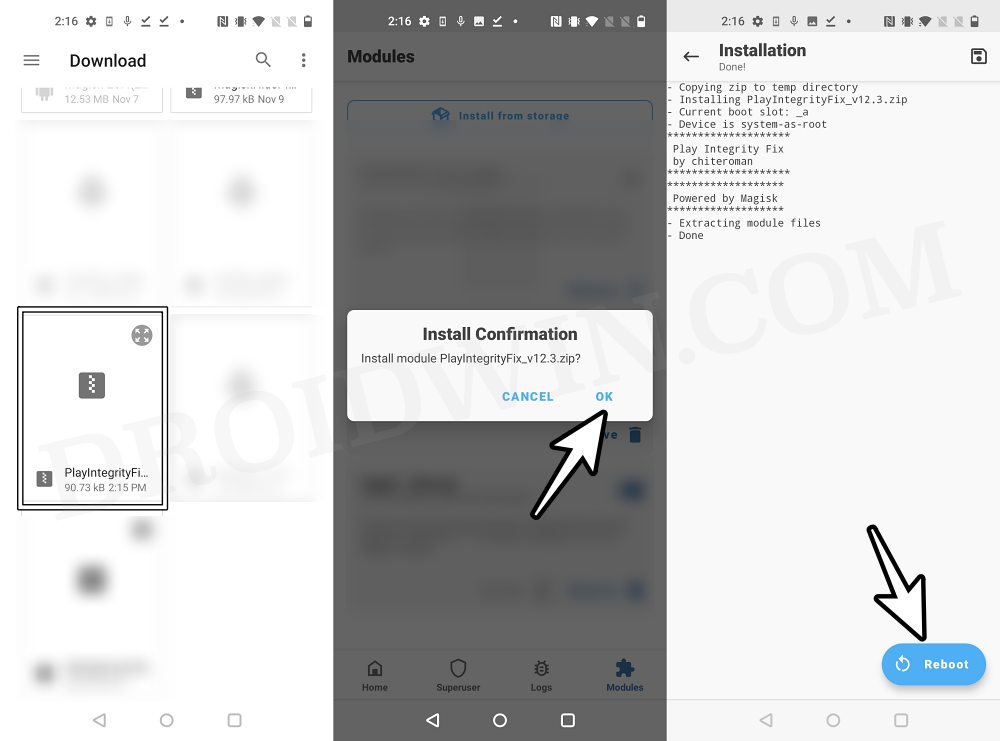
- Now download the “latest version” [extremely important] of Play Integrity Fix from GitHub.
- Then flash the module via Magisk and restart your device.
- Then enable the toggle next to Enforce Denylist. Now tap on Configure Denylist.
- Then expand the following apps and checkmark all its services Google Play Service Google Play Store Google Service Framework Google Play Protect Service [if present]
- Likewise, do the same for the banking/payment apps of your choice.
- Finally, delete the data from all the apps from which you have hidden root.
- Once done, restart your device [compulsory] and check out the result.
Via Pixel Flasher
Initially, Pixel Flasher gave us the platform to directly upload the build.prop JSON file that is passing the Play Integrity Test [instead of manually pushing it to the device]. Now, it has gone a step ahead and even incorporated a feature that will generate a random JSON file for you. So the major task of creating a JSON file is taken care of by the tool itself.
Use Custom Fingerprint/Build.Prop to Pass Play Integrity Test
You only need to do a couple of clicks to generate this file and send it to your device. After that, perform the test and check if your device is passing it. If it’s not, then again instruct the tool to generate a new JSON file and keep on doing so until you achieve success. All of this is given in the above linked guide, do check it out.
Manual Method
In this method, you’ll have to manually find a less popular device that is unknown to the masses, then get hold of the build.prop files. After that, you’ll need to find the PRODUCT (ro..name), DEVICE (ro..device), MANUFACTURER (ro..manufacturer), BRAND (ro..brand), MODEL (ro..model), and FINGERPRINT (ro..fingerprint), and the SECURITY_PATCH (ro.build.version.security_patch from system build.prop) values.
Use Custom Fingerprint/Build.Prop to Pass Play Integrity Test
Then you’ll have to create a JSON file using these values and transfer it to your device. While this is the most tedious out of all the three methods listed here, but it has the least chance of getting caught by Google and hence comes with the highest success rate. So if you wish to try it out, then do refer to the above guide, it will directly take you to the required section.
- List of custom fingerprints/JSON/build prop that pass Play Integrity
- Use Custom Fingerprint/Build.Prop to Pass Play Integrity Test
- Play Integrity Error Getting Token from Google: How to Fix
- Google Pay not working in Xiaomi EU ROM: Play Integrity Fix

- Aban 3 months ago Reply please share the latest keybox file with me.
- Aban 3 months ago Reply please share the latest keybox file
- Xif 4 months ago Reply Please give the keybox file….
- Pasupathi S 6 months ago Reply Hi brother please share me keybox XML file. Gmail I’d – spasupathi1306@gmail.com
- Moheen 6 months ago Reply Hi sir , please send me latest keybox xml file Email: moheen0006@gmail.com
- Moheen 6 months ago Reply moheen0006@gmail.com
- Anirudh 7 months ago Reply Hi can you please share the keybox XML file with me? Thanks a lot!
- Guna 7 months ago Reply I am on infinity x latest build need a keybox file pls share
- George 7 months ago Reply Keybox send please
- MOHD HABIB SIDDIQUI 7 months ago Reply Bro please send me the latest 17th keybox file please bro I am your subscriber thank you
- Kaushik Singha 7 months ago Reply pls share the 17th keybox file pls
- Kaushik Singha 7 months ago Reply pls share the 17th keybox file
- Abhishek 7 months ago Reply Plz provide the xml to funkybaba12@gmail.com thankyou.
- Jhin 8 months ago Reply hi there, please send the latest keybox file, thank you.. love your vids btw
- Ejaz 8 months ago Reply Need letest keybox file
- Rizki 9 months ago Reply Please send the keybox file sir, thank you.
- Mithilesh 9 months ago Reply Please send me key box file
- Amit 9 months ago Reply Send me keybox XML file
- saurabh 9 months ago Reply Plzz mail me the xml file bro been your sub from day1 Anish 7 months ago Reply Bro please send me keybox XML file
- saurabh 9 months ago Reply Plzz mail me the xml file bro
- Tinku Rajbhar 9 months ago Reply Brother, I am not able run the Axis Bank and YONO SBI apps on my rooted phone because they require strong integrity. Please give me a valid keybox.xml. I have been your subscriber for a very long time. Please.
- Abd 9 months ago Reply Hello brother Plz send keybox.xml Alkindh2008@gmail.com
- Sam 9 months ago Reply Please Send Me A Keybox File And Can You Please Share The Process Of Obtaining An Unrevoked KeyBox File Thank You
- Ronald 9 months ago Reply Good morning,i have been following your channel and subscribed to it to keep up with any updates or new developents. I want to install your U1nica rom on my Samsung S20fe im just not sure if my whatsapp will work without rooting,if you suggest rooting can you kindly send me the Keybox XML please,i appreciate it in advance
- ARBAAZ 9 months ago Reply BEO PLEASE GIVE ME FILE I ALREADY COMMENT ON PRIVIOUS ONE
- Kyamps 9 months ago Reply Please send keybox xml file to my email
- Jyotish 9 months ago Reply Keybox Leonardo González 9 months ago Reply Please send me a new keybox thanks
- Karime orane 9 months ago Reply Please send the keybox file thank you
- Wleam 9 months ago Reply Pls send keybox
- Lanthanode 9 months ago Reply Send latest keybox file sir thanks
- Lanthanode 9 months ago Reply Send latest keybox file sir
- Anshika 9 months ago Reply Please send the keybox XML file
- Pipi 9 months ago Reply Plss mail the XML file.
- ASHAR 9 months ago Reply Hi sir , please send me keybox xml file
- Sajal 9 months ago Reply Send me keybox XML file
- James 2 years ago Reply The PIFPrebuilt.apk won’t install: Xiaomi Redmi Note 11, A14, crDroid v10. (and there is no other version of this app installed) “App not installed as package conflicts with an existing package.” adb install –bypass-low-target-sdk-block PifPrebuilt.apk platform-tools>adb install –bypass-low-target-sdk-block PifPrebuilt.apk Performing Streamed Install adb: failed to install PifPrebuilt.apk: Failure [INSTALL_FAILED_SHARED_USER_INCOMPATIBLE: Reconciliation failed…: Reconcile failed: Package com.goolag.pif has no signatures that match those in shared user android.uid.system; ignoring!] PI Checker still fails device integrity, even with PIF 15.2. I see it says “no fingerprint” with the release so what solution to get one? Play shows not certified now as well.
(Cancel Reply)
Δ
Use Custom Fingerprint/Build.Prop to Pass Play Integrity Test
In this guide, we will show you two different methods to create custom fingerprints/build.prop to pass the Play Integrity Test on your rooted device or if you are running a custom ROM. Well, it seems we might finally reach the end of the road, as far as gaining administrative privileges is concerned. For the unaware, if you root your device, then it will trip the SafetyNet Test, thereby making it difficult to use banking and payment apps.
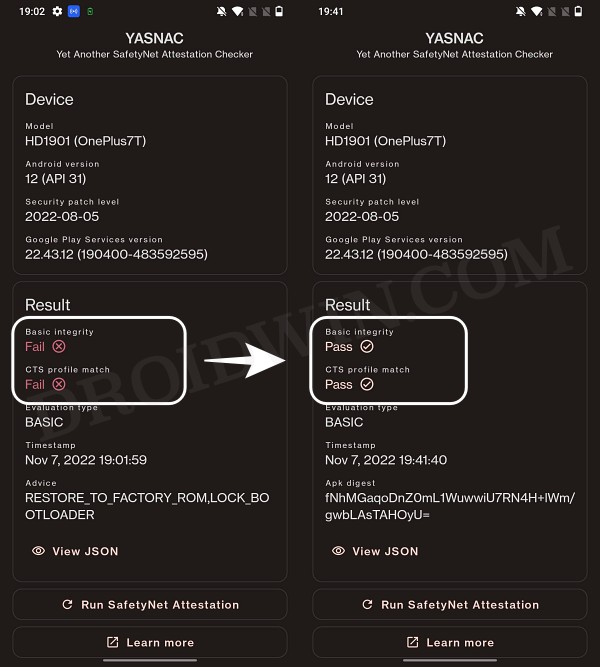
However, we managed to find a workaround that helped us pass this test with ease . Fast forward to this year, Google introduced the Play Integrity Test and has instructed every app to incorporate its API by January 2025. At the time of writing, many banking and payment apps have already shifted over to this test.
As before, if your device is rooted, then you will fail this test, thereby resulting in your inability to use banking apps. Fortunately, we once again managed to get hold of a method to bypass this test . Google then took a step further and patched our tweak only for us to bypass it once more! Until now. The Silicon Valley giant has finally taken the most extreme step to date which might finally spell the end of root for the tech enthusiasts.
- Google ‘Banning’ Fingerprints for Play Integrity: Is Hiding Root Impossible?
- How to Create and Use a Custom Fingerprint/Build.Prop to Pass Play Integrity One Click Method [Easiest] Create a New Fingerprint JSON File Manually Some Additional Tips on Creating Custom JSON Files Pixel Flasher Tool [Recommended]
- What if the Test Fails? Repeat and Repeat!
- Rooting and Custom ROMs: A Difficult Yet Achievable Journey Ahead!
- UPDATE: List of Fingerprints Build Prop Passing Play Integrity
Google ‘Banning’ Fingerprints for Play Integrity: Is Hiding Root Impossible?
Up until now, we were able to use the XDA Senior Member Chiteroman’s module to easily pass the MEETS_DEVICE_INTEGRITY and MEETS_BASIC_INTEGRITY, which are two prerequisites of the Play Integrity test. In hindsight, the module uses a fingerprint from one of the unpatched devices and the developer then uploads his mod over to GitHub. Since this mod is open source, anyone can easily decode it, including Google! And that is exactly what is happening.
While it might sound hard to digest why would Google end up utilizing a part of its resources towards this project which affects only about 3% of Android users, but trust us, that’s exactly what’s currently going on. The developer has tried out numerous combinations of fingerprints in its modules, including different OEMs, different Android versions, and even different custom ROMs [such as Evolution X].
However, every time a new module is released, Google tends to patch it straightaway, thereby leaving the developer with three options- either keep on playing this trial-and-error method, make the module closed source, or list out the instructions on how a user could create a custom fingerprint file and use it to pass this test.
The first approach was neither the most feasible nor the most viable for him [because he wasn’t earning anything from it and more importantly he has a life out of this modding community too!]. Likewise, making it a closed source might have raised a few eyebrows from some of the users [though judging by his reputation, that shouldn’t happen in the first place]. Henceforth, the third option is our best bet.
How to Create and Use a Custom Fingerprint/Build.Prop to Pass Play Integrity

There exist a couple of methods of getting this job done- the automatic and the manual way. In the automatic method, you would still need to carry out the first step from the manual method, but it will then take care of the rest of the steps. Moreover, please take a backup beforehand, just to be on the safer side. Droidwin and its members wouldn’t be held responsible in case of a thermonuclear war, your alarm doesn’t wake you up, or if anything happens to your device and data by performing the below steps.
One Click Method [Easiest]
Well, we can’t thank chiteroman enough for this! He has just released a plug-and-play version of this module which would be the easiest and best method to opt for the generic users. All you need to do is get hold of this module v14.2 from GitHub , enable Zygisk, flash it via Magisk, and delete the data of Google Services Framework, Play Store, Play Service, and Play Protect Service [if present]. Here’s a detailed guide on the same , it’s highly recommended you check it out.
Create a New Fingerprint JSON File Manually
XDA Senior Recognized Developer Osmosis took this responsibility on his shoulders and has done quite an excellent job in listing out the steps on how you could create and use a custom.pif.json. Here are the instructions steps for the same:
[Check out UPDATE section at the end of this guide!] First and foremost, download the stock ROM for a random device [see below], extract it, and get the system build.prop and/or product build.prop and vendor build.prop files from it. [In some cases, you could simply get hold of the firmware DUMP file directly on websites like Gitlab. So it’s better if you can find the dump because then you wouldn’t have the download the ROM and neither would you have to extract these files].
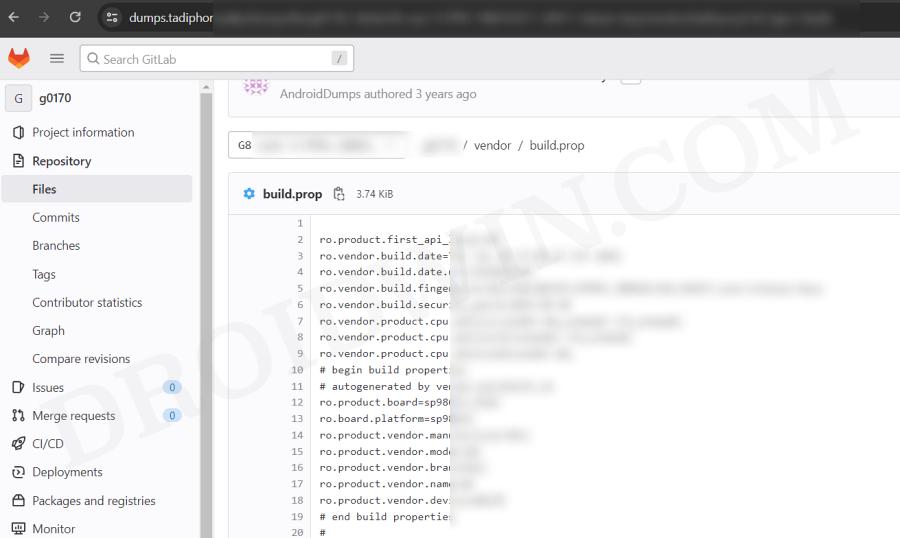
We cannot share these files/details publicly because Google will get hold of them and mass ban all of them at once [it has just happened with an Asus device. We managed to get an unpatched fingerprint from one of the Asus devices and used it to pass the Play Integrity Test. This worked for a few days before being ultimately patched by Google!]. Regarding “a random device” that we mentioned above, make sure to keep the following points in mind before you download its ROM:
- All older Nexus devices (Nexus 6/shamu and older) appear to be banned.
- Final release ROM builds of all no-longer-supported remaining Nexus and Pixel devices are banned.
- The device must have at least been upgraded to Oreo (Android 8) and should have come with at least an Android 6 or higher version out of the box.
- Devices launching with Pie (Android 9) or later might not work.
- In a nutshell, try to pick a combination of a device and its ROM which you don’t think many people will choose. This is because “The less obvious statistical data Google receives indicating a particular fingerprint is being abused, the fewer fingerprints will get banned”.
- Don’t go for the likes of Pixel, Samsung, Xiaomi, and other popular OEMs as most of their fingerprints have already been used or patched by Google. Instead, go for less-known brands such as Asus, Vivo, Oppo, or other Chinese brands that not many know about. Remember, the less popular a device is, the better your chance of passing the Play Integrity test!
Let’s now talk about the location of build.prop, product, and vendor.prop. In case of build.prop, it could be found at /system/system/build.prop or /system/build.prop. The product can be /product/build.prop and/or /product/etc/build.prop. The vendor is located in /vendor/build.prop or/system/vendor/build.prop.
In general, they’ll be ro.build.fingerprint + ro.product.* (older system build.prop), or, ro.system.build.fingerprint + ro.product.system.* (newer system build.prop) [or, ro.product.build.fingerprint + ro.product.product.* (product build.prop, only needed on devices where system build.prop contains “generic” values)].
From there, you’ll have to copy the following six values: PRODUCT (ro..name), DEVICE (ro..device), MANUFACTURER (ro..manufacturer), BRAND (ro..brand), MODEL (ro..model), and FINGERPRINT (ro..fingerprint). Optionally, also copy SECURITY_PATCH (ro.build.version.security_patch from system build.prop)
Any build prior to March 16, 2018 does not require a matching SECURITY_PATCH field, though adding it wouldn’t be of any harm. Moreover, do note that the date should be from the ro.build.date present in the system build.prop, instead of the AOSP base date in the fingerprint.
Now paste the copied values between the quotes of the corresponding fields in the template custom.pif.json sample shown below [it’s just a sample one that has already been banned by Google. So make sure to replace the values accordingly].
{

  "PRODUCT": "taimen",

  "DEVICE": "taimen",

  "MANUFACTURER": "Google",

  "BRAND": "google",

  "MODEL": "Pixel 2 XL",

  "FINGERPRINT": "google/taimen/taimen:8.1.0/OPM4.171019.021.R1/4833808:user/release-keys",

  "SECURITY_PATCH": "2018-07-05",

  "FIRST_API_LEVEL": "26"

}
Here’s another JSON file with slightly more information:
{

  "MANUFACTURER": "Google",

  "MODEL": "Pixel 2 XL",

  "FINGERPRINT": "google/taimen/taimen:8.1.0/OPM4.171019.021.R1/4833808:user/release-keys",

  "BRAND": "google",

  "PRODUCT": "taimen",

  "DEVICE": "taimen",

  "RELEASE": "8.1.0",

  "ID": "OPM4.171019.021.R1",

  "INCREMENTAL": "4833808",

  "TYPE": "user",

  "TAGS": "release-keys",

  "SECURITY_PATCH": "2018-07-05",

  "DEVICE_INITIAL_SDK_INT": "26"

}
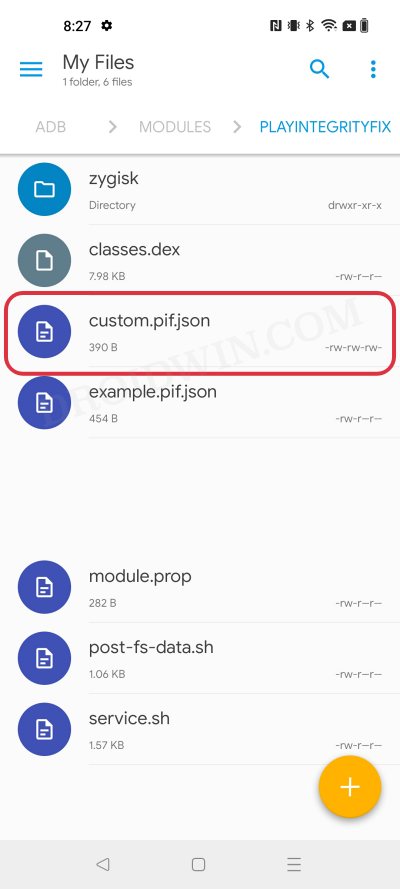
Once you have got the required information, save it in a text file and rename it to custom.pif.json if you are using the fork of the original module [by Osmosis, which we are using] or pif.json [if you are using the original module by Chiteroman]. After that, you’ll now have to transfer the file to your device.

For that, you could either do so via the Pixel Flasher Tool as explained in the next section, or by copying your .json file to /data/adb/modules/playintegrityfix/custom.pif.json [for Osmosis, in our case] or /data/adb/pif.json [for Chiteroman]. Once done, restart your device and then check if it passes the Play Integrity Test using this custom fingerprint/build.prop! If it doesn’t, then you’ll have to pick a different fingerprint and retry this process.
Some Additional Tips on Creating Custom JSON Files
- Let’s say that a device was released with Android 8, and then it received subsequent updates to Android 9 and 10. This way you’ll be able to create three different fingerprint JSON files to test. However, most of the details will be the same in all those files, such as MODEL, BRAND, MANUFACTURER, and even the FIRST API LEVEL because the device was initially launched with Android 8, that fact isn’t going to change irrespective of the current OS.
- Moreover, there needs to be a comma after the end of every line in the JSON file, except the last line [as is evident from our above example.
- If you still have any doubts with regard to your JSON file, then you could use this JSON Validator and it will point out all the errors in your file, if any.
Pixel Flasher Tool [Recommended]
The tool supports two methods- it could either generate a random fingerprint JSON file for you or you could create and upload your own custom fingerprint. If you ask the tool to generate a JSON file for you, then it has a high chance of getting patched by Google as opposed to the one that you have created manually. However, as opposed to the manual creation, it will take a lot [and yes, we really mean a lot] of time and effort. So decide on this trade-off accordingly.
- To begin with, get hold of the build.prop file from the desired firmware version as explained above.
- Then download and extract Android SDK Platform Tools on your PC.
- After that, enable Zygisk via the Magisk’s settings menu and restart your device.
- Now download Pixel Flasher from GitHub and launch it [credits: XDA Recognized Developer badabing2003].
- Then click on Browse > navigate to the platform-tools folder and select it.
- Now click on Scan and select your device from the list.
- Then click Magisk > Install PIF module and select the desired one [we have chosen Osmosis].
- The latest version of the mod will now be installed. Once done, hit OK and click Reboot System.
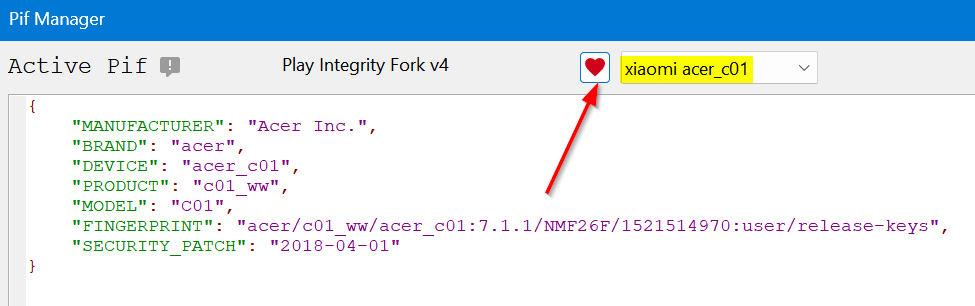
- Once your device boots up, click on PIF Manager [it will be empty as of now].
- Now, if you want to opt for the Manual Method , then click on Process build.prop(s) , navigate, and select your build.prop files. The order of precedence is as follows: build.prop system-build.prop system.prop product-build.prop product.prop vendor-build.prop vendor.prop Any other prop file
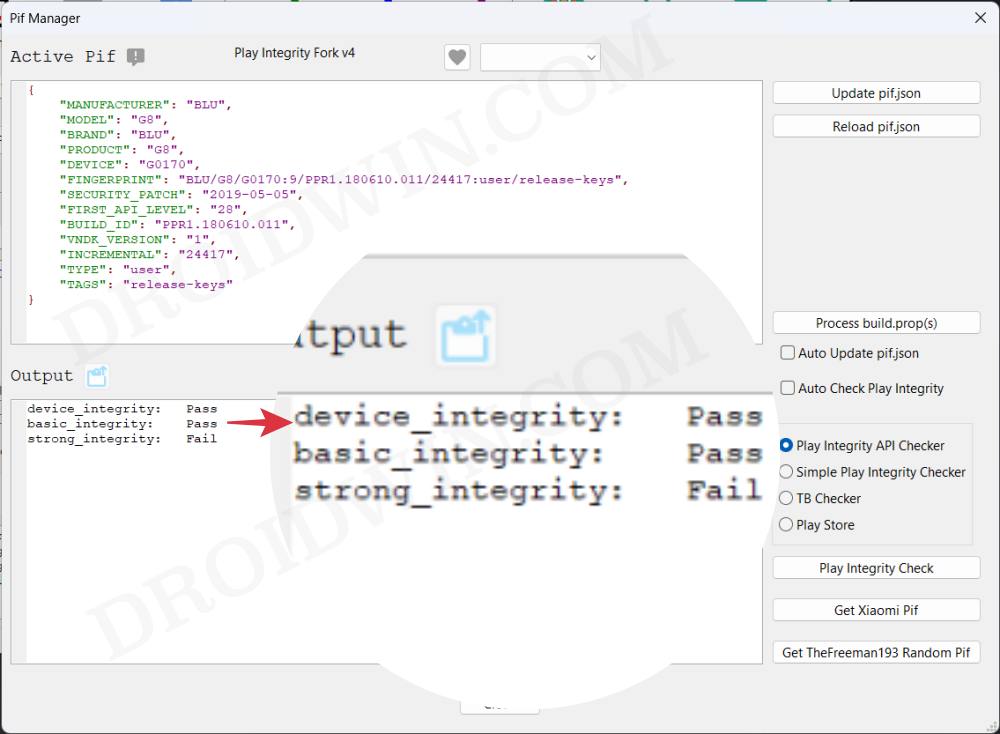
- The tool will now read these files and bring up the output something as shown in the below screenshot.
- On the other hand, for Automatic Method , click on the Get TheFreeman193 Random Pif button. It will populate the output window with the data from a random device.
- Once done, click on the Paste button next to Output and the data will be populated under the Active PIF section.
- At this stage, you should see the red warning next to Active PIF. This just indicates that the contents of the Active PIF window are not the same as the contents on the device.
- So click on Create PIF.json and the file will be transferred to your device. Likewise, the red warning should now turn gey, meaning the content of PIF widow is the same as that on your device.
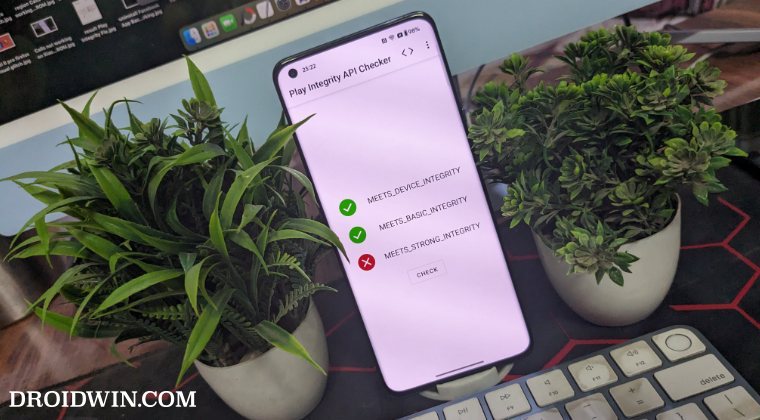
- Finally, download and install a SafetyNet Checker app out of the four listed there. As of now, we are going ahead with Play Integrity API Checker.
- So click on Play Integrity check. It will launch the Play Integrity API Checker app, perform the test, and display the result in the output window.
- If it passes the device integrity and basic integrity tests, then congrats, you have found the needle in the haystack! But what if the test fails? Let’s find out.
What if the Test Fails? Repeat and Repeat!
- If you have chosen the Manual Method and failed the test, then you’ll have to get hold of a new JSON file from different firmware and repeat the above steps. Do so until you get the right JSON file that passes both these tests.
- If you have chosen the Automatic Method , then in that case, click on the Get TheFreeman193 Random Pif button > click on Paste next to Output. Then click on Update PIF.json > Play Integrity Check. It will perform the check and display the result. Keep on carrying out these processes until you achieve success.
Moreover, as soon as you find the right fingerprint JSON file, make sure to hit the heart icon and save that file. And please don’t share it with others as upon doing so, the chances of it getting into the hands of Google and subsequently nullifying it by the Silicon Valley giant increases tremendously. [So sharing is not caring in this case!].
Rooting and Custom ROMs: A Difficult Yet Achievable Journey Ahead!
So this was all from this guide on how to use a custom fingerprint/build.prop and pass the Play Integrity Test. While we always believed in the “sharing is caring” motto, however, for once, let’s not adopt it in this case scenario. If you get hold of a working fingerprint and then end up sharing that with the rest of the users, then it will ultimately be patched by Google. So keep that unique build.prop with yourself and prevent it from getting caught by Google!
NOTE: Some or the other changes are being constantly implemented by Google at an alarming rate. Thankfully, the developers are always one step ahead and are testing out new ways of bypassing the patches enforced by the Silicon Valley giant. But this also means that you will witness changes to the modules at frequent intervals as well, so we will update this guide as and when that happens. Make sure to keep a tab on this post regularly. [Screenshots Credits, unless specified otherwise: XDA Recognized Contributor badabing2003].
UPDATE: List of Fingerprints Build Prop Passing Play Integrity
Well, we decided to do all the dirty work on your behalf by compiling a list of all the custom fingerprints/JSON/build props from the devices that pass the Play Integrity tests. However, make sure you’re the earliest adopter of these builds, or else, it won’t be long before others get their hands on them. With that said, even if these get patched by Google, we will generate a new one at the earliest. So make sure to keep a tab on the below linked guide frequently.
List of custom fingerprints/JSON/build prop that pass Play Integrity
- sonn 2 months ago Reply Send me XML file to pass device integrity
- Shadman 4 months ago Reply Hellloo pleaseee send keybox.xml Email : shadmanahmadixo@gmail.com
- Ameer 11 months ago Reply Send me XML file to pass strong integrity Skye 9 months ago Reply Please give me keybox.xml Thank you
- Milan Čížek 2 years ago Reply Hi, I have extracted all three build.prop (system,product,vendor) from original stock image – extracted all *.img via payload-dumper-go.exe from payload.bin + ext2explore.exe. But I am not able to load the prop to PIF Manager, it always ends with the error. File “pif_manager.py”, line 1051, in process_props AttributeError: ‘PifManager’ object has no attribute ‘first_api’ https://pasteboard.co/UioQok8ehMt9.png What is wrong? ro.product.first_api_level=30 is in vendor-build.prop ro.board.first_api_level=30 too
- Tjw 2 years ago Reply Thanks for this guide. I can finally get a working custom file. I appreciate this simplified explanation and it’s straight forward enough for me to get this working. Well done author!! Thanks
- Jonathan 2 years ago Reply get the system build.prop and/or product build.prop and vendor build.prop files from it. How? Milan Čížek 2 years ago Reply You have to download stock image for your phone and then extract them from system/product/vendor.img files. Swastik Singh 8 months ago Reply Pls XML file or file links to solve the issue of safety internet pass problem . in poco f5 matrixx os
- kryspus 2 years ago Reply hello, I have downloaded 4 differents rom, could you explain how to extract the system to get in to it? Thx
- kryspus 2 years ago Reply Hello i have hiting facing the wall while i wanted to unpack stock rom to see the right files. It’s looks like a quite a challenge, can i expect any advice here? It’s unbelievable how much GB’s i have to download from internet and a bunch of tools to get a few lines of code.
- Jimmy 2 years ago Reply Thank you for this guide. I have just discovered today that many of my apps are refusing to work because of this problem. Cheers
(Cancel Reply)
Δ
List of custom fingerprints/JSON/build prop that pass Play Integrity
From this guide, you can get hold of the build prop JSON file having custom fingerprints that pass the Play Integrity tests. Ever since Google laid out an ultimatum for the apps to make a switch from SafetyNet to Play Integrity , things have gotten quite challenging for tech enthusiasts. Gone are the days when you could simply flash a module, pass the test, and run the banking and payment apps with ease.
While the module to pass the Play Integrity still exists, however, it’s the interference from Google that has made things all the worse. Since the module is open source and available on GitHub, Google is able to easily access it and then ends up patching the fingerprint present in that module. The developer then rolls out a new version of the module with a different fingerprint but Google once again does the same- patching it and hence once again nullifying the module.
- Using a Rare Fingerprint/Build Prop
- List of custom fingerprints/JSON/build prop that passes Play Integrity BLU G8 Samsung SM-G950U Pixel 9 Pro
- How to use custom fingerprints/build.prop to Play Integrity
Using a Rare Fingerprint/Build Prop
Well, we can’t just keep on playing this cat-and-mouse game with Google. But what else could be done? As things stand, your best course of action is to manually create a fingerprint from a device that is quite rare and unknown to the masses. If you choose a fingerprint from the likes of Galaxy S23, Pixel 7, or Redmi Note 12, then for sure they would not work as Google would have already patched them.
Likewise, don’t use those fingerprints that come with a high chance of being used by the masses because they will also be patched by the Silicon Valley giant sooner rather than later. All in all, use a build.prop file that comes from a rare device and not many should be aware of the same [you could check out our detailed guide about which type of fingerprints are best suited under this scenario].
So it’s just a hit-and-trial method of getting hold of that perfect build prop JSON file having custom fingerprints that pass the Play Integrity test. Moreover, even if you get hold of the same, it is highly recommended that you don’t share it with others as its usage will skyrocket over time, come under the radar of Google, and you know what will happen next. However, to help you out, we are making an exception to this rule!
We will be listing out all those build prop JSON file having custom fingerprints that pass the Play Integrity test. It’s just on a first-come-first-serve basis, if you are among the earliest visitors to this site, then your device will end up passing both the MEETS_DEVICE_INTEGRITY and MEETS_BASIC_INTEGRITY tests. On the other hand, if you are late to the party, then the fingerprint would already have been used by the masses and it might not work for your device [still, you may give it a shot!].
List of custom fingerprints/JSON/build prop that passes Play Integrity

BLU G8
Raw dump of the firmware: G8-user-9-PPR1.180610.011-24417-release-keys [g0170/vendor/build.prop]
{

"MANUFACTURER": "BLU",

"MODEL": "G8",

"BRAND": "BLU",

"PRODUCT": "G8",

"DEVICE": "G0170",

"FINGERPRINT": "BLU/G8/G0170:9/PPR1.180610.011/24417:user/release-keys",

"SECURITY_PATCH": "2019-05-05",

"FIRST_API_LEVEL": "28",

"BUILD_ID": "PPR1.180610.011",

"VNDK_VERSION": "1",

"INCREMENTAL": "24417",

"TYPE": "user",

"TAGS": "release-keys"

}
Samsung SM-G950U
{

"MANUFACTURER": "samsung",

"MODEL": "SM-G950U",

"BRAND": "samsung",

"PRODUCT": "dreamqltesq",

"DEVICE": "dreamqltesq",

"FINGERPRINT": "samsung/dreamqltesq/dreamqltesq:7.0/NRD90M/G950USQU1AQDE:user/release-keys",

"SECURITY_PATCH": "2017-04-01",

"FIRST_API_LEVEL": "24",

"BUILD_ID": "NRD90M",

"VNDK_VERSION": "",

"INCREMENTAL": "G950USQU1AQDE",

"TYPE": "user",

"TAGS": "release-keys"

}
Pixel 9 Pro
{

"ID": "AD1A.240530.047.U1",

"BRAND": "google",

"DEVICE": "caiman",

"FINGERPRINT": "google/caiman/caiman:14/AD1A.240530.047.U1/12150698:user/release-keys",

"MANUFACTURER": "Google",

"MODEL": "Pixel 9 Pro",

"PRODUCT": "caiman",

"SECURITY_PATCH": "2024-08-05"

}
How to use custom fingerprints/build.prop to Play Integrity
Now that we have got hold of the most important data, you just need to create a JSON file using this data and send this JSON file to your device. You could either do so manually via a File Explorer or via the Pixel Flasher Tool . After that, restart your device and check out the results via an app such as Play Integrity API Checker.
That’s it. This was all from this guide regarding the build prop JSON file having custom fingerprints that pass the Play Integrity tests. We will be continuously updating this section with more fingerprints as and when we get hold of the same. Stay tuned!
- Use Custom Fingerprint/Build.Prop to Pass Play Integrity Test
- Play Integrity Error Getting Token from Google: How to Fix
- Google Pay not working in Xiaomi EU ROM: Play Integrity Fix
- How to pass “Meets Device and Basic Integrity” via Play Integrity Fix
- J 5 months ago Reply Please, send me the keybox
- David 7 months ago Reply Please send me the valid keybox file for OnePlus 13
- sam 9 months ago Reply please send XML.file latest version Nelprime 7 months ago Reply Please send me the keybox file.
(Cancel Reply)
Δ
