How to Restore Nothing Phone 1 from Custom ROM to Stock
In this guide, we will show you the steps to restore Nothing Phone 1 from Custom ROM to Stock. The device from a relatively newer player in the market had created quite an unprecedented hype when it was first launched. While that hype has slowly settled down, however, we cannot deny the fact that this device is quite an active player in custom development.
While the device is yet to be officially blessed with the Android 13 update but we already have the support of two custom ROMs with the latest OS build. However, in some instances, a custom ROM might not be in sync with your requirement or a few apps or services might not be working in this customized ecosystem. In all these cases, the best bet is to restore your Nothing Phone 1 from Custom ROM to Stock. And in this guide, we will show you how to do just that. Follow along.
- How to Restore Nothing Phone 1 from Custom ROM to Stock STEP 1: Install Android SDK STEP 2: Enable USB Debugging and OEM Unlocking STEP 3: Unlock Bootloader on Nothing Phone 1 STEP 4: Download Boot and Vendor_Boot for Nothing Phone 1 STEP 5: Boot Nothing Phone 1 to Fastboot Mode STEP 6: Flash Boot and Vendor Boot STEP 7: Install Stock Firmware via ADB
How to Restore Nothing Phone 1 from Custom ROM to Stock
The below process will wipe off all the data from your device, so take a complete device backup beforehand. Droidwin and its members wouldn’t be held responsible in case of a thermonuclear war, your alarm doesn’t wake you up, or if anything happens to your device and data by performing the below steps.
STEP 1: Install Android SDK

First and foremost, you will have to install the Android SDK Platform Tools on your PC. This is the official ADB and Fastboot binary provided by Google and is the only recommended one. So download it and then extract it to any convenient location on your PC. Doing so will give you the platform-tools folder, which will be used throughout this guide.
STEP 2: Enable USB Debugging and OEM Unlocking
Next up, you will also have to enable USB Debugging and OEM Unlocking on your device. The former will make your device recognizable by the PC in ADB mode. This will then allow you to boot your device to Fastboot Mode. On the other hand, OEM Unlocking is required to carry out the bootloader unlocking process.
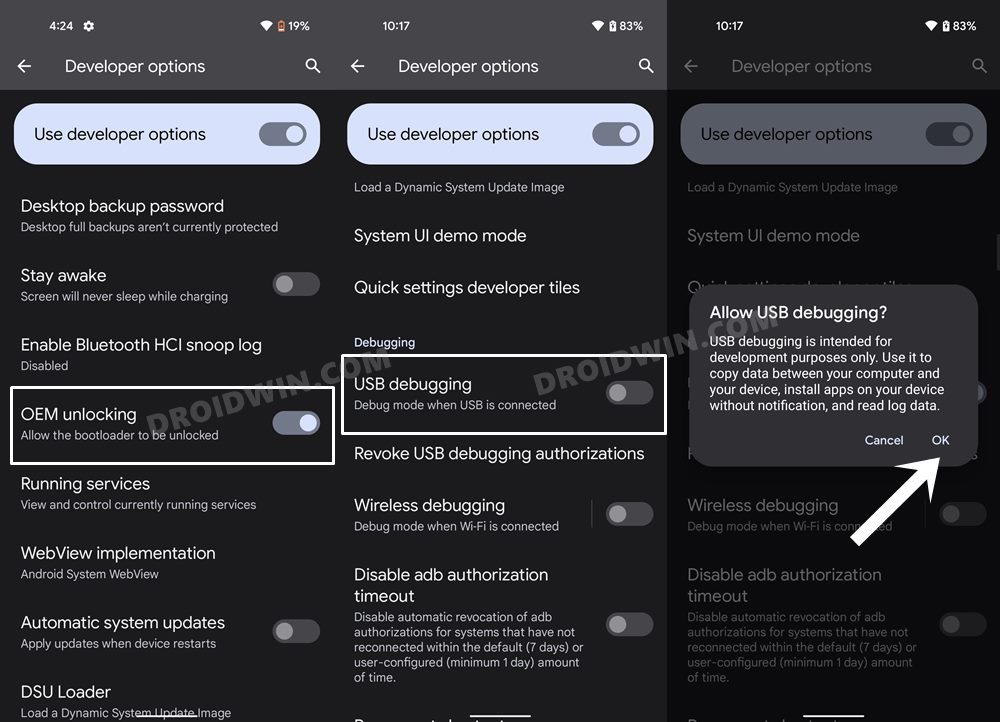
So head over to Settings > About Phone > Tap on Build Number 7 times > Go back to Settings > System > Advanced > Developer Options > Enable USB Debugging and OEM Unlocking.
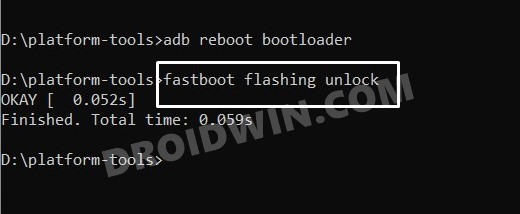
STEP 3: Unlock Bootloader on Nothing Phone 1
Next up, you will also have to unlock the device’s bootloader. Do keep in mind that doing so will wipe off all the data from your device and could nullify its warranty as well. So if that’s all well and good, then please refer to our detailed guide on Unlock Bootloader on Nothing Phone 1 [and its Critical Partition] . Once done, don’t restore the backup now as well will again have to format the device in the subsequent steps.
STEP 4: Download Boot and Vendor_Boot for Nothing Phone 1
You could directly get the boot and vendor_boot.img files from here without downloading the firmware. But first, make sure that it matches the firmware version that is currently installed on your device. If it doesn’t match, then refer to the below manual steps to get this job done.
- Download the stock firmware [the same version that is currently installed on your device].
- Then extract it to any convenient location on your PC.
- You will get the payload.bin file. Extract it to get the resultant partition IMG files.
- Once extracted, copy the boot and vendor_boot and transfer them to the platform-tools folder on your PC.
- Also, transfer the firmware ZIP file to the platform-tools folder as it will be flashed later on as well.
STEP 5: Boot Nothing Phone 1 to Fastboot Mode
- Now connect your device to the PC via a USB cable. Make sure USB Debugging is enabled.
- Then head over to the platform-tools folder, type in CMD in the address bar, and hit Enter. This will launch the Command Prompt.
- Type in the following command in the CMD window to boot your device to Fastboot Mode adb reboot bootloader
- To verify the Fastboot connection, type in the below command and you should get back the device ID. fastboot devices
STEP 6: Flash Boot and Vendor Boot
- First off, type in the below command to reset your device : fastboot -w
- Then execute the below command to flash the boot.img file fastboot flash boot boot.img
- Then type in the below command to flash the vendor_boot.img file fastboot flash vendor_boot vendor_boot.img
- Again reboot your device to Fastboot mode via the below command: fastboot reboot fastboot
- Now reboot your device to Recovery via the below command: fastboot reboot recovery
STEP 7: Install Stock Firmware via ADB
- Use the Volume keys to highlight the Apply Update from ADB option and press the Power key to confirm it.
- You should now see a message along the following lines on your device.
- Now head over to the platform-tools folder, type in CMD in the address bar, and hit Enter. This will launch the Command Prompt.
- Type in the following command in the CMD window to verify the ADB Sideload connection: adb devices
- If you get the sideload keyword in the Command Prompt, then the connection stands successful and you may proceed ahead.
- So go to the CMD window (that you have opened inside platform-tools) and type in the below command to install the firmware ZIP file: adb sideload update.zip
- The installation process will now begin and could take a few minutes. Once done, use the Volume keys to select the Reboot System Now option and press the Power key to confirm it.

(Cancel Reply)
Δ
