How to Root Android Device via KernelSU [GKI and LKM]
In this guide, we will show you the steps to root your Android device via KernelSu. Up until now, you could gain administrative privileges by patching and flashing the boot.img/init_boot.img or directly flashing the Magisk ZIP via a custom recovery. Now there has been a newer approach to get this job done- and this involves taking the kernel route.
- What is KernelSU
- What are the Different Modes of KernelSU Benefits of GKI Mode Benefits of LKM Mode Should You Choose GKI or LKM Mode in KernelSU
- The Prerequisites to Root Android Device via KernelSU STEP 1: Check if Device has GKI Kernel STEP 2: Download Android SDK Platform Tools STEP 3: Enable USB Debugging and OEM Unlocking STEP 4: Unlock Bootloader STEP 5: Find the Kernel Module Interface STEP 6: Verify Security Patch
- How to Root Android via KernelSU LKM Via Stock Firmware Via KernelSU Manager Select and patch a file Install Directly Install to Another Partition
- How to Root Android via KernelSU GKI Using Boot.img provided by KernelSU Manually Extracting Boot.img Via magiskboot on Phone Via magiskboot on PC Via Android Kitchen Install KernelSU via TWRP and Root Android Install KernelSU via Kernel Flasher and Root Android
- Root Android via Prepatched Kernels with KernelSU Support
- Rooting via Magisk and KernelSU: Is it Possible?
- Can KernelSU GKI and LKM Exist Together?
- How to Flash Modules via KernelSU
- How to Unroot any Android Device via KernelSU When Rooted in LKM Mode When Rooted in GKI Mode
What is KernelSU
KernelSU is a root solution for Android devices that beholds a Generic Kernel Image, it works in kernel mode and grants root permission to applications directly in the kernel space. Similar to how you could flash a single GSI file to any project treble device, similarly you will be able to root your device via a generic kernel image.
There is just one requirement for this tweak to work- your device should have a GKI Kernel [we will show you how to check that as well]. Moroever, since this is kernel-based aka it works in kernel mode, so it can easily provide a kernel interface that will allow you to open floodgates to a plethora of tweaks such as adding a hardware breakpoint to any process in kernel mode.
What are the Different Modes of KernelSU
There exist two different modes in KernelSU that you could use to root your device: Generic Kernel Image and Loadable Kernel Module . In GKI mode, the original kernel of the device will be replaced with the generic kernel image provided by KernelSU. On the other hand, in LKM mode, the original kernel of the device will not be replaced and the loadable kernel module will be loaded into the device kernel.
Benefits of GKI Mode
- A GKI module is compatible with far more devices when compared with LKM
- There is no need to rely on the OEM or wait for them to release kernel updates [just make sure that the KMI remains consistent, more on that later].
Benefits of LKM Mode
- If you are planning to make some tweaks to the stock kernel or want to use a custom kernel,m then you should opt for the LKM Mode.
- Likewise, using an LKM Mode will make it easier for you to update devices and install OTA updates when compared with GKI. KernelSU in LKM Mode
- Another interesting and highly useful feature of LKM is that it can also be loaded with temporary root permissions as well. The reason for the same is the fact that it does not replace the boot partition and hence it will not trigger the Android Verified Boot.
- Last but not the least, you can also temporarily disable root access by uninstalling LKM, which isn’t possible with GKI. Moreover, you could then re-enable the root access just by doing a restart!
Should You Choose GKI or LKM Mode in KernelSU
If you are using an Android device [smartphone, then you should opt for LKM. On the other hand, if you are using an emulator or Windows Subsystem for Android, then consider using the GKI .
NOTE: Nowadays, some developers provide a prepatched kernel with the in-built support for KernelSU/KernelSU Next along with SUSFS [a root hiding tool], so you wouldn’t even have to carry out most of the prerequisites given below. Simply scroll to the “Root Android via Prepatched Kernels with KernelSU Support” section of this guide to know more [hit Ctrl+F on Windows or CMD+F on Mac to bring up Find, paste that query, and hit Enter- you’ll be straightaway taken to that section.
The Prerequisites to Root Android Device via KernelSU

Before proceeding ahead, please take a backup of all the data on your device. Droidwin and its members wouldn’t be held responsible in case of a thermonuclear war, your alarm doesn’t wake you up, or if anything happens to your device and data by performing the below steps.
STEP 1: Check if Device has GKI Kernel
- First off, verify if your device has a GKI Kernel or not.
- To do so, download and install the KernelSU app from GitHub . Then launch it. Left: Yes | Right: No
- If it shows Not Installed, then you could root your device via KernelSU.
- However, if it shows Unsupported, then your device cannot be rooted via KernelSU.
STEP 2: Download Android SDK Platform Tools

Next up, you have to install the Android SDK Platform Tools on your PC. This is the official ADB and Fastboot binary provided by Google and is the only recommended one. So download it and then extract it to any convenient location on your PC. Doing so will give you the platform tools folder, which will be used throughout this guide.
STEP 3: Enable USB Debugging and OEM Unlocking
Next up, you will also have to enable USB Debugging and OEM Unlocking on your device. The former will make your device recognizable by the PC in ADB mode. This will then allow you to boot your device to Fastboot Mode. On the other hand, OEM Unlocking is required to carry out the bootloader unlocking.
So head over to Settings > About Phone > Tap on Build Number 7 times > Go back to Settings > System > Developer Options > Enable USB Debugging and OEM Unlocking.
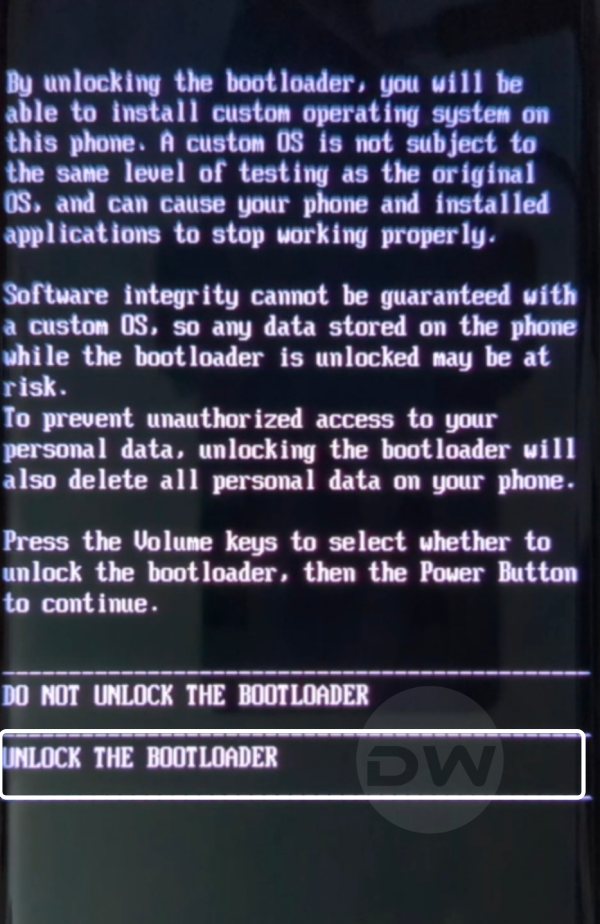
STEP 4: Unlock Bootloader
It doesn’t matter which method you opt for when it comes to rooting the device, having an unlocked bootloader is a must. So refer to our detailed guide on How to Unlock Bootloader of Any Android Device and get this job done. However, do note that doing so will wipe off all the data from your device and might make its warranty null and void as well.
STEP 5: Find the Kernel Module Interface
First off, let’s find the kernel module interface for the kernel installed on your device. All the kernels that have the same KMI are cross-compatible [hence the term Generic in GKI Kernel].
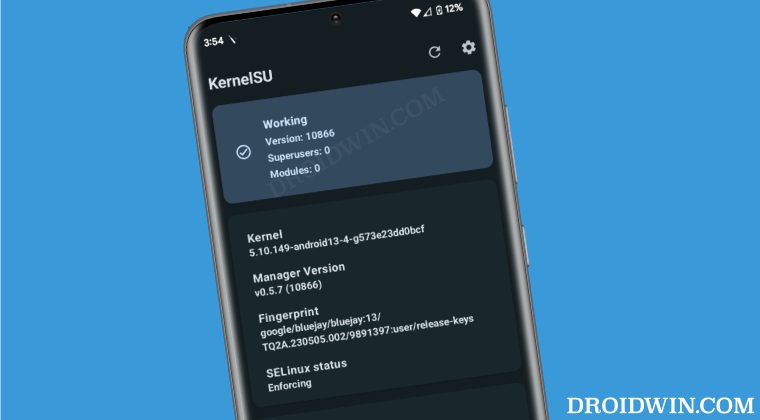
- Launch the KernelSU app and check out the Kernel Version.
- You could also verify the same from Settings > About Phone > Kernel version.
- It should be in the following format, where w.x-zzz-k will be the KMI version. KernelRelease := Version . PatchLevel .SubLevel- AndroidRelease - KmiGeneration -suffix w .x .y -zzz -k -something
- For example, on my device, the Kernel Version is 5.10. 149- android13 – 4 -00003-gebdbc9fbe2e2.
- So the KMI version for my device will be 5.10-android13-4.
NOTE 1 : The SubLevel in the kernel version is not part of the KMI. So 5.10. 137 -android13-4-gebdbc9fbe2e2 has the same KMI as 5.10. 149 -android13-4-gebdbc9fbe2e2.
EXAMPLE 2: In the screenshot for my device that I will be using throughout this guide, the Kernel Version Format is:

5.10.198-android13-4-00036-g11d7e4f57f68-ab1139

w= 5

x= 10

y= 198

zzz= android 13

k= 4

something= 00036-g11d7e4f57f68-ab1139
Therefore, the KMI Version , which is w.x-zzz-k , translates to 5.10-android13-4 for my device.
NOTE 2 : The Android OS version is not necessarily the same as the version number of the Linux kernel [the former could be greater than the latter as well]. So if your kernel version is android12-5.10.101, but your Android system version is Android 13 or other, then it’s completely normal and nothing to worry about.
STEP 6: Verify Security Patch
This is an extremely important step that usually goes unnoticed. Before you proceed to get hold of the kernel provided by the KernelSU, you would usually check for the KMI version. However, that isn’t the only heck that you should perform, you’ll also have to keep a tab on the security patch level. To be more specific, do not download a kernel that has a lower security patch than the one that is currently installed on your device as it will trigger the Anti Rollback.
For example, if the current kernel version is 5.10.101-android12-9-g30979850fc20 and has a security patch of October 2023. But if you’re flashing a kernel having version 5.10.101-android12-9-g30979850fc20 and a security patch of July 2023, then it will lead to a bootloop.
This is because even though the KMIs are the same, the security patch is undergoing a downgrade, which is a big no. So you should only download the kernel with the security patch or higher than the current one [which in this case should be >= October 2023].
How to Root Android via KernelSU LKM
There exist quite a few methods when it comes to rooting Android via LKM in KernelSU. Go through each of these methods once and then try out the one that is in sync with your requirements.
Via Stock Firmware
This is for those sets of users who are aware of the kernel compression format of their official boot.img [such as gz for Xiaomi devices]. Moreover, your device should support temporary boot [the fastboot boot command] as well. If you are not sure of these requirements or if your device doesn’t support them, then please try out the manual approach given in the next section [and skip this section].
- First off, download the already patched boot.img corresponding to your device’s GKI from here.
- For example, if your KMI is 5.10.149-android13-4, then download the one which corresponds to this format: android13-5.10.149_ yyyy-MM.boot-
.img - You will find around 3 different kernels corresponding to the same KMI, with the only difference being in the kernels compression format [for example, Xiaomi usually uses gz].
- Once you have got the boot.img, transfer it to the platform tools folder.
- Now open CMD inside platform tools and type in the below command to boot your device to the Fastboot Mode adb reboot bootloader
- Then execute the below command to temporary boot via the patched boot.img: fastboot boot boot.img
- Verify if your device boots to the OS or not. If it does, then you have obtained a temporary root.
- However, if if it doesn’t, then just do a normal restart, and your device will be boot to the non-rooted OS [and you should try out any of the other methods listed below].
- Moving on, to obtain a permanent root, you could take two different approaches.
- Either launch the KernelSU app, tap on Install, select the Direct Install option, and reboot the device when done.
- Or boot to Fastboot Mode, type in the below command to permanently flash the boot.img: fastboot flash boot boot.img
- Finally, type in the below command to boot your device to the rooted OS: fastboot reboot
Via KernelSU Manager
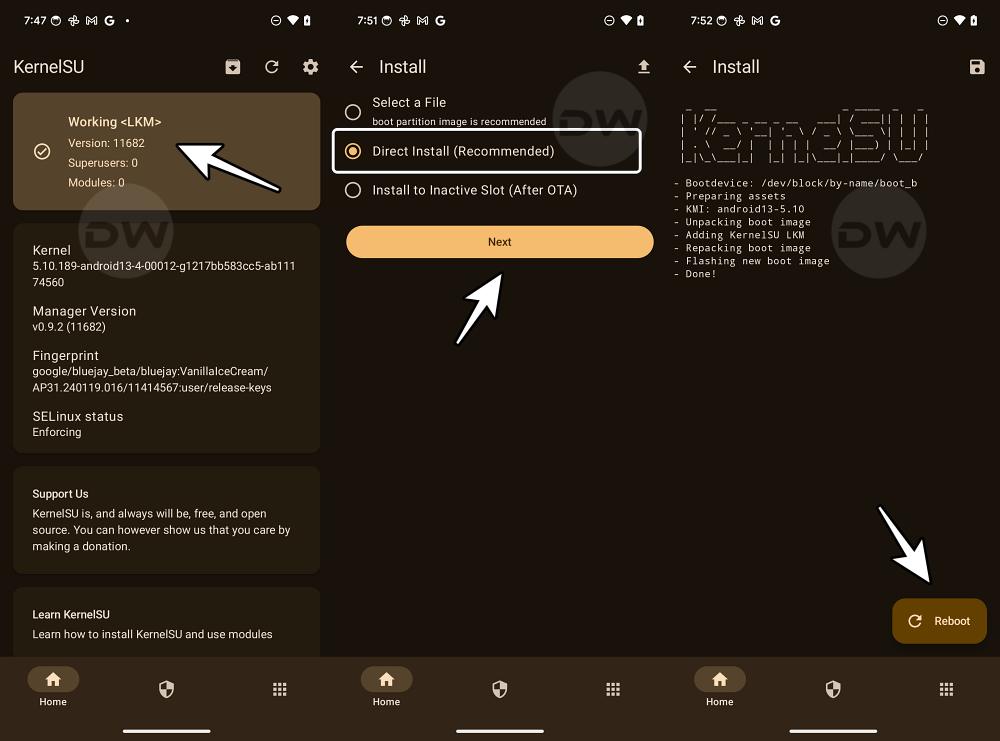
If your device does not support fastboot boot or if the available kernels are not compatible with your devices [such as Pixels, which requires manual patching, explained at the end], then in those cases, you could opt for this method. So launch KernelSU Manager and tap on the Install icon at the top right. You’ll be provided with three options: Select and patch a file, Install Directly, and Install to Another Partition. Here’s what each of these options signifies:

NOTE : “Non-rooted users” will only see the Select and Patch a File option as the other two require a rooted device beforehand.
Select and patch a file
It is highly recommended that you use the boot.img instead of init_boot while carrying out the below steps.
- If your device is currently non-rooted, then choose this option.
- First off, extract the boot.img from the firmware that is currently installed on your device.
- Then tap on Not Installed > Select a File > choose the stock boot.img.
- Once done, transfer the patched file to the platform-tools folder.
- Now, rename it to boot.img [or init_boot.img, if you used that file].
- Then open Command Prompt and type in the below command: adb reboot bootloader
- Now use the below command to flash the KernelSU patched boot fastboot flash boot boot.img fastboot flash init_boot init_boot.img // for those who used init_boot
- Now use the below command to boot your device to the rooted OS fastboot reboot
Install Directly
If your device is already rooted and you’re just planning to upgrade the KernelSU , then this should be your go-to method. So choose this option and the KernelSU manager will automatically get your device information, patch the official firmware, and subsequently flash it. Your device will then boot to the upgraded KernelSU module.
Install to Another Partition
Use this method if you want to retain root after OTA . It’s just that your device should support an A/B partition [which nearly every Android device supports, still you may perform this check via the Trenle Info app]. If that’s well and good, then here’s how to use this feature:
- First off, download and install the OTA update on your device.
- Then launch KernelSU, tap on the Install icon at the top right, and choose Install to Another Partition.
- The manager will now automatically patch the official firmware and then install it to another partition.
- Once done, restart the device. The slots will be changed and the device will boot to the rooted updated OS!
How to Root Android via KernelSU GKI
There exist four different methods through which you can root your Android device via GKI in KernelSU. Go through each of these methods once and then try out the one that is in sync with your requirements.
Using Boot.img provided by KernelSU
If you are able to verify the kernel compression format and are sure of the fact that your device supports the fastboot boot command, then this should be your go-to method.
- Download the correct boot.img from GitHub using the KMI version of your kernel [see STEP 5 Prerequisites].
- There might be three boot files in different formats having the same KMI and security patch levels, the only difference being in the kernel compression format.
- So you’ll have to check the kernel compression format for your stock boot.img and then download the file accordingly. For example, Xiaomi usually use gz or uncompressed.
- Now transfer this boot.img file to the platform-tools folder. Likewise, open Command Prompt inside the platform-tools folder.
- Then type in the below command to boot your device to Fastboot Mode adb reboot bootloader
- Now if your device supports temporary boot, then use the below command to temporarily boot your device to the rooted OS. If everything works well and good, then you may do the permanent installation. fastboot boot boot.img
- If your device gets stuck in a bootloop, then just do a reboot. The patched boot will be replaced by the stock one and your device will boot to the non-rooted OS. You may then try out any of the other methods listed in this guide.
- If your device doesn’t support fastboot boot or if it does and you are now looking for permanent root, then you may take two different approaches.
- First off, launch the KernelSU app, tap on Install, select the Direct Install option, and reboot the device when done.
- Or boot your device to Fastboot Mode and use the below command to permanently flash the boot.img: fastboot flash boot boot.img
- Finally, use the below command to boot your device to the rooted OS: fastboot reboot
Manually Extracting Boot.img
If the kernel file provided by KernelSU isn’t compatible with your device or you are unsure of which file you need to download, or you own a Pixel device whose compression format is unknown, then in those cases, you may use any of the below three methods to root your Android device via KernelSU.
Via magiskboot on Phone
- Download the latest Magisk APK file from its official GitHub page.
- Now rename the Magisk APK to Magisk ZIP and then unzip the file.
- After that, transfer this file to the platform-tools folder on your PC.
- Likewise, open the Command Prompt window inside this folder.
- Now type in the below command to transfer the libmagiskboot.so file from Magisk to the tmp directory of magiskboot on your device. adb push Magisk/lib/arm64-v8a/libmagiskboot.so /data/local/tmp/magiskboot
- Now download the AnyKernel3 ZIP corresponding to your kernel’s KMI [see Prerequisite STEP 5].
- Then extract it and transfer the Image file to your device. Also, transfer the stock boot.img to your device.
- Now type in the below command in the CMD window: adb shell
- Then change the directory via: cd /data/local/tmp/
- Now execute the below command chmod +x magiskboot
- Again, open the shell environment via: adb shell
- Likewise, change the current directory: cd /data/local/tmp/
- Now unpack the boot.img via the below command: ./magiskboot unpack boot.img
- You will get a kernel file, this is your stock kernel.
- Replace kernel with Image by running the below command: mv -f Image kernel
- Finally, execute the below command to repack the boot.img file: ./magiskboot repack boot.img
- You will get a new-boot.img file, transfer it to platform-tools.
- Now boot your device to Fastboot Mode via the below command: adb reboot reboot
- Then use the below command to flash the new boot-img file: fastboot flash boot new-boot.img
- Note: If supported by your device, you may also temporarily boot: fastboot boot new-boot.img
- Then use the fastboot flash boot new-boot.img for permanent root.
- Finally, boot your device to the rooted OS via the below command fastboot reboot
Via magiskboot on PC
- Download the magiskboot for your OS from here .
- Now download the AnyKernel3 ZIP corresponding to your kernel’s KMI [see Prerequisite STEP 5].
- Then extract it and transfer the Image file to your device. Also, transfer the stock boot.img to your device.
- Now type in the below command in the CMD window: adb shell
- Then change the directory via: cd /data/local/tmp/
- Now execute the below command chmod +x magiskboot
- Again, open the shell environment via: adb shell
- Likewise, change the current directory: cd /data/local/tmp/
- Now unpack the boot.img via the below command: ./magiskboot unpack boot.img
- You will get a kernel file, this is your stock kernel.
- Replace kernel with Image by running the below command: mv -f Image kernel
- Finally, execute the below command to repack the boot.img file: ./magiskboot repack boot.img
- You will get a new-boot.img file, transfer it to platform-tools.
- Now boot your device to Fastboot Mode via the below command: adb reboot reboot
- Then use the below command to flash the new boot-img file: fastboot flash boot new-boot.img
- Note: If supported by your device, you may also temporarily boot: fastboot boot new-boot.img
- Then use the fastboot flash boot new-boot.img for permanent root.
- Finally, boot your device to the rooted OS via the below command fastboot reboot
Via Android Kitchen
If you are not sure of the kernel compression format or if the patched boot.img is not available for your device [such as Pixel uses lz4_legacy, for which the boot.img is not present], then you’ll have to manually get this job done. In this regard, there are three different methods that you could opt for and we have listed all of them below. Go through them once and then try out the one that is in sync with your requirements.
- To begin with, extract the boot.img from the stock firmware.
- Make sure it is the same version that is installed on your device.
- Then download and extract Android Image Kitchen on your PC.
- Now transfer the stock boot.img inside the Android Image Kitchen folder.
- Then download and extract AnyKernel3 ZIP file that corresponds to your KMI.
- For example, if your KMI is 5.10.149-android13-4, then download the one which corresponds to this format: android13-5.10.149_yyyy-MM.boot-
.img - Now open the CMD window inside the Android Image Kitchen folder and type in the below command to extract the boot.img unpackimg.bat boot.img
- It will now unpack boot.img and you will get a couple of files. Replace boot.img-kernel in the split_img directory with the Image you extracted from AnyKernel3.
- Make sure to rename the Image boot.img-kernel. Once done, type in the below command to repack the boot.img repackimg.bat
- You’ll get image-new.img, and transfer it to the platform-tools folder. Then open the CMD window inside this folder.
- Now type in the below command to boot your device to Fastboot Mode adb reboot bootloader
- Then execute the below command to temporary boot via the patched boot.img: fastboot boot image-new.img
- If everything’s working well and good, then reboot your device to Fastboot Mode.
- If it’s not, then just do a normal restart, and your device will be booted to the OS.
- Now type in the below command to permanently flash this boot.img: fastboot flash boot image-new.img
- Finally, type in the below command to boot your device to the rooted OS: fastboot reboot
Install KernelSU via TWRP and Root Android
The benefit of this method is that it’s quite easy to execute. But on the flip side, not every device has a working custom recovery like TWRP. If yours has one, then let’s get started. Before starting, do check out our guide on How to Install TWRP Recovery on Android
- Download the AnyKernel3 ZIP that corresponds to your device’s KMI.
- For example, if your KMI is 5.10.149-android13-4, then download: AnyKernel3-android13-5.10.149_yyyy-mm.zip
- Once downloaded, transfer it to your device.
- Then open Command Prompt inside the platform-tools folder.
- Now type in the below command to boot your device to TWRP. adb reboot recovery
- Then go to Install, select the kernel.zip, and perform a right swipe to flash it.
- Once done, go to Reboot and select System. Your device will boot to the rooted OS.
Install KernelSU via Kernel Flasher and Root Android
The benefit of this method is that it’s extremely easy to carry out. However, its prerequisite is its biggest drawback- your device needs to be rooted beforehand. So in what case will it come in handy? Well, if you have installed an older version of KernelSU and want to update it to the latest version, then this should be your go-to choice.
- Download and install Franko Kernel Manager from the Play Store
- Then launch it and tap Grant in the Magisk pop-up.
- Now tap on Manual Flasher and select Flasher.
- Then select the kernel.zip file and hit Flash & Reboot.
- The flashing will now begin. Once done, your device will boot to the rooted OS.
Root Android via Prepatched Kernels with KernelSU Support
Some developers provide pre-patched kernels with support for KernelSU or KernelSU Next [fork of KernelSU]. You just need to flash that custom kernel and your device stands rooted, so there’s no need to carry out most of the technicalities mentioned above. To try it out, you may refer to the guides listed below to know more about them:
- How to Root any OnePlus via KernelSU Next and SUSFS
- How to Root Pixel Devices via KernelSU
- Guide to Root Nothing Phone 2 via KernelSU
- Root Samsung UN1CA ROM via KernelSU and SUSFS
- Root Galaxy A52s 5G with KernelSU and KernelSU Next SUSFS
- How to Root Galaxy S20 FE via KernelSU and SUSFS
- How to Root OnePlus 13 via KernelSU Next and SUSFS
- Here’s How to Root OnePlus 11 using KernelSU Next and SUSFS
- Unlock Bootloader and Root OnePlus 13R/Ace 3 via KernelSU
- How to Flash Kernel with Integrated KernelSU on Galaxy S24 Ultra
Rooting via Magisk and KernelSU: Is it Possible?
Yes, you can root your device via Magisk and KernelSU as well. This could be done by initially rooting your device via Magisk [even a temporary root will do], then granting the administrative privileges and SuperUser rights to KernelSU, then rooting your device via KernelSU using any of your preferred methods, and finally, uninstalling Magisk. This way you’ll still have root and KernelSU but not Magisk. Here’s how all of this could be carried out:
- To begin with, root your device via Magisk patched boot/init_boot.
- After that, download and install the KernelSU app on your device.
- Now root your device via KernelSU using any of the given methods.
- Then launch the Magisk app > tap on Uninstall > Complete Uninstall.
- Once done, hit Reboot. Your device will now reboot to the rooted OS.
- Along with root, you’ll have KernelSU but no Magisk on your device.
Can KernelSU GKI and LKM Exist Together?
Yes, both the Generic Kernel Image and Loadable Kernel Module of KernelSU can co-exist together, however, the priority of the GKI mode will be higher than that of LKM. Say, if you are using a GKI Kernel to replace the original kernel and then use LKM to patch the GKI kernel, then in that case, LKM will be ignored and the device will always run in GKI mode!
How to Flash Modules via KernelSU
Here’s how you could flash a module ZIP file using KernelSU:
- Download the desired module ZIP file to your device.
- Then launch KernelSU and go to the Modules section.
- Tap on Install, navigate to the module zip, and select it.
- It will now be flashed. Once done, hit the Reboot button.
- Device will boot to OS and the module will be activated.
How to Unroot any Android Device via KernelSU
If you no longer want to have root on your device for whatever reason, then either refer to our detailed guide on How to Unroot any Android Device: Uninstall Magisk/KernelSU or check out the below shorter instructions:
When Rooted in LKM Mode
If you have rooted your device in LKM Mode, then the process is quite easy and can be carried out directly from within the app itself. Here’s how:
- Launch KernelSU, go to Modules, and disable and uninstall all of them.
- Then go to Home, tap on the Settings icon at the top right > hit Uninstall.
- Next up, select Uninstall Permanently and tap OK in the prompt that appears.
- Finally, restart your device. KernelSU is removed and your device is unrooted.
When Rooted in GKI Mode
If you have rooted your device in GKI Mode, then there will be no Uninstall option in the KernelSU app. In such cases, you’ll have to take the help of the stock boot/init_boot file and the Fastboot Command to get this job done. Here’s how:
- Get the same stock boot/init_boot.img file that you had earlier provided to KernelSU for rooting.
- Just to recall, it should be extracted from the same firmware that is currently installed on your device.
- Now launch KernelSU, go to Modules, and remove all the modules from there.
- Then, uninstall the KernelSU app from your device.
- Now, download and extract the Android SDK Platform Tools on your PC.
- Then transfer the boot/init_boot inside this platform-tools folder.
- Now open Command Prompt inside this folder and type in the below command: adb reboot bootloader
- Now type in either of the two commands, depending on the file that you are using: fastboot flash boot boot.img fastboot flash init_boot init_boot.img
- Finally, use the below command to boot your device to the non-rooted OS: fastboot reboot
- How to Extract Boot.img for Root via DSU Sideloader
- How to Freeze Apps on your Android Device [Without Root]
- Signature verification failed: How to Sideload Magisk & Root [Video]
- How to Set up and Run Shizuku [Wireless Debugging, Root, ADB]

- Sam 2 years ago Reply Yeah, it’s sad to know that KernelSU is only support GKI’s kernel, and also that KernelSU is only support Android 12 and above. It’s very frustrating to know that KernelSU is only for some device only.
(Cancel Reply)
Δ
How to Root any OnePlus via KernelSU Next and SUSFS
In this guide, we will show you the steps to root your OnePlus device using KernelSU Next and SUSFS. When it comes to gaining administrative privileges over your device, Magisk has long been the go-to choice for tech enthusiasts. However, over the last few months, we have witnessed a slight change in this trend, with many people moving towards KernelSU.
One major reason for the same is the issues with hiding the root when it comes to Magisk. Even if you end up passing the Basic and Device test [well, in some cases, even the Strong Test] and hide the Magisk app, the banking and payment apps will still end up identifying that your device is rooted via Magisk, and hence they will refuse to function.
Fortunately, at least for now, that isn’t the case with KernelSU. This, when combined with the SUSFS, gives you the most stringent root hiding environment along with a slew of additional advanced-level tweaks. So, without any further ado, let’s make you aware of the steps to root your OnePlus device using the combination of KernelSU Next and SUSFS. Follow along.
- How to Root any OnePlus Phone via KernelSU Next and SUSFS SUPPORTED DEVICE LIST INSTALLATION STEPS
- How to Install OnePlus Kernel with KernelSU Next without TWRP
How to Root any OnePlus Phone via KernelSU Next and SUSFS

Before starting, take a backup of all the data on your device, just to be on the safe side. Droidwin and its members wouldn’t be held responsible in case of a thermonuclear war, your alarm doesn’t wake you up, or if anything happens to your device, and data by performing the below steps.
SUPPORTED DEVICE LIST
As of now, these are the supported devices, though more devices will be added in the near future, so stay tuned!
OP ACE 2 PRO

OP ACE 2

OP ACE 3V

OP ACE 5

OP ACE 5 PRO

OP NORD 4

OP OPEN

OP PAD 2

OP 10 PRO

OP 10T

OP 11R

OP 11

OP 12

OP 12R

OP 13

OP 13R

OP 13S
INSTALLATION STEPS

- First off, download the required files from below: OnePlus Kernel with KernelSU Next and SUSFS Support KernelSU Next App SUSFS Module
- Then install the TWRP Recovery onto your device.
- Now reboot your device to TWRP Recovery using: adb reboot recovery // from the OS fastboot reboot recovery // from Fastboot Mode
- Now go to Install > select the OnePlus Kernel > flash it.
- Then go to Reboot and select System to boot to the OS.
- Next up, install the KernelSU Next app. Then launch it.
- Go to Modules, tap Install, and flash the SUSFS Module.
- Now, hit Reboot. Once it boots up, tap Open next to SUSFS.
- Then tap on Custom SUSFS Settings and customize it as per your liking.
- How to Root OnePlus 13 via KernelSU Next and SUSFS
- How to Root OnePlus 11 using KernelSU Next and SUSFS
- Detailed Guide to Hide Root via KernelSU on Rooted Android
- How to Install OTA Updates on Rooted Device via KernelSU
How to Install OnePlus Kernel with KernelSU Next without TWRP

Some OnePlus devices might not have a working TWRP Recovery. So in such cases, here’s what you need to do:
- First off, download the required files from below: OnePlus Kernel with KernelSU Next and SUSFS Support KernelSU Next App SUSFS Module
- Download the same firmware which is installed on your device.
- Then extract the init_boot.img from it using Fastboot Enhance.
- Now transfer the file to your device. Then install KernelSU Next.
- Launch it, tap on the downward arrow > select a file > init_boot.
- File will now be patched. Transfer it to the platform-tools folder.
- Now open the Command Prompt inside the platform-tools folder.
- Then type in the below command to boot your device to Fastboot. adb reboot bootloader
- Now type in the below command to flash this patched init_boot: fastboot flash init_boot patched_init_boot.img
- Then type the below command to boot the device to the rooted OS fastboot reboot
- Install the Kernel Flasher app , launch it, and tap View next to both slots.
- Then note down the Slot name [A or B] that gives you the Flash option.
- Now tap on Flash > Flash AK3 ZIP > select the OnePlus Kernel.
- Once done, restart the device for the kernel to be up and running.
- Next up, install the KernelSU Next app. Then launch it.
- Go to Modules, tap Install, and flash the SUSFS Module.
- Now, hit Reboot. Once it boots up, tap Open next to SUSFS.
- Then tap on Custom SUSFS Settings and customize it as per your liking.
- ae 3 months ago Reply does it not work on oxygenos 16 because the apps are no longer being granted root access
- Akash 5 months ago Reply Need kernal su file for oneplus 8 pro running 13
(Cancel Reply)
Δ
Root Galaxy A52s 5G with KernelSU and KernelSU Next SUSFS
In this guide, we will show you the steps to install the latest Ascendia Kernel with KernelSU/KernelSU Next SUSFS on your Galaxy A52s 5G. Nowadays, there exist quite a few ways of gaining administrative privileges over your device. While Magisk is still the go-to choice for the masses, however, in recent times, many users are making a shift towards the likes of APatch and KernelSU. One major reason for the same is the fact that hiding the root has become quite a challenging task when it comes to Magisk.
On the other hand, many banking and payment apps are yet to give any major attention to the APatch and KernelSU. So if you root your device using either of these two approaches, then there’s a high chance of your device being able to mitigate the Play Integrity fiasco. So in this guide, we will be taking the kernel approach and listing the steps to root your Galaxy A52s 5G by installing the Ascendia Kernel, which comes embedded with KernelSU.
- How to Root Galaxy A52s 5G with Ascendia Kernel and KernelSU Features of the Ascendia Kernel Supported Devices Flashing Steps
- How to Root A52s 5G via KernelSU Next and SUSFS
How to Root Galaxy A52s 5G with Ascendia Kernel and KernelSU

Before starting, please take a complete device backup. Droidwin and its members wouldn’t be held responsible in case of a thermonuclear war, your alarm doesn’t wake you up, or if anything happens to your device, and data by performing the below steps.
Features of the Ascendia Kernel
- Built from A528NKSU4GXE1 kernel source code
- Linux 5.4.254, based on LA.UM.9.14.r1-22000-LAHAINA.QSSI12.0
- Pure stock kernel, only minor changes were applied
- Built with Clang 11.0.2 ( r383902b1 ) Toolchain
- Samsung Knox features disabled (RKP, FIVE, Defex, etc.)
- (Almost) All of Samsung’s debug killed
- Switchable SELinux status
- Camera bootloader lock fix included
This kernel [and the featured image as well] has been developed by XDA Senior Member RisenID, so all thanks go to him.
Supported Devices
- SM-A528B (a52sxqxx)
- SM-A528B (a52sxqzt)
- SM-A528N (a52sxqks)
Flashing Steps

- Download and extract Android SDK Platform Tools .
- After that, unlock the bootloader on your device.
- Next up, install the TWRP Recovery on your device.
- Then download the Ascendia Kernel with KernelSU: Ascendia KernelSU v1.0.1 (One UI/GSI) Ascendia KernelSU v1.0.1 (AOSP)
- Now boot your device to the TWRP Recovery using: adb reboot recovery
- After that, take a backup of the following partitions: Boot, DTBO, Vendor Boot, Vendor Image
- Now go to Install, select the Ascendia KernelSU, and flash it.
- Then go to Reboot and select System. The device will boot to the OS.
- Now, download, install, and launch the KernelSU Manager app .
- Finally, verify whether your device is successfully rooted via this app.
How to Root A52s 5G via KernelSU Next and SUSFS

- Download and extract Android SDK Platform Tools .
- After that, unlock the bootloader on your device.
- Next up, install the TWRP Recovery on your device.
- Then download the KernelSU Next with SUSFS: KernelSU-Next v1.0.6 (One UI) KernelSU-Next v1.0.6 (AOSP)
- Now boot your device to the TWRP Recovery using: adb reboot recovery
- After that, take a backup of the following partitions: Boot, DTBO, Vendor Boot, Vendor Image
- Now go to Install, select the KernelSU Next, and flash it.
- Then go to Reboot and select System. The device will boot to the OS.
- Now, download, install, and launch the KernelSU-Next Manager app.
- Finally, verify whether your device is successfully rooted via this app.
- Then download the SUSFS module , flash it via KernelSU Next, and restart the device.
- Now go to Modules, tap on Open next to SUSFS, and carry out the desired tweak.
- Once done, tap on Custom SUSFS settings and tweak it as per the requirements.
- Install iodeOS on Galaxy A52s 5G, Galaxy Tab S5e (LTE/Wi-Fi)
- How to Install UN1CA ROM on Galaxy A52s 5G
- WiFi Fix for Custom ROMs for Galaxy A52s 5G/M52/A73
- How to Install Android 15 Custom ROMs on Galaxy A52s 5G
- Botond 4 months ago Reply I need help the susfs days failed the module . And Idk how to find modules for root. I want to increase sot on my device
(Cancel Reply)
Δ
How to Root OnePlus 13 via KernelSU Next and SUSFS
In this guide, we will show you the steps to root your OnePlus 13 via KernelSU Next and SUSFS. There exist quite a few ways using which you can root your Android device, with Magisk reigning supreme at the top. However, we are seeing a slight change in the priority among the tech enthusiasts. There has been a minuscule yet noticeable shift among the users from Magisk to its counterparts.
These include the likes of unofficial forks of Magisk like Kitsune or Delta, or other third-party alternatives like KernelSU, APatch, and KernelSU Next. So why this change all of a sudden? Well, it has now become quite a challenging task to hide root as banking and payment apps have put in place numerous checks for the Magisk binary.
However, they are yt to do so for the aforementioned apps. Hence, if you rooted via any of those apps, then there’s a high chance that you can easily bypass the root checks on your device and use payment apps without any issues. So due to all these reasons, this guide will show you the steps to root your OnePlus 13 via KernelSU Next and SUSFS. Follow along,
- How to Root OnePlus 13 via KernelSU Next and SUSFS METHOD 1 [Shorter Method] METHOD 2 [Longer Method]
How to Root OnePlus 13 via KernelSU Next and SUSFS

Before starting, please take a backup of all the data on your device. Droidwin and its members wouldn’t be held responsible in case of a thermonuclear war, your alarm doesn’t wake you up, or if anything happens to your device and data by performing the below steps.
METHOD 1 [Shorter Method]
How to Root any OnePlus via KernelSU Next and SUSFS
METHOD 2 [Longer Method]
- To begin with, download the same firmware that is installed on your device.
- You may verify the same from the device’s Version Number.
- Now extract it, get the payload.bin file, and load it into the Fastboot Enhance Tool . Then extract the init_boot.img file from it.
- Next up, download and extract the Android SDK Platform Tools on your PC.
- Then enable USB Debugging and OEM Unlocking, and connect your device to PC via USB.
- Now unlock the bootloader on your device via the fastboot flashing unlock command.
- Then install the KSU Next app > patch the init_boot.img file via it.
- Now transfer this patched file to platform-tools and rename it to patched_init_boot.img
- Next up, download and install the Key Attestation app on your device.
- Then download the 6.6.66 kernelsu next boot.img (or more than .66 if available) from here .
- Now boot your device to the Fastboot Mode via: adb reboot bootloader
- Then flash the patched init_boot via: fastboot flash init_boot patched_init_boot.img
- Now restart your device, launch KernelSU Next, and make sure it is working in LKM Mode.
- Then get the vbmeta.img file from the same firmware version that is installed on your device.
- Now transfer the file to the platform-tools folder. Then boot your device to the Fastboot Mode adb reboot bootloader
- Now disable Android Verified Boot by flashing vbmeta.img as follows: fastboot –disable-verification flash vbmeta vbmeta.img
- Now flash the boot.img as follows: fastboot flash boot boot.img
- Then flash the SUSFS module from here . Now copy the verified boot hash under “root of trust”
- Go to /data/adb/VerifiedBootHash and put the string you copied in the text file
- Finally, restart your device for the changes to take place.
- How to Switch from Magisk to KernelSU
- How to Hide Root via KernelSU on Rooted Android
- Rooting via Magisk/KernelSU/APatch: Boot or Init Boot
- How to Flash Kernel with Integrated KernelSU on Galaxy S24 Ultra
- Freddy 2 months ago Reply Your instructions don’t make sense Longer method 4.Then install the KSU Next app > patch the init_boot.img file via it. Okay explain where to get this init_boot.img Sadique Hassan 2 months ago Reply sorry mate for the confusion. I have updated the guide with more clarity..
- Muji 11 months ago Reply Please give a susfs img for one plus 13r
(Cancel Reply)
Δ
How to Root OnePlus 11 using KernelSU Next and SUSFS
In this guide, we will show you the steps to root your OnePlus 11 using KernelSU Next and SUSFS. During the initial days of Android, you just needed to flash the SuperSU Hide module to hide the root. The things became a little bit more complicated [but still manageable] due to the introduction of SafetyNet. Then came the most challenging part, Play Integrity.
Ever since this test came into the picture [especially the Strong Test], hiding root has become one of the most challenging task, especially when the banking and payment apps come into the picture. Owing to all these reasons, a major chunk of the userbase has completely ditched these tweaks, and we can’t blame them either.
However, for the niche segment for tech enthusiasts who are still into this domain, they have started making a switch from Magisk to its counterpart. These include the forks of Magisk like Kitsune or other standalone apps like KernelSU, KernelSU Next, and APatch, among others. The reason for that is numerous banking apps still only check for Magisk, they haven’t yet started carrying out tests on the aforementioned apps.
Hence, if you obtain root via any of those apps, then there’s a high chance of you being able to easily hide the root on your device. So on that note, this tie around our focus will be on the KernelSU Next and SUSFS to root your OnePlus 11. Follow along for the instructions.
How to Root OnePlus 11 using KernelSU Next and SUSFS

Before starting, please back up all the data on your device. Droidwin and its members wouldn’t be held responsible in case of a thermonuclear war, your alarm doesn’t wake you up, or if anything happens to your device and data by performing the below steps. [Credits: XDA Senior Member fatalcoder524]
- To begin with, download and extract the Android SDK Platform Tools on your PC.
- Then enable USB Debugging and OEM Unlocking and connect your device to PC via USB.
- Now unlock the bootloader on your device via the fastboot flashing unlock command.
- Then download and install the KernelSU Next app on your device.
- Now extract the susfs-temp-op11-boot.zip and get the resultant IMG file.
- You’ll now have to boot your device to the rooted OS via the above IMG file.
- For that, transfer the file to the platform tools folder and then boot your device to the Fastboot Mode using the below command: adb reboot bootloader
- Then type in the below command to temporarily boot to the rooted OS [do not flash it]: fastboot boot susfs-temp-op11-boot.img
- Then download and install Horizon Kernel Flasher [you may use any kernel flasher app].
- Now launch KernelSU > go to SuperUser tab > give root access to Horizon Kernel Flasher.
- Then download the AnyKernel3 ZIP for your device. Now launch Horizon Kernel Flasher.
- Now select the AnyKernel3 Zip and flash it. Once done, restart your device.
- Then launch KernelSU Next -> Module > install the susfs4ksu-module > Restart device.
- Once it boots up, the SUSFS should be activated. Launch KernelSU Next and you’ll see the SuSFS version in the Home tab.
- Likewise, you should see a logo of SUFS under Status in the Kernel SU Next modules page under susfs4ksu-module.
- To access it, just hit Open and you’ll be taken to the module home page. You may now tweak it as per your requirement.
- How to Switch from Magisk to KernelSU
- How to Hide Root via KernelSU on Rooted Android
- Rooting via Magisk/KernelSU/APatch: Boot or Init Boot
- How to Flash Kernel with Integrated KernelSU on Galaxy S24 Ultra
- Jhoan 7 months ago Reply If you want, we can also talk on WhatsApp.
- Jhoan 7 months ago Reply Hello, how are you? I hope you’re well. 👍🏻 I’d like to know how much you’ll charge to flash the OnePlus 10 Pro KernelSU+SUSFS AnyKernel3 ZIP for KernelSU. I have everything and I can send it to you. You just have to send me the PayPal account. Thanks.
- Dipayan Roy 11 months ago Reply Does the susfs boot zip file work for every device? And after the complete process will my device be rooted permanently?
- swayam 11 months ago Reply can you send me the susfs file for oneplus 11r
(Cancel Reply)
Δ
