How to Root Android Devices via Magisk and vendor_boot
In this guide, we will show you the steps to root your device using Magisk and the vendor_boot file. When it comes to rooting via Magisk, there are two ways out- either using the boot.img [for devices which came with Android 12 or older versions] or the init_boot.img [for devices that shipped with Android 13 or higher versions out of the box].

But now, there’s a third way out as well. Recently, while going through the changelog of the latest Magisk release version 30.3, I stumbled upon this line- Support installing Magisk into vendor_boot partition. So what are we waiting for? Let’s try out this way of rooting right away.
- Does My Device Support Rooting via Vendor_Boot?
- How to Check if My Boot Partition Has Ramdisk?
- How to Root Android Devices via Magisk and vendor_boot
Does My Device Support Rooting via Vendor_Boot?
The first and most important question is which types of devices support this new rooting technique. I did some testing and found out that the devices that do not have a Ramdisk can use the process to root via vendor_boot. This is because on newer devices (especially those on Android 12+ versions with GKI Kernel), the ramdisk was moved out of boot into the vendor_boot partition.
So if your device’s boot.img has no ramdisk, then Magisk must be installed into vendor_boot [if init_boot is out of the question as well]. If your device does have a Ramdisk, then you can simply use the boot.img or the init_boot.img file to obtain root.
I’m being straightforward right away- there might be other qualification metrics out there, but it’ still quite an early stage, so I don’t have enough data right now. As and when I get more information on this subject, I will update this section accordingly.
How to Check if My Boot Partition Has Ramdisk?
That’s a great question! There are quite a few ways of getting this job done, and we have listed all of them below. You may try out the one that is in sync with your requirements.
- Magisk: Install the Magisk app > Launch it > Refer to the value next to Ramdisk [YES/NO].
- ADB Shell: Type in adb shell getprop | findstr ramdisk in the CMD window and refer to the value next to ro.boot.has_boot_ramdisk [true/1 or false/0].
- Fastboot Command: Boot to Fastboot Mode via adb reboot bootloader > Type in fastboot getvar all 2>&1 | findstr ramdisk > refer to the value next to boot_ramdisk [true/1 or false/0].
If the output is YES/TRUE/1, then your device has Ramdisk and you’ll have to use boot.img/init_boot. But if your device does not have a Ramdisk [output comes out to be NO/FALSE/0], then you can use the vendor_boot to root your device via Magisk.
How to Root Android Devices via Magisk and vendor_boot
Before starting, please take a complete device backup, just to be on the safe side. Droidwin and its members wouldn’t be held responsible in case of a thermonuclear war, your alarm doesn’t wake you up, or if anything happens to your device and data by performing the steps below.
- Download and extract Android SDK Platform Tools onto your PC.
- Now download the same firmware that is installed on your device. Current Installed Firmware Version
- Then extract it [see below] and get the vendor_boot.img file from it. Xiaomi/Poco/Redmi : Download the Fastboot ROM . Extract TGZ via 7ZIP > Extract TAR via 7ZIP > Extract Images via 7ZIP > Get the vendor_boot.img file. Pixel : Download the Factory Image > Extract the Images folder > get the vendor_boot.img file. OnePlus : Download the firmware via Oxygen Updater or a third-party site > Extract the ZIP > Extract the vendor_boot.img from the payload.bin via Fastboot Enhance [no need to extract the entire firmware]. Nothing : Download the Fastboot ROM from GitHub > Extract the ROM ZIP > Get the vendor_boot.img. Extracting vendor_boot from OnePlus Firmware via Fastboot Enhance
- Now, download and install Magisk version 30.3 or higher.
- Then launch it, tap Install next to Magisk > Select and patch a file > choose vendor_boot.img > tap on Let’s Go.
- Magisk will now patch the file and place it in the Downloads folder on your device.
- Transfer it to the platform-tools folder and rename it to patched_vendor_boot.img.
- Next up, enable USB Debugging and connect the device to the PC using a USB cable.
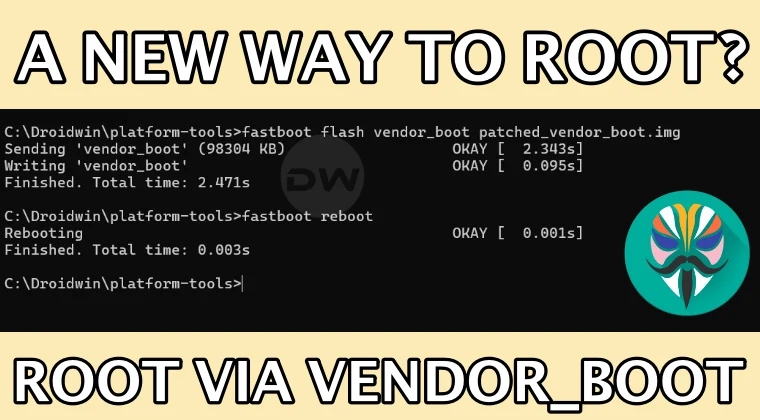
- Now open Command Prompt inside platform-tools and type in the below command: adb reboot bootloader
- Then type in the below command to flash the patched vendor_boot file: fastboot flash vendor_boot patched_vendor_boot.img
- Now boot to the OS via the below command: fastboot reboot
- Then launch Magisk and tap OK in the Additional Dependencies prompt [if it appears].
- Then choose Direct Install [Recommended] and hit Let’s Go.
- Your device will undergo a reboot within 5 seconds and boot to the rooted OS.
- How to Root Android 16 via Magisk Patched Boot/Init_Boot
- How to Root Android Device using KernelSU [GKI and LKM]
- Root Android via APatch: Give SU Access and Flash Modules
- How to Unroot Android Devices: Uninstall Magisk/KernelSU

- Anis 4 months ago Reply There’s is a option on software update named as local install. Can somebody make package that unrestrict users to unlock the bootloader in oppo/coloros. I have got a useful thing for u there’s an app called CoolApk. It is a chinese app in which you can find many categories especially #luckytool is useful many people there make modules for oneplus devices and many more remaining to find.
- Anis 4 months ago Reply I don’t anything about rooting. Can you suggest me some lectures So further I can root my device someday. My device is Oppo k13. My question- Are the boot.img and vendor boot.img are same for all devices and what is difference between them. Sadique Hassan 4 months ago Reply Unfortunately, Oppo no longer supports bootloader unlocking, which is the first requirement for rooting any device. Regarding root, you can choose between Magisk, KernelSU, or APatch, but let’s stick with Magisk. If your device came with Android 12 or older out of the box, then you have to patch and flash the boot.img. But if it came with Androidn13 or higher, you have to patch and flash the init_boot. Vendor_boot is still in testing pohase, so it isn’t recommended to use for now. As far as the boot/init_boot files are concerned, you have to extract it from the same firmware which is installed on your device [you can verify it from Build Number or Version Number]. Here’s a complete detailed guide on this topic that deserves your attention: https://droidwin.com/how-to-root-android-16-via-magisk-patched-boot-init_boot/ [while it focuses on Android 16, it is applicable across all versions]. Anis 4 months ago Reply Thanks! Your website is very useful for the fellows like me🥲. Btw do oneplus still allow to unlock bootloader. Next time I will buy xiaomi device. Sadique Hassan 4 months ago Reply Yoiur most welcome mate…. If you’re looking for bootloader unlocking, buy either OnePlus, Pixel, or Nothing. Xiaomi has made it a mess when it comes to bootloader unlocking, especially with HyperOS [although I have made a few videos o how you can bypass those requirements, see here: https://droidwin.com/how-to-bypass-xiaomi-hyperos-bootloader-unlock-requirement/ ]. However, Xiaomi still has the maximum number of custom ROMs, so if you are able to unlock the Xiaomi’s bootloader, then you’re in for a great journey in the custom development.
(Cancel Reply)
Δ
