How to Root OnePlus 6T without TWRP Recovery
In this tutorial, we will show you how to root OnePlus 6T without using TWRP. Android thanks to its open-source nature lets you carry out a plethora of things. For example, you could try out new icons packs, fonts, launchers, and themes. For the tech geeks, they take this a step further and allows for tweaking with the device’s OS. In this regard, the first step involves unlocking the device’s bootloader. Once that is done, you just have to get administrative privileges in the form of the root. Now there are two methods through which you could perform this root: with or without TWRP. In this guide, we will focus on the latter, which is how to root OnePlus 6T without using TWRP Recovery.
- Why Should we Root without TWRP? Prerequisites STEP 1: Get a Stock Boot.Img File STEP 2: Patch the stock Boot.Img File STEP 3: Temporary Boot the Patched Boot Image File STEP 4: Permanently Install the Patched Boot Image File
- Conclusion
Why Should we Root without TWRP?
Rooting any Android device without TWRP has quite a few benefits. The biggest one is the fact that some of the devices don’t even have a working TWRP Recovery. For other devices that have an official/unofficial TWRP, even they now prefer this method. The reason is plain and simple: they wish to keep the stock recovery rather than a custom one.
There’s always some associated risks with TWRP, for example, data getting encrypted, or your device getting into a bootloop or bricked state (if you end up flashing any other TWRP build by mistake). Furthermore, now with this A/B partition thing, you will have to first boot the TWRP image file and then flash the TWRP ZIP file. Isn’t this asking too much just for a simple root? Well if you also echo this feeling, then follow the below steps to root your OnePlus 6T without TWRP Recovery.
Prerequisites
- Download and install the latest Magisk Manager APK file on your device: Magisk Manager
- The bootloader of your device should be unlocked. Have a look at our guide on how to do so.
- Although rooting is going to wipe your data, still, it is recommended to make a complete backup of all your data.
- Keep your device appropriately charged, at least to a minimum recommended level of 50%
- Install ADB and Fastboot Tool for entering Fastboot commands.
- Also, download and install the USB Drivers for your device. This helps in successfully connecting your device to the PC.
- Enable the ‘USB Debugging’ option. Go to ‘Settings’ -> ‘About Phone -> Tap on Build Number 7 times -> Go back to Settings -> Developer Options -> Toggle on the USB Debugging’ switch.
STEP 1: Get a Stock Boot.Img File
STEP 2: Patch the stock Boot.Img File
Now that you have the stock boot.img file, transfer it to your device. Then follow the below steps. Or if you are new to all this, we would highly recommend going through our article on the said topic: Patch Stock Boot Image via Magisk and Flash it using Fastboot (just the first half).
- Open the Magisk Manager app on your device.
- Tap on Install > Install > ‘ Patch Boot Image File ‘.
- Navigate to the folder where the stock boot.img file is present and then select it.
- Magisk will now begin patching the file. Once that is done, the file will be saved most probably in Internal Storage > Downloads folder.
STEP 3: Temporary Boot the Patched Boot Image File
Now we will temporarily boot this patched boot.img file. Follow the below steps in the same manner as mentioned:
- Connect your device to PC via USB Cable.
- Make sure you have installed the ADB and Fastboot Tool on your PC.
- Transfer this boot image file to the folder where ADB and Fastboot tools are installed, i.e inside the platform-tools folder.
- Inside the same folder, while pressing the ‘Shift’ key, right-click in an empty area.
- Select ‘OpenPowerShell window here’.
- Or you could also type in cmd in the platform-tools folder’s address bar and hit Enter. This will open the Command Prompt.
- Type in the below code to check whether your device is successfully connected to PC: adb devices If you get an alpha-numeric code with ‘device’ written next to it, then you are good to go. Otherwise, check whether the correct USB drivers are installed or not. Also, make sure USB Debugging is enabled.
- Next, type in the below code to boot your device to fastboot mode: adb reboot bootloader
- Now, type the following command to temporary boot your device with the patched boot image file: fastboot boot patched-boot-filename.img Replace the ‘ patched-boot-filename’ with the actual name of the patched boot image.
After executing the above command, your device will reboot to Android System. Now you need to permanently install this patched boot file. Head over to the below section.
STEP 4: Permanently Install the Patched Boot Image File
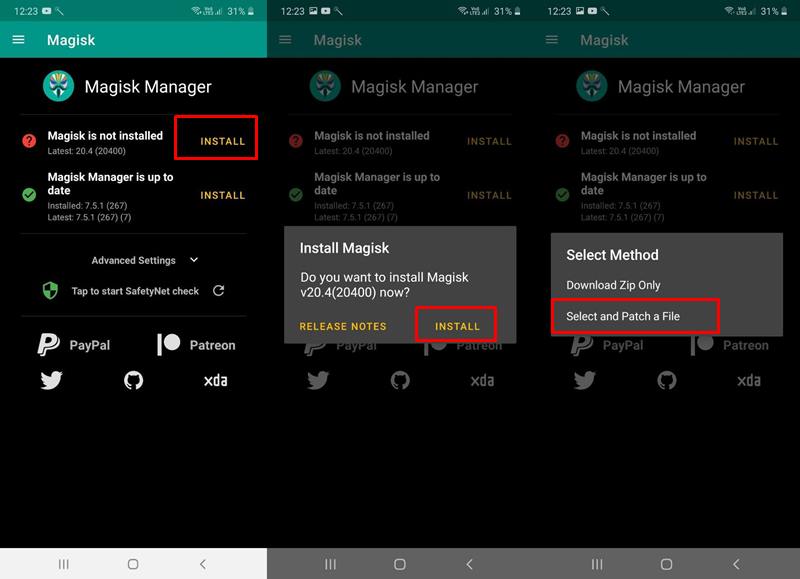
- Open the Magisk Manager app on your Android device.
- Tap on the first ‘ INSTALL ‘ button (which is just next to the ‘Magisk’ status).
- In the ‘Install Magisk’ dialog box that appears, tap on ‘ INSTALL ‘.
- Under ‘Select Method’, select the ‘ Direct Install (Recommended) ‘ option.
- Now Magisk will begin flashing the patched boot image on your device.
- Once complete, tap on the ‘ Reboot ‘ button situated at the bottom right corner. Once your device reboots, it will be successfully rooted.
Conclusion
- [3 METHODS] How To Transfer or Install Files via TWRP Recovery
- How to Boot Any Android Device to TWRP Recovery
- What is a Nandroid Backup? How to Create and Restore it Via TWRP

(Cancel Reply)
Δ
