How to Root Pixel Devices via KernelSU
In this guide, we will show you the steps to root your Pixel device via KernelSU. Magisk has long been the go-to choice for tech enthusiasts to gain administrative privilege over their device. However, over the recent years, we have seen users making a switch over to the kernel mode of rooting, using the KernelSU. So why this change? Well, many payment and banking apps [and even the likes of Uber and McDonald’s!] have been able to identify the root on a device if it has been rooted via Magisk.
What is even more concerning is the fact that many of the root hide mechanisms are also failing. So it was only a matter of time before users made a switch to an alternate mode of rooting. This is where KernelSU came into the picture and has now become the de facto choice for the masses. If you are among them, then this guide will make you aware of the steps to root your Pixel device via KernelSU. So without further ado, let’s get started.
- How to Root Pixel Devices via KernelSU STEP 1: Backup Boot.img STEP 2: The Prerequisites STEP 3A: Flash Custom Kernel Using Fastboot Command STEP 3B: Flash Custom Kernel Via Custom Recovery STEP 3C: Flash Custom Kernel Using a Kernel Flasher App STEP 4: Verify Kernel Installation
- How to Disable Verification
- How to Go Back to Stock Kernel/Fix Bootloop When Flashing Custom Kernel
How to Root Pixel Devices via KernelSU
Before starting, please take a complete device backup. Moreover, there exist three different methods through which you can flash a custom kernel – via fastboot command, using a custom recovery, and via a kernel flasher. We have given all three methods below [we had to include the custom recovery method because Pixel 7A has one!].
Go through them once, as well as their perks and drawbacks, and then try out the one that is in sync with your requirements. Droidwin and its members wouldn’t be held responsible in case of a thermonuclear war, your alarm doesn’t wake you up, or if anything happens to your device and data by performing the below steps.
STEP 1: Backup Boot.img
The custom kernel is flashed in the boot partition. So it is highly recommended to back up your stock boot.img [from the same firmware that is currently installed on your device. You can verify the same from the device’s Build Number.
STEP 2: The Prerequisites
- Download a custom kernel of your choice [make sure it supports KernelSU/KernelSU Next].
- For this guide, we will be using Blue Spark, so download it from below: Pixel 6/7/8/9
- Once downloaded, download & extract Android SDK Platform Tools .
- Then enable USB Debugging and OEM Unlocking on your device.
- After that, unlock the bootloader on your device.
- Then boot your device to the Fastboot Mode via: adb reboot bootloader
- Now refer to any one of the three kernel flashing methods given below:
STEP 3A: Flash Custom Kernel Using Fastboot Command
The easiest and most straightforward out of the three kernel flashing methods, this is usually the go-to choice for the masses. Just make sure to rename the custom kernel to kernel.img and transfer it to the platform-tools folder on your PC.
- Type the below command to flash the custom kernel on your device: fastboot flash boot kernel.img
- After that, type in the below command to boot your device to the OS: fastboot reboot
STEP 3B: Flash Custom Kernel Via Custom Recovery
If you don’t want to root your device and, more importantly, want to get this job done without using a PC, then this method is just for you [the without PC parameter will only work for you if your device already has a recovery installed and you know the hardware ky combination to boot the device to the recovery].
- First off, transfer the kernel.img file to your device.
- Next up, install a custom recovery onto your device.
- Then boot your device to it via the below command: adb reboot recovery
- Now go to Install > Install Image > select boot.img.
- Then choose the boot partition and swipe to flash it.
- Finally, head to Reboot > System to boot to the OS.
STEP 3C: Flash Custom Kernel Using a Kernel Flasher App
You can also flash the kernel using a kernel flasher app, however, that would require your device to be rooted beforehand [ Magisk | APatch ]. Once done, you may then proceed with the below steps [NOTE: as soon as you obtain root via KernelSU, the root via Magisk will be gone, and you can then simply uninstall the Magisk app].
- Install the Kernel Flasher App from GitHub.
- Launch it and grant it the SuperUser request.
- Now, check your active slot via the Slot Suffix.
- Now tap View next to that slot [A in my case].
- Then hit Flash > Flash partition image > boot
- Now, select the kernel file > Reboot > Reboot.
STEP 4: Verify Kernel Installation
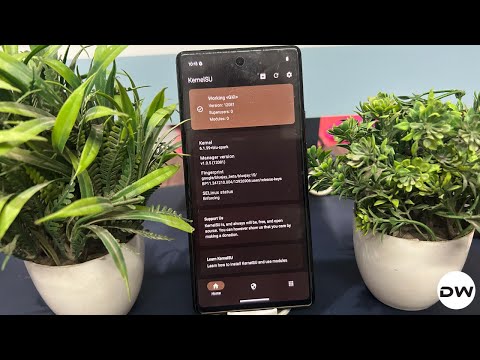
Once you have flashed the custom kernel and booted to the OS, it’s now time to verify the result. Since I have flashed a kernel that supports KernelSU, I can simply install the KernelSU app from GitHub and verify the result. So, install and launch it, and verify if it states “Working in
How to Disable Verification
If you are planning to disable the Android Verified Boot, then here’s what you need to do. The below process will wipe off all the data, so make sure to backup all your data beforehand.
- First off, download the same version of Factory Image that is installed on the device.
- Then, extract it, go to Images, copy the vbmeta.img, and transfer it to platform-tools.
- Once that is done, boot your phone to the Fastboot Mode using the below command: adb reboot bootloader
- Now use the below command to flash the vbmeta file and disable AVB on your device fastboot –disable-verity –disable-verification flash vbmeta vbmeta.img
How to Go Back to Stock Kernel/Fix Bootloop When Flashing Custom Kernel
If you no longer wish to use the custom kernel, or your device is currently in a bootloop state after flashing the custom kernel, then in both these states, here’s what you need to do: [NOTE: As soon as you flash the stock kernel, you’ll end up losing the KernelSU root as well.]
- First off, download the same version of Factory Image that is installed on the device.
- Now extract the boot.img file from it [or use the backup one that you took in STEP 1]
- Once that is done, place the boot.img file inside the platform-tools folder on your PC.
- Then open the Command Prompt inside that folder and type in the below command: adb reboot bootloader
- Next up, type in the below command to go back to stock kernel and fix bootloop issue fastboot flash boot boot.img
- Finally, type the following command to boot your device to the OS with stock kernel: fastboot reboot

(Cancel Reply)
Δ
