How to Root UN1CA ROM and Pass Play Integrity Test
In this guide, we will show you the steps to root your UN1CA ROM and subsequently pass the Play Integrity Test. When it comes to Custom ROMs, then there are quite a few noteworthy players in this domain for Samsung devices. These include the popular AOSP-based ROMs such as the likes of LineageOS, crDroid, and PixelOS.
However, many users out there are content with the UI/UX of the stock One UI itself but just want a few additional goodies that other custom ROMs have to offer. And for them, the UN1CA might be their perfect choice. Staying close to the stock One UI, it beholds a slew of additional goodies.

Moreover, even if the official update cycle for your device has ended, there is a high chance that your device might still get blessed with a new iteration of the OS [for instance, S20 FE has received its last official Android 13 update, but the developer of this ROM has even released the One UI 6.1 build based on Android 14]. With that said, you have the opportunity to add more functionalities to this ROM by gaining administrative privileges.

This in turn will allow you to welcome abode tons of Magisk modules, LSPosed Framework, among others. Apart from that, you can even pass the Play Integrity test which in turn will allow you to run banking and payment apps without any issues. So, keeping these points in mind, this guide will lay down the steps to root the UN1CA ROM and then pass the Play Integrity test on it as well. Without any further ado, let’s get started.
- How to Root UN1CA ROM via Magisk
- How to Root UN1CA via KernelSU and SUSFS
- Pass Play Integrity on Rooted UN1CA ROM Pass Basic, Device, and Strong via Keybox XML Pass Device and Basic Without Keybox XML
How to Root UN1CA ROM via Magisk
- First off, download and extract Android SDK Platform Tools on your PC.
- Then enable USB Debugging and connect your device to PC via USB cable.
- Now open Command Prompt inside the platform-tools folder and type in: adb reboot recovery
- This will boot your device to the TWRP Recovery [with encrypted storage].
- Now download Magisk APK from here and transfer it inside platform tools.
- Likewise, make a copy of APK and rename it to ZIP. This gives us Magisk ZIP.
- Then type the below command to transfer both the Magisk ZIP and APK files: adb push Magisk.zip /data adb push Magisk.apk /data
- Now go to Install and flash the Magisk ZIP. Once done, go to Reboot > System.
- Launch the Magisk app and it will ask you to complete additional setup. Tap OK.
- Your device will restart and then the UN1CA ROM stands rooted on your device.
How to Root UN1CA via KernelSU and SUSFS
How to Root UN1CA ROM via KernelSU and SUSFS
Pass Play Integrity on Rooted UN1CA ROM
Pass Basic, Device, and Strong via Keybox XML
How to Pass Strong Integrity on Unlocked Bootloader & Root!
Pass Device and Basic Without Keybox XML

- Launch Magisk and tap on the settings icon situated at the top right.
- After that, enable the toggle next to Zygisk.
- Then tap on Hide the Magisk App > Enable the toggle next to Allow apps from this source.
- Give it a new name of your choice and hit OK.
- It will now ask for a home-screen shortcut, reply accordingly.
- Then enable the toggle next to Enforce Denylist. After that, tap on Configure Denylist.
- Then expand the following apps and checkmark all its services Google Play Service Google Play Store Google Service Framework Google Play Protect Service [if present] Banking/Payment Apps of your choice
- Likewise, do the same for the banking/payment apps of your choice.
- Now download the “latest version” [extremely important] of Play Integrity Fix Module from GitHub.
- Then flash the module via Magisk and restart your device.
- Now delete the data of the Google Services Framework, Play Store, Play Service, and Play Protect Service [if present].
- Finally, delete the data of the banking/payment app of your choice.
- Once done, restart your device [compulsory] and then check out the result.
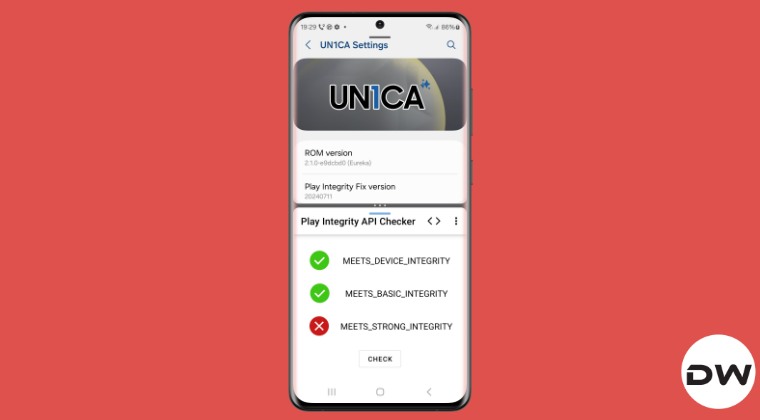
- For that, download and install the Play Integrity API Checker app from the Play Store.
- Then launch it and make sure you are passing the Device and the Basic Integrity Tests.
- Install Kali Linux Nethunter Kernel on Galaxy S20 FE
- Install Custom ROMs on Galaxy S20 FE 4G/5G [One UI and AOSP]
- Remove Unlock Bootloader Warning on Samsung Galaxy S20/S20+/Ultra/FE
- How to Install TWRP and Root Samsung Galaxy S20 FE 5G (Snapdragon)

(Cancel Reply)
Δ
