How to Root UN1CA ROM via KernelSU and SUSFS
In this guide, we will show you the steps to root your UN1CA ROM via KernelSU and SUSFS. If you are getting to get more out of One UI but at the same time, wish to remain inside the One UI ecosystem instead of jumping ships over to the AOSP side of the world, then UN1CA is undoubtedly the best ROM out there. Introducing a ton of additional features without making the ROM bloatware and at the same time, offering a fluid and snappy usage experience, well, we couldn’t have asked for more.
Likewise, you can easily root this UN1CA ROM via both Magisk and KernelSU. In our previous guide, we have already shown you how to get this job done via Magisk . However, one of the biggest issues with Magisk is that banking and payment apps [and even the likes of Uber and McDonald’s] are easily able to detect root, which, as of now, is not the case with KernelSU. So many users are flocking towards this kernel-based rooting alternative. If you are among them, then this guide will help you out. Follow along for the instructions.
- How to Root UN1CA ROM via KernelSU and SUSFS SUPPORTED DEVICES ROOTING STEPS
How to Root UN1CA ROM via KernelSU and SUSFS
Before starting, please take a complete device backup, just to be on the safe side. Droidwin and its members wouldn’t be held responsible in case of a thermonuclear war, your alarm doesn’t wake you up, or if anything happens to your device, and data by performing the below steps.
SUPPORTED DEVICES
 - ksu-a52s

 - ksu-a71

 - ksu-a73

 - ksu-m52

 - ksu-r8q

 - ksu-s22u

 - ksu-sm7125
ROOTING STEPS

- To begin with, download the KernelSU ZIP for your device from here .
- Then, download and extract Android SDK Platform Tools on your PC.
- Now enable USB Debugging and connect your device to the PC via USB.
- Then open Command Prompt inside the platform-tools folder and type: adb reboot recovery
- If the Internal Storage is encrypted, then transfer the kernel to the data partition.
- For that, first transfer the kernel to the platform-tools and rename it to kernel.zip.
- Then type in the below command in the CMD window to transfer the file to /data. adb push kernel.zip /data
- Once done, go to the data partition, select the kernel.zip file, and swipe to flash it.
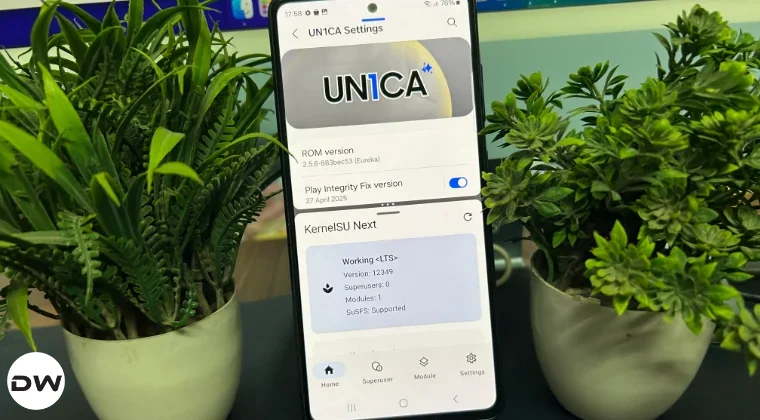
- Now go to Reboot > System. Then install the KernelSU Next app onto your device.
- Now launch it and verify that your device is rooted. Then download the SUSFS module .
- Now go to Modules > tap Install > select the SUSFS module > OK. Then, hit Reboot.
- Then launch KernelSU > go to Modules > open SUSFS > tap on Custom SUSFS Settings .
- You may now carry out the required tweak from here.
- How to Enable Zygisk in KernelSU and APatch
- How to Root Galaxy S20 FE via KernelSU and SUSFS
- Root Galaxy A52s 5G with KernelSU and KernelSU Next SUSFS
- How to Switch from Magisk to KernelSU

- Syed 9 months ago Reply Hey bro Can u please make a video on how to root Nubia REDMAGIC 7 or new devices with kernelsu & sufs… Thanks Your videos & hard work is appreciated…
- Syed 9 months ago Reply Hey bro Can u please make a video on how to root Nubia REDMAGIC 7 or new devices with kernelsu & sufs… Thanks Your videos & hard work is appreciated…
(Cancel Reply)
Δ
Root Galaxy A52s 5G with KernelSU and KernelSU Next SUSFS
In this guide, we will show you the steps to install the latest Ascendia Kernel with KernelSU/KernelSU Next SUSFS on your Galaxy A52s 5G. Nowadays, there exist quite a few ways of gaining administrative privileges over your device. While Magisk is still the go-to choice for the masses, however, in recent times, many users are making a shift towards the likes of APatch and KernelSU. One major reason for the same is the fact that hiding the root has become quite a challenging task when it comes to Magisk.
On the other hand, many banking and payment apps are yet to give any major attention to the APatch and KernelSU. So if you root your device using either of these two approaches, then there’s a high chance of your device being able to mitigate the Play Integrity fiasco. So in this guide, we will be taking the kernel approach and listing the steps to root your Galaxy A52s 5G by installing the Ascendia Kernel, which comes embedded with KernelSU.
- How to Root Galaxy A52s 5G with Ascendia Kernel and KernelSU Features of the Ascendia Kernel Supported Devices Flashing Steps
- How to Root A52s 5G via KernelSU Next and SUSFS
How to Root Galaxy A52s 5G with Ascendia Kernel and KernelSU

Before starting, please take a complete device backup. Droidwin and its members wouldn’t be held responsible in case of a thermonuclear war, your alarm doesn’t wake you up, or if anything happens to your device, and data by performing the below steps.
Features of the Ascendia Kernel
- Built from A528NKSU4GXE1 kernel source code
- Linux 5.4.254, based on LA.UM.9.14.r1-22000-LAHAINA.QSSI12.0
- Pure stock kernel, only minor changes were applied
- Built with Clang 11.0.2 ( r383902b1 ) Toolchain
- Samsung Knox features disabled (RKP, FIVE, Defex, etc.)
- (Almost) All of Samsung’s debug killed
- Switchable SELinux status
- Camera bootloader lock fix included
This kernel [and the featured image as well] has been developed by XDA Senior Member RisenID, so all thanks go to him.
Supported Devices
- SM-A528B (a52sxqxx)
- SM-A528B (a52sxqzt)
- SM-A528N (a52sxqks)
Flashing Steps

- Download and extract Android SDK Platform Tools .
- After that, unlock the bootloader on your device.
- Next up, install the TWRP Recovery on your device.
- Then download the Ascendia Kernel with KernelSU: Ascendia KernelSU v1.0.1 (One UI/GSI) Ascendia KernelSU v1.0.1 (AOSP)
- Now boot your device to the TWRP Recovery using: adb reboot recovery
- After that, take a backup of the following partitions: Boot, DTBO, Vendor Boot, Vendor Image
- Now go to Install, select the Ascendia KernelSU, and flash it.
- Then go to Reboot and select System. The device will boot to the OS.
- Now, download, install, and launch the KernelSU Manager app .
- Finally, verify whether your device is successfully rooted via this app.
How to Root A52s 5G via KernelSU Next and SUSFS

- Download and extract Android SDK Platform Tools .
- After that, unlock the bootloader on your device.
- Next up, install the TWRP Recovery on your device.
- Then download the KernelSU Next with SUSFS: KernelSU-Next v1.0.6 (One UI) KernelSU-Next v1.0.6 (AOSP)
- Now boot your device to the TWRP Recovery using: adb reboot recovery
- After that, take a backup of the following partitions: Boot, DTBO, Vendor Boot, Vendor Image
- Now go to Install, select the KernelSU Next, and flash it.
- Then go to Reboot and select System. The device will boot to the OS.
- Now, download, install, and launch the KernelSU-Next Manager app.
- Finally, verify whether your device is successfully rooted via this app.
- Then download the SUSFS module , flash it via KernelSU Next, and restart the device.
- Now go to Modules, tap on Open next to SUSFS, and carry out the desired tweak.
- Once done, tap on Custom SUSFS settings and tweak it as per the requirements.
- Install iodeOS on Galaxy A52s 5G, Galaxy Tab S5e (LTE/Wi-Fi)
- How to Install UN1CA ROM on Galaxy A52s 5G
- WiFi Fix for Custom ROMs for Galaxy A52s 5G/M52/A73
- How to Install Android 15 Custom ROMs on Galaxy A52s 5G
- Botond 4 months ago Reply I need help the susfs days failed the module . And Idk how to find modules for root. I want to increase sot on my device
(Cancel Reply)
Δ
