How to Watch Netflix in HD on Rooted Devices (Get Widevine L1 Support)
In this guide, we will show you the steps to watch Netflix in HD on your rooted Android device and get back the WideVine L1 Certification. For stepping into custom development, your first prerequisite is to unlock the device’s bootloader. Doing so will pave the way to welcome abode a plethora of mods and tweaks, including the ability to gain administrative privileges by rooting your device via Magisk. But on the flip side, it does come with its fair share of issues as well.
- Why WideVine L1 Gets Downgraded to L3?
- Using Attestation Key
- Using Let Me Downgrade, LSPosed, and Lucky Patcher
- Using Liboemcrypto Disabler
- For KernelSU/APatch Users [NEW]
- Watch Netflix in HD on Rooted Device by Hiding Root STEP 1: Hide Magisk App STEP 2: Enable Systemless Hosts STEP 3: Enable Zygisk STEP 4: Pass SafetyNet Play Integrity STEP 5: Configure Denylist STEP 6: Delete Data STEP 7: Check SafetyNet Test Results STEP 8: Check Netflix Widivine Certification on Rooted Android STEP 9: Flash DRM Module [Optional]
- Watch Netflix in HD on Rooted Devices via Lucky Patcher [Not Recommended]
Why WideVine L1 Gets Downgraded to L3?
Widevine L1 requires a working TEE (Trusted Execution Environment). But when you unlock the bootloader, the device will use an alternate keystore, which has no attestation key installed. And without an attestation key, the TEE refuses to work. Moreover, without TEE, provisioning 4.0 can’t provision Widevine L1 for your device. As a result of all this, the Widevine Certification on your device ends up being downgraded to L3 from L1.
Using Attestation Key
This has been tested working on Nothing / OPPO / OnePlus / Realme devices. [Credits: XDA Recognized Developer Steve0007].
- To begin with, root your device, preferably via Magisk .
- Now, download and extract Android SDK Platform Tools on your PC.
- Then download the attestation.zip and extract it inside the platform-tools.
- Now type the below command to transfer the attention file to the temp directory on your device: adb push attestation /data/local/tmp
- Now open Command Prompt inside the platform-tools and type: [you’ll get a SuperUser request, hit Grant]. adb shell su -c exit
- Then type in the below command [you’ll get the message: InstallKeybox is done!] adb shell su -c LD_LIBRARY_PATH=/vendor/lib64/hw KmInstallKeybox /data/local/tmp/attestation attestation true NOTE: On some devices, you might get an errorInstallkeybox Failed! -2000. This is completely normal and you may proceed ahead.
- Now type in the below command: adb shell rm /data/local/tmp/attestation
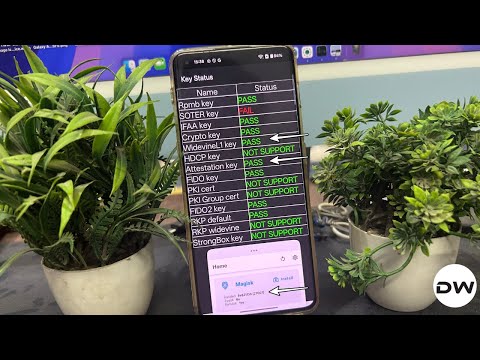
- Now open the Dialer and type in #899# on your OnePlus device.
- Then select Manual Test, scroll to the far right, and select Others.
- Now, click on Key Status, and all keys except SOTER should now be green.
- Finally, uninstall and reinstall Netflix from the Play Store to make the changes active.
Using Let Me Downgrade, LSPosed, and Lucky Patcher
Do not that to carry out this task, we will be using the Lucky Patcher app, which isn’t the safest app out there. So proceed ahead with caution and at your own risk, not to mention that you should take a backup to be on the safer side]. Droidwin and its members wouldn’t be held responsible in case of a thermonuclear war, your alarm doesn’t wake you up, or if anything happens to your device and data by performing the below steps.
- First off, root your device via Magisk [recommended]/ KernelSU / APatch .
- Next up download, install, and set up LSPosed Framework on your device.
- Now install the SAI app from GitHub [it will be used to install Split APKs].
- Then install Hide My App List from GitHub [used to hide rooting apps from Netflix]
- Likewise, install the latest version [important] of the Lucky Patcher app.
- You’ll get a warning before installing, tap on Install Anyway.
- Then download and install Let Me Downgrade [this will help us downgrade Netflix].
- Now launch LSPosed, go to Modules, and enable all three modules, namely: Hide My App List Lucky Patcher Let Me Downgrade
- In the case of Let Me Downgrade, checkmark System Framwork+System UI+SAI.
- Then expand the notification panel and tap on the Let Me Downgrade QS tile.
- Now restart your device for all three modules to be activated.
- Then install Netflix 2.2.0 , launch it, and sign in to your account.
- It will ask you to update the app, ignore the message, and minimize the app.
- Then install Netflix8.23.0 , sign in, ignore the update message, and minimize it.
- Now open Hide My App > Template Manage > Create a Blacklist Template.
- Then name the template Netflix and add the following four apps to the list: Let Me Downgrade LSPosed Magisk Lucky Patcher
- Now go to the home page > select App Manage > Choose Netflix > Enable Hide.
- Then tap on Using 0 Templates > select the Netflix template.
- Now download and install Netflix7-114.0 but do not open the app.
- Launch Magisk, go to Settings > Enforce Denylist > select Netflix.
- Open Netflix and you’ll be greeted with Error (15001), which is normal.
- Now delete the Cache of Netflix and Force Stop the app as well.
- Then open the SAI app and install Netflix7.44.0 . Do not launch the app.
- Open Lucky Patcher and it will ask you to randomize the package name.
- Hit OK/Yes/Install and wait for the process to complete.
- You’ll also get a SuperUser request, hit Grant.
- If you get a prompt to update Lucky Patcher, tap Update/YES [important].
- Now select Netflix from the list > Menu of Patches > Custom Patch > Apply.
- Once done, launch the app [if it doesn’t open, then force close and delete its cache].
- You’ll get a prompt to update Netflix, hit Cancel and you may now use the app.
That’s it. These were the steps to watch Netflix on your rooted Android device. While it is among the lengthiest, most complicated, and riskiest approaches, it is just for one time and the end result is worth the effort. Isn’t it?
Using Liboemcrypto Disabler
UPDATE: This method will no longer be able to give you WideVine L1 Certification but will at least make Netflix work on rooted devices .
- Download the huskydgs magisk mount extend and Liboemcrypto Disabler modules .
- Then launch Magisk, go to Modules, select the huskydgs magisk mount extend and flash it.
- Along the same lines, flash the Liboemcrypto Disabler module as well.
- Once done, restart your device. It will now make Netflix work on your rooted device
For KernelSU/APatch Users [NEW]
If you have obtained root via KernelSU, then you should instead use this Liboemcrypto Disabler module [Credits: XDA Senior Member Th3be4st], flash it via KernelSU or Apatch , then reboot the device, and check out the results.
Watch Netflix in HD on Rooted Device by Hiding Root
The below instructions are listed under separate sections for ease of understanding. Make sure to follow the same sequence as mentioned. Droidwin and its members wouldn’t be held responsible in case of a thermonuclear war, your alarm doesn’t wake you up, or if anything happens to your device and data by performing the below steps.

STEP 1: Hide Magisk App
- Launch the Magisk App and tap on the settings icon situated at the top right.
- Then tap on Hide the Magisk App > Enable the toggle next to Allow apps from this source.
- Assign a new random name to this Magisk app and hit OK.
- It will now ask for a home-screen shortcut, tap OK [recommended].
STEP 2: Enable Systemless Hosts
- Launch the Magisk App and tap on the settings icon situated at the top right.
- Then tap on Systemless hosts.
- Now go to the Modules section and verify that it has been added.
STEP 3: Enable Zygisk
- Launch the Magisk App and tap on the settings icon situated at the top right.
- Then enable the toggle next to Zygisk and restart your phone.
- Now launch Magisk and make sure that it says YES next to Zygisk.
STEP 4: PassSafetyNetPlay Integrity
UPDATE : There’s no need to pass the SafetyNet Test. Instead, just pass the Play Integrity Test using the instructions given here and your task stands complete. The SafetyNet instructions are still preserved below, though you should ignore them.
- Download the new Universal SafetyNet Fix module from below: SafetyNet Fix module v2.3.1-MOD_3.0 [NEW]
- Then launch Magisk, go to the Modules section, and tap on Install from Storage.
- Navigate to the downloaded safetynet module and select it.
- It will now be flashed. Once done, hit Reboot.
STEP 5: Configure Denylist
Denylist is the new name for the traditional Magisk hide. You could use this functionality to hide root from the desired apps, apart from the three compulsory apps listed below.
- Launch the Magisk App and tap on the settings icon situated at the top right.
- Then enable the toggle next to Enforce Denylist. Now tap on Configure Denylist.
- Then expand the following apps and checkmark all its services Google Play Service Google Play Store Google Service Framework Google Play Protect Service [if present]
- After that, hide the root from the Netflix app as well.
- NOTE : Upon restart, the Google Service Framework might get unchecked and Google Play Services might be missing from the DenyList. This is just a UI bug and nothing to worry about [as they are still active in the backend].
STEP 6: Delete Data
You will now have to delete the app data of all the apps from which you have hidden root. These include the compulsory Google apps and the desired apps of your choice.
- Head over to Settings > Apps and select Google Play Service.
- Then go to its Storage section and tap on Manage Space > Clear all data.
- After that, delete the data of Google Play Store and Google Play Protect Service [if present].
- Then tap on the overflow icon situated at the top right and select Show System.
- This will bring up the system apps. Select Google Service Framework and delete its data.
- Finally, delete the data of the Nextflix app. Once done, restart your device [compulsory].
STEP 7: Check SafetyNet Test Results
UPDATE: This is no longer required for Play Integrity users.
- Download and install the YASNAC app from Play Store.
- Then launch it and tap on Run SafetyNet Attestation.
- You should now get Pass under both Basic Integrity and CTS Profile Match.
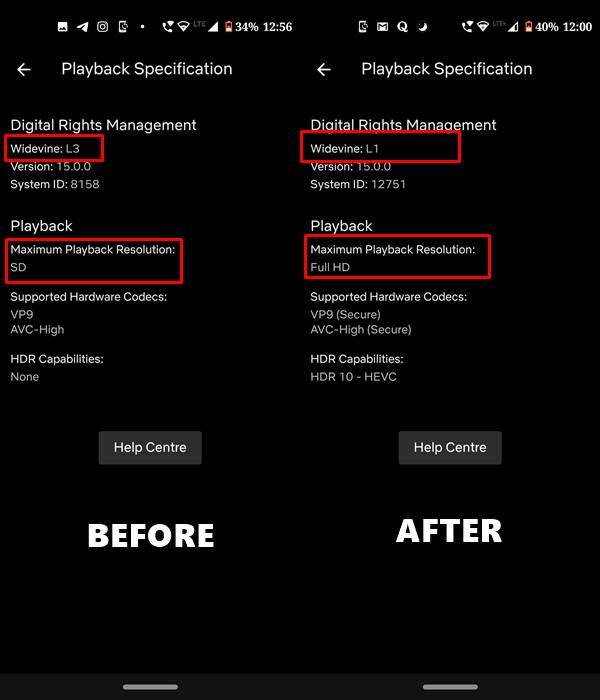
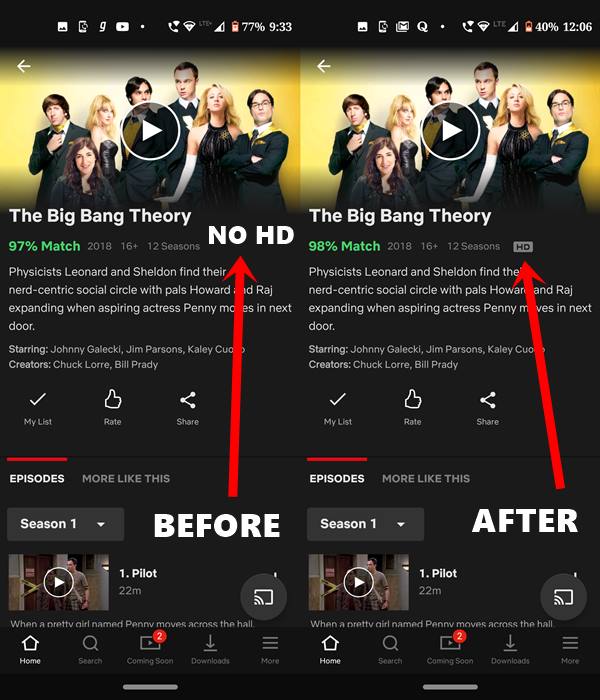
STEP 8: Check Netflix Widivine Certification on Rooted Android
Your final course of action should be to check the Widivine Certification of Netlfix on your rooted Android. You could directly perform this check from Netflix, there’s no need to download any third-party app for the same. Here’s how:
- Launch Netflix, select your profile, and go to App Settings.
- Then go to Playback Specification and it should show L1 next to Widevine.
- Likewise, Maximum Playback Resolution should be Full HD.
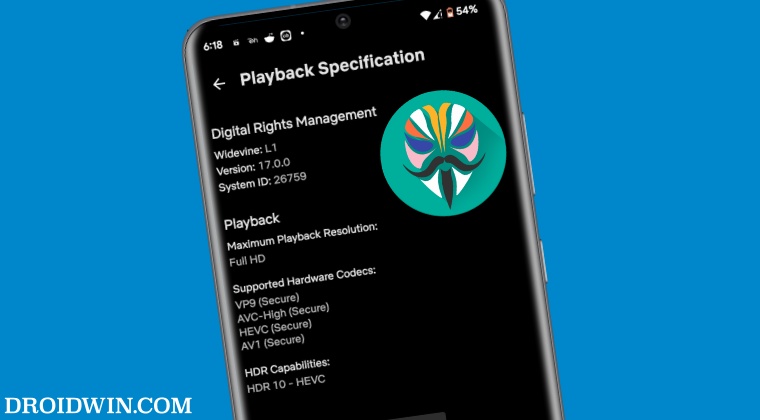
STEP 9: Flash DRM Module [Optional]
In rare cases, Netflix might still be on WideVine L3 even after carrying out all the aforementioned tweaks. So in such cases, you will have to additionally flash the DRM Disabler Module as well. Here’s how it could be done:
- Download the Liboemcryptodisabler Module on your device.
- Then launch Magisk, go to Modules, and tap on Install from Storage.
- Now select the downloaded module and hit OK. It will now be flashed.
- Once done, hit Reboot. Upon restart, you should get the L1 Certification.
Watch Netflix in HD on Rooted Devices via Lucky Patcher [Not Recommended]
Before moving ahead, there are a few prerequisites to be met. Two of the most obvious ones include an unlocked bootloader and a rooted device . Once your device satisfies both these requirements, the next thing that needs to be done is you have to download the Lucky Patcher app.
Do note that it is an extremely dangerous app. So proceed with caution. Droidwin or any of its members won’t be held responsible in case anything happens to your device. Now that the compulsory warning message has been dealt with, here are the steps to get this job done.

- First of all, download and install the Lucky Patcher app on your device.
- Launch the app and grant it the Magisk root permission.
- Now scroll to the Netflix app and tap on it.
- Select Menu of patches from the drop-down. Then click on Custom Patch .
- There’s only one custom patch available. Tap on Apply and wait for the process to finish.
- Once that is done, you need to clear its data. For that, go to Settings > Apps and Notifications > App Info .
- Then select Netflix from the list and go to its Storage and Cache > Tap on Clear Storage .
- Finally, launch the Netflix app, log in with your credentials, and binge-watch the content in HD.

- кмс авто виндовс 10 3 months ago Reply Watching Netflix in HD on rooted devices can be tricky due to DRM restrictions. By enabling Widevine L1 support or using tools like Magisk modules, you can restore HD playback while keeping your device rooted. It’s a handy solution for those who want full-quality streaming without unrooting.
- M 3 years ago Reply Can I delete the patcher app after the process is completed?
- Michael F Corker 5 years ago Reply Thanks for the guide, but it is not working. I have a rooted OnePlus 7 Pro with (OOS 10.3.8) with Magisk v23. I even downloaded the required version of Netflix (v7.44.0 build 34701) from downzen, as mentioned in the patch readme. But even after doing the above-written steps, the app is stuck on L3 certification.
(Cancel Reply)
Δ
