HP Printer not working in Chromebook Chrome OS: Fix Filter Failed Error
In this guide, we will show you two different methods to fix the HP Printer not working Filter Fail Error in Chromebook Chrome OS v97. These laptops from the Search Engine giants were initially used mostly in schools, enterprises, and organizations. However, recently it has seen its popularity on the rise among everyday users as well, so much so that some have even made the jump from Windows to Chrome OS.
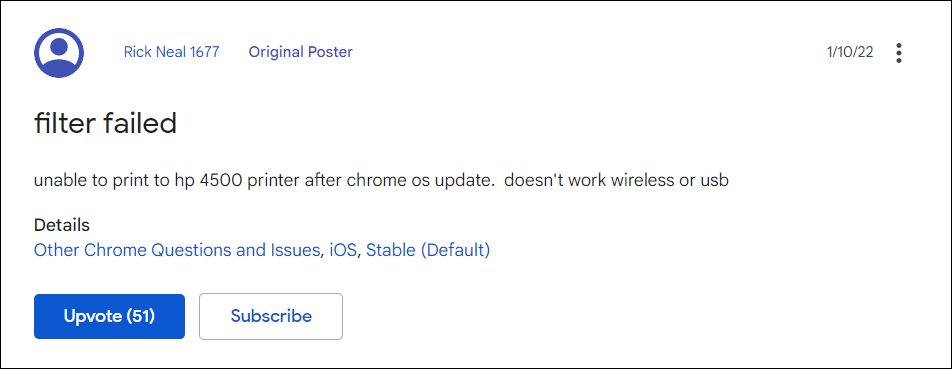
But we might not see that happening on the large scale any time soon, more so after its recent buggy phase. While issues with its Network and Phone Hub app is still yet to be addressed, a new bug has already made its way. All the users who have updated their Chromebook to Chrome OS v97 are reporting that their HP Printer is no longer working.
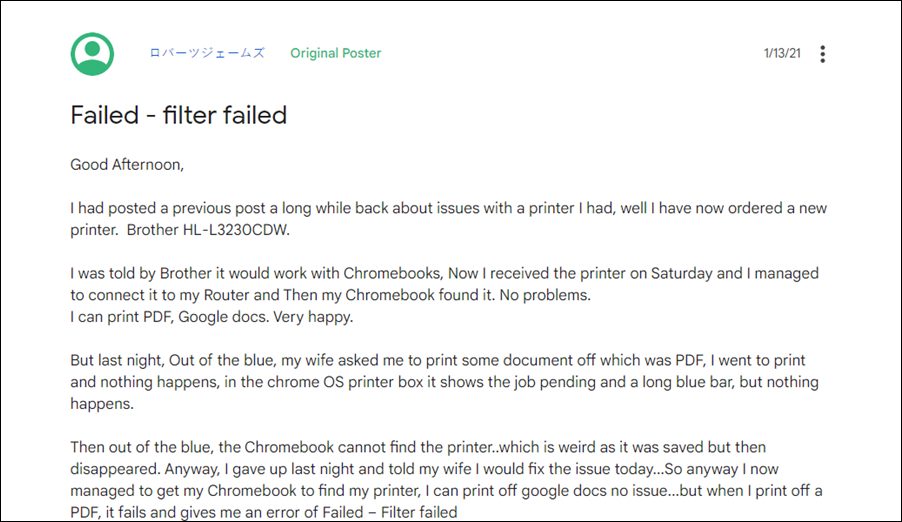
Whenever they are trying to print a file, they are instead being greeted with the Failed- Filter Fail error message. For some, even the printer is not appearing on their laptop. So if you are also getting bugged with this issue, then this tutorial shall help you out. In this guide, we will show you various methods to fix the HP Printer not working Filter Fail Error in Chromebook Chrome OS v97. Follow along.
- HP Printer not working in Chromebook Chrome OS: Fix Filter Failed Error FIX 1: Via HP Print Service Plugin FIX 2: Downgrade Chrome OS to v96 Downgrade Via Powerwash Downgrade via Crosh
HP Printer not working in Chromebook Chrome OS: Fix Filter Failed Error
There exist two different methods of rectifying this issue- using the Service Plugin app and via downgrading the OS. We have listed both these methods below. Go through them and then decide which one you should try out.
FIX 1: Via HP Print Service Plugin
- To begin with, install the HP Print Service plugin from the Play Store.
- Then bring up the print menu but instead of using the Print option, choose Save as PDF.
- Now save this file somewhere on your PC.
- Then open the Files app, navigate to that saved file, and select Share.
- Select HP Print Service from the share menu.
- Now select your printer and choose the desired print options (1 or 2 sided, color or black & white, etc).
- Finally, hit the Print icon situated at the top right and the page would be now printed without any issues.
- Check if it fixes the HP Printer not working Filter Fail Error in Chromebook Chrome OS v97.
FIX 2: Downgrade Chrome OS to v96
This issue is currently bugging Chrome OS stable version 97.0.4692.91 and Beta version 98.0.4758.51. In this regard, downgrading it to the earlier OS build version 96.0.4664.111 has rectified this issue for many users. But do keep in mind that this process will wipe off all the data on your device, so take a backup of all the data on your PC and then refer to our guide on How to Downgrade Chromebook Chrome OS to an Older Version [2 Methods] . The shorter instruction is given below:
Downgrade Via Powerwash
- Head over to the log-in screen and press the Ctrl+Shift+Alt+R shortcut keys.
- This will bring the Reset page. Again press the Ctrl+Shift+Alt+R shortcut.
- Now click on the Powerwash and Revert button situated at the bottom right.
- Your Chromebook will now be wiped and subsequently downgraded to the earlier version.
Downgrade via Crosh
- Then use the Ctrl+Alt+T shortcut keys to open the Crosh terminal.
- Now type in the below command and hit Enter: rollback
- Your Chromebook will now undergo a reset and will be downgraded to the earlier stable build.
- Network not available when setting up Chromebook: How to Fix
- Phone Hub Not Working: Cannot Connect Android to Chromebook [Fixed]
- Printer not working in Windows 11: How to Fix
- How to Fix Amazon Prime Video Error 7235 on Chromebook

(Cancel Reply)
Δ
Printer not working in Windows 11: How to Fix
In this guide, we will show you various methods to fix the Printer not working issue in Windows 11. There has been a slew of complaints lined up across various forums where users have voiced their concerns regarding the printer not functioning along the expected lines. Now there could be quite a few plausible reasons for this issue.
These include the likes of outdated drivers, incorrect printer setup, Firewall restrictive measures, issues with the Print Spooler, or due to the RPC Authentication Level Privacy. Keeping all these points in mind, this guide will list out 10+ different methods that shall help you fix the issue of the Printer not working in Windows 11. So without any further ado, let’s get started.
- How to Fix Printer not working in Windows 11 FIX 1: Use Printer Troubleshooter FIX 2: Clear Print Queue FIX 3: Re-Enable Print to PDF FIX 4: Turn on File and Printer Sharing FIX 5: Update Printer Drivers FIX 6: Re-Enable Printer Drivers FIX 7: Install HotFix Update FIX 8: Disable Firewall FIX 9: Re-Add Printers FIX 10: Restart Print Spooler Service FIX 11: Reset Printer Spooler FIX 12: Disable RPC Authentication Level Privacy
How to Fix Printer not working in Windows 11
Do note that there’s no universal fix as such. You will have to try out each of the below-mentioned workarounds and then check which one spells out success for you. In this regard, we will first be listing out the basic fixes before moving on to the advanced ones. So with that in mind, let’s get started.
FIX 1: Use Printer Troubleshooter
Windows has built-in quite a few troubleshooter apps, and one of them focuses specifically on finding and fixing printer-related issues. So let’s put it to the test right away.
- To begin with, use the Windows+I shortcut keys to open the Settings menu.
- Then select System from the left menu bar and scroll to Troubleshooter.
- After that, click on Other Troubleshooter and then click Run next to Printer.
- The Printer Troubleshooter will now scan for underlying issues and should bring in the associated fixes as well.
- Just click on the required fix to implement it. Once done. restart your PC for the changes to take effect.
- Once your PC boots up, check whether the Printer not working issue in Windows 11 has been fixed or not.
FIX 2: Clear Print Queue
If you have put some files in the print queue so that they get automatically printed one after another, then in some instances, they might slow down the printer or prevent it from carrying out its normal functionality. Therefore, you should consider clearing this queue, which could be done as follows:
- To begin with. use the Windows+I shortcut keys to open the Settings menu.
- Then select Bluetooth and Devices from the left menu bar and go to the Printers and Scanners section.
- Now select your printer from the list and then click on Open Print Queue.
- Next up, go to the Printer tab and click on Cancel All Documents.
- Once done, verify if the Printer not working issue in Windows 11 has been fixed or not.
FIX 3: Re-Enable Print to PDF
For some, it was disabling and then re-enabling the Print to PDF option that spelled out success for them. Here’s how to try it out:
- Use the windows+R shortcut keys to open the Run dialog box.
- Then type in the below command and hit Enter to open the Programs and Features page: appwiz.cpl
- After that, click on Turn Windows features on or off from the left menu bar.
- Now scroll to the Microsoft Print to PDF option, uncheck, and then re-check it.
- Finally, click OK to save the changes and then check if it fixes the Printer not working issue in Windows 11.
FIX 4: Turn on File and Printer Sharing
The File and Printer Sharing feature allows for a streamlined sharing of files across devices that are connected to the same network. So you should consider turning in this feature so that there’s no roadblock in the printing process. (Only perform these steps if you are connected to a private/personal network and not an open/public one).
- Launch the Control Panel from the Start Menu,
- Then change View by to Large icon and select Network and Sharing Center.
- After that, click on Change advanced sharing settings from the left menu bar.
- Then scroll to the File and Printer Sharing section and select Turn on file and printer sharing.
- Check if it fixes the Printer not working issue in Windows 11.
FIX 5: Update Printer Drivers
Using old or outdated drivers could have an adverse impact on its associated device, which in this case is the printers. Therefore you should update these drivers to their latest build, using the instructions given below.
- Right-click on the Start menu and select Device Manager.
- Then expand the Print Queues section, right-click on your printer, and select Update Driver.
- After that, choose Search automatically for drivers.
- Windows will now search for the latest drivers and will subsequently install them.
- Once done, restart your PC and then check if the Printer not working issue in Windows 11 has been fixed or not.
FIX 6: Re-Enable Printer Drivers
Disabling and then re-enabling the printer drivers will give the device a fresh instance to work upon, and this, in turn, could end up rectifying the underlying issue as well. So let’s try it out as well:
- Use the Windows+X shortcut keys and select Device Manager from the menu that appears.
- Then expand the Print Queues section, right-click on your printer, and select Disable Device.
- After that, click Disable in the confirmation dialog box.
- Now wait for around 10-15 seconds, right-click on your printer and select Re-Enable.
- See if it was able to fix the Printer not working issue in Windows 11.
FIX 7: Install HotFix Update
It’s no hidden secret by now that Windows quality updates could spell out trouble for the printers. Its recently released KB5006746 update ended up breaking the printer’s functionality. Though the Redmond giants were quick to rectify it by releasing a hotfix update a couple of days later. While chances of that happening again is rare but are still there. So check your PC for any pending updates, and if it is there, then get hold of it right away. Here’s how:
- Open the Settings menu via Windows+I shortcut keys.
- Then select Windows Update from the left menu bar.
- If there’s a pending update, then download and install it right away.
- Once done, restart your PC and then check if the Printer not working issue in Windows 11 has been fixed or not.
FIX 8: Disable Firewall
In some instances, the Firewall tends to become overprotective and in turn, ends up blocking a secure connection as well. To get out of this scenario, you should consider temporarily disabling it while the printing process is going on. Given here are the steps to disable Firewall in Windows Defender. If you are using a third-party antivirus app, then please check that software’s Firewall settings menu to disable it.
- To begin with, launch Windows Defender Firewall from the Start Menu.
- Then click on Turn Windows Defender Firewall on or off from the left menu bar.
- After that, select Turn off Firewall under both the Public and Private network sections.
- Finally, hit Apply > OK to save the changes.
- Now check if it fixes the Printer not working issue in Windows 11
FIX 9: Re-Add Printers
In case the printers have been incorrectly set up or any of their configurations have got corrupted, then you should consider unpairing and then re-pairing the printers with your PC. Here’s how it could be done:
- Open the Settings menu and go to the Bluetooth & devices section from the left menu bar.
- After that, go to the Printers & scanners section and select your printer.
- Then click on the Remove button to bid adieu to that printer.
- After that, click on Add. Your PC will now scan for nearby printers on the same network.
- Select your printer from the list and proceed with the on-screen instructions to pair it.
- Once done, verify whether it fixes the Printer not working issue in Windows 11.
FIX 10: Restart Print Spooler Service
The Print Spooler Service is constantly running in the background to provide for seamless and uninterrupted printing, especially when a lot of files are lined up in the queue. However, if it faces an issue or two, then its repercussions will directly be faced with the printing service. Therefore, you should consider giving this service a fresh start, which could be done as follows:
- Use the Windows+R shortcut keys to bring up the Run dialog box.
- Then type in the below command and hit Enter to launch the Services menu. services.msc
- Now scroll to the Print Spooler Service, right-click on it, and select Restart.
- Wait for a few seconds let it restart and then check if it fixes the Printer not working issue in Windows 11.
FIX 11: Reset Printer Spooler
If the Print Spoiler service gets corrupted, then a simple reboot might not be enough. In such cases, you should consider deleting its registry values and then let Windows re-create them from scratch. Here’s how:
- Head over to the Start menu and launch Registry Editor.
- Then copy-paste the below location in the Registry Editor’s address bar and hit Enter: Computer\HKEY_LOCAL_MACHINE\SYSTEM\CurrentControlSet\Control\Print\Environments\Windows NT x86\Print Processors
- Except for ‘winprint’, delete all its other keys from the right-hand side and then restart your PC.
- Verify if this registry tweak managed to fix the Printer not working issue in Windows 11.
FIX 12: Disable RPC Authentication Level Privacy
Microsoft Remote Procedure Call provides multiple levels of authentication and is used to establish a secure connection between client and server by verifying each of the data packets being exchanged. However, the RPC run-time library could well end up creating a restrictive environment for your printers, and hence the best bet is to temporarily disable it. Here’s how it could be done:
- Head over to the Start menu and launch Registry Editor.
- Now copy-paste the below location in the address bar and hit Enter: HKEY_LOCAL_MACHINE\System\CurrentControlSet\Control\Print
- Now go to the right-hand side, right-click in an empty location and select New > Dword (32-bit) Value.
- Name this value RpcAuthnLevelPrivacyEnabled and save it.
- Then double click to open it, type in 0 in the Value Data field, and click OK to save it.
- Now restart your PC for the changes to be implemented. Once it boots up, the underlying printer issue would be rectified as well.
- How to Fix Windows 11 High CPU and Disk Usage
- How to Fix Windows 11 Search Not Working Issue [5 Methods]
- Windows 11 Taskbar Not Working: How to Fix
- Windows 11 Start Menu Not Working: How to Fix [10+ Methods]
(Cancel Reply)
Δ
HP Printer not working in Chromebook Chrome OS: Fix Filter Failed Error
In this guide, we will show you two different methods to fix the HP Printer not working Filter Fail Error in Chromebook Chrome OS v97. These laptops from the Search Engine giants were initially used mostly in schools, enterprises, and organizations. However, recently it has seen its popularity on the rise among everyday users as well, so much so that some have even made the jump from Windows to Chrome OS.
But we might not see that happening on the large scale any time soon, more so after its recent buggy phase. While issues with its Network and Phone Hub app is still yet to be addressed, a new bug has already made its way. All the users who have updated their Chromebook to Chrome OS v97 are reporting that their HP Printer is no longer working.
Whenever they are trying to print a file, they are instead being greeted with the Failed- Filter Fail error message. For some, even the printer is not appearing on their laptop. So if you are also getting bugged with this issue, then this tutorial shall help you out. In this guide, we will show you various methods to fix the HP Printer not working Filter Fail Error in Chromebook Chrome OS v97. Follow along.
- HP Printer not working in Chromebook Chrome OS: Fix Filter Failed Error FIX 1: Via HP Print Service Plugin FIX 2: Downgrade Chrome OS to v96 Downgrade Via Powerwash Downgrade via Crosh
HP Printer not working in Chromebook Chrome OS: Fix Filter Failed Error
There exist two different methods of rectifying this issue- using the Service Plugin app and via downgrading the OS. We have listed both these methods below. Go through them and then decide which one you should try out.
FIX 1: Via HP Print Service Plugin
- To begin with, install the HP Print Service plugin from the Play Store.
- Then bring up the print menu but instead of using the Print option, choose Save as PDF.
- Now save this file somewhere on your PC.
- Then open the Files app, navigate to that saved file, and select Share.
- Select HP Print Service from the share menu.
- Now select your printer and choose the desired print options (1 or 2 sided, color or black & white, etc).
- Finally, hit the Print icon situated at the top right and the page would be now printed without any issues.
- Check if it fixes the HP Printer not working Filter Fail Error in Chromebook Chrome OS v97.
FIX 2: Downgrade Chrome OS to v96
This issue is currently bugging Chrome OS stable version 97.0.4692.91 and Beta version 98.0.4758.51. In this regard, downgrading it to the earlier OS build version 96.0.4664.111 has rectified this issue for many users. But do keep in mind that this process will wipe off all the data on your device, so take a backup of all the data on your PC and then refer to our guide on How to Downgrade Chromebook Chrome OS to an Older Version [2 Methods] . The shorter instruction is given below:
Downgrade Via Powerwash
- Head over to the log-in screen and press the Ctrl+Shift+Alt+R shortcut keys.
- This will bring the Reset page. Again press the Ctrl+Shift+Alt+R shortcut.
- Now click on the Powerwash and Revert button situated at the bottom right.
- Your Chromebook will now be wiped and subsequently downgraded to the earlier version.
Downgrade via Crosh
- Then use the Ctrl+Alt+T shortcut keys to open the Crosh terminal.
- Now type in the below command and hit Enter: rollback
- Your Chromebook will now undergo a reset and will be downgraded to the earlier stable build.
- Network not available when setting up Chromebook: How to Fix
- Phone Hub Not Working: Cannot Connect Android to Chromebook [Fixed]
- Printer not working in Windows 11: How to Fix
- How to Fix Amazon Prime Video Error 7235 on Chromebook
(Cancel Reply)
Δ
