Install Android 13 Custom ROM on OnePlus 9/Pro: Paranoid Android
UPDATE: Click here to install various Android 14 Custom ROMs for your OnePlus 9/Pro
In this guide, we will show you the steps to install the Paranoid Android custom ROM based on Android 13 onto the OnePlus 9/Pro device. The ninth iteration of devices from OnePlus has already been blessed with the latest Android OS. However, consider yourself lucky enough if you find any trace of the OxygenOS because the entire ecosystem has been Oppoified. Fortunately, both these devices are quite active players in the custom development and have just been blessed with a custom ROM.
Part of the popular Paranoid family, the ROM is based on the Code Linaro Organization Android base, as opposed to the usual Android Open Source Project [AOSP]. So a higher degree of performance, battery life, and functionality are on the cards, with just the right amount of feature sets. So without any further ado, let’s make you aware of the steps to install the Paranoid Android custom ROM based on Android 13 onto the OnePlus 9/Pro.
- Install Paranoid Android Custom ROM Android 13 on OnePlus 9/Pro STEP 1: Install Android SDK STEP 2: Enable USB Debugging and OEM Unlocking STEP 3: Unlock Bootloader on OnePlus 9/Pro STEP 4: Download Paranoid Android for OnePlus 9/Pro STEP 5: Boot OnePlus 9/Pro to Fastboot Mode STEP 6: Install Android 13 Custom ROM on OnePlus 9/Pro
Install Paranoid Android Custom ROM Android 13 on OnePlus 9/Pro

The below instructions are listed under separate sections for ease of understanding. Make sure to follow the same sequence as mentioned. Droidwin and its members wouldn’t be held responsible in case of a thermonuclear war, your alarm doesn’t wake you up, or if anything happens to your device and data by performing the below steps.
STEP 1: Install Android SDK

First and foremost, you will have to install the Android SDK Platform Tools on your PC. This is the official ADB and Fastboot binary provided by Google and is the only recommended one. So download it and then extract it to any convenient location on your PC. Doing so will give you the platform-tools folder, which will be used throughout this guide.
STEP 2: Enable USB Debugging and OEM Unlocking
Next up, you will also have to enable USB Debugging and OEM Unlocking on your device. The former will make your device recognizable by the PC in ADB mode. This will then allow you to boot your device to Fastboot Mode. On the other hand, OEM Unlocking is required to carry out the bootloader unlocking process.
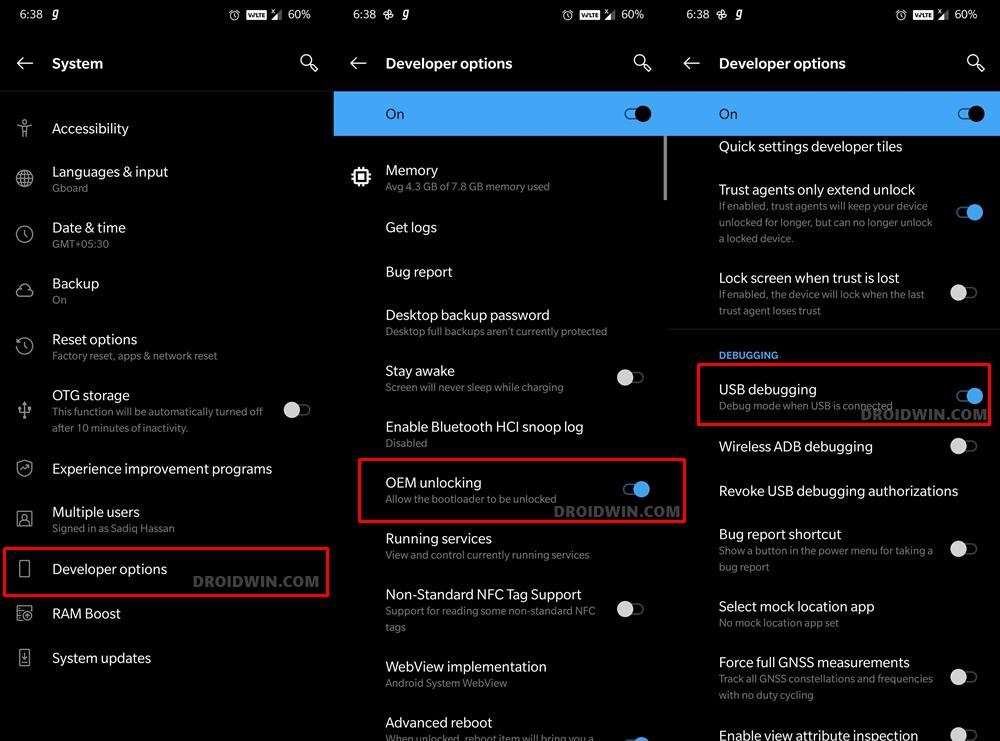
So head over to Settings > About Phone > Tap on Build Number 7 times > Go back to Settings > System > Advanced > Developer Options > Enable USB Debugging and OEM Unlocking.
STEP 3: Unlock Bootloader on OnePlus 9/Pro
Next up, you will also have to unlock the device’s bootloader. Do keep in mind that doing so will wipe off all the data from your device and could nullify its warranty as well. So if that’s all well and good, then please refer to our detailed guide on How to Unlock the Bootloader on OnePlus 9, 9 Pro, and 9R . Once done, don’t restore the backup now as well will again have to format the device in the subsequent steps.
STEP 4: Download Paranoid Android for OnePlus 9/Pro
- Grab hold of the Android 13 custom ROM for your OnePlus 9/Pro from below: Paranoid Android ROM: OnePlus 9 | OnePlus 9 Pro [NOTE: Download the ROM that ends with image.zip]
- Once downloaded, transfer the ROM to the platform-tools folder on your PC.
STEP 5: Boot OnePlus 9/Pro to Fastboot Mode
- Now connect your device to the PC via a USB cable. Make sure USB Debugging is enabled.
- Then head over to the platform-tools folder, type in CMD in the address bar, and hit Enter. This will launch the Command Prompt.
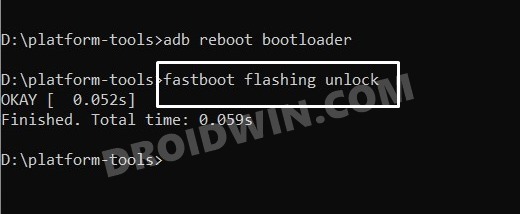
- Type in the following command in the CMD window to boot your device to Fastboot Mode adb reboot bootloader
- To verify the Fastboot connection, type in the below command and you should get back the device ID. fastboot devices
STEP 6: Install Android 13 Custom ROM on OnePlus 9/Pro
- Execute the below command to flash the ROM onto your device [replace filename accordingly] fastboot update filename.zip
- After that, type in the below command to factory reset your device: fastboot -w
- You may now reboot to the newly installed OS via the below command: fastboot reboot
- Install Android 13 on the OnePlus 9 Pro via Fastboot Commands
- How to Switch between ColorOS and OxygenOS in OnePlus 9 Pro
- OnePlus 9 Pro T-Mobile Modem Retention and Data Fix
- Convert OnePlus 9 Pro T-Mobile to EU via MSM Tool [Without unlock.bin]

- parth dave 2 years ago Reply i am currently using oxygen os 11 on oneplus 9 to install topaz stable a firmware install is required or not and plz can you make a dedicated video on that
- Parth 2 years ago Reply I tried to install this on my smartphone but can’t successed plz can you help me
(Cancel Reply)
Δ
