Install LineageOS GSI ROM on Galaxy A53 5G
In this guide, we will show you the steps to install the LineageOS GSI ROM on Galaxy A53 5G. In recent years, the A series from the South Korean giant are in the limelight more often than not. While there are already a plethora of devices from numerous OEMs in this domain, still, it’s the A lineup from Samsung wherein most users are inclined towards. Among them, the A53 is a newer entry to this list, and in a short span itself has managed to catch the attention of the masses.
If we turn our attention towards custom development, then they are performing quite decently too. Working custom recovery has already made its way and you could also easily gain administrative access by rooting your device via Magisk. However, it is the custom ROM domain that seems to be missing any noteworthy names. Well, this is where the Generic System Image comes in handy.
Using it, you could now install one of the most popular custom ROMs, LineageOS, onto your Galaxy A53 5G. This ROM has always been known to maintain an equilibrium between the features and the overall device stability. And that is the reason why it has become the go-to choice for various tech enthusiasts. So on that note, let’s get started with the steps to install the LineageOS GSI ROM on Galaxy A53 5G.
- Install LineageOS GSI ROM on Galaxy A53 5G STEP 1: Install Android SDK STEP 2: Download GSI Flasher Tool STEP 3: Convert LineageOS GSI ROM to TWRP Flashable STEP 4: Enable USB Debugging and OEM Unlocking STEP 5: Unlock Bootloader STEP 6: Install TWRP Recovery STEP 7: Boot to TWRP STEP 8: Install GSI ROM via TWRP
- FAQ: GSI ROM Bugs and Bootloop Fixes
Install LineageOS GSI ROM on Galaxy A53 5G

The below instructions are listed under separate sections for ease of understanding. Make sure to follow the same sequence as mentioned. Droidwin and its members wouldn’t be held responsible in case of a thermonuclear war, your alarm doesn’t wake you up, or if anything happens to your device and data by performing the below steps.
STEP 1: Install Android SDK
First and foremost, you will have to install the Android SDK Platform Tools on your PC. This is the official ADB and Fastboot binary provided by Google and is the only recommended one. So download it and then extract it to any convenient location on your PC. Doing so will give you the platform-tools folder, which will be used throughout this guide to install the LineageOS GSI ROM onto Samsung Galaxy A53 5G.

STEP 2: Download GSI Flasher Tool
Next up, download the GSI Flasher Tool and extract it to any convenient location on your PC.
Download: GSI Flasher Tool [Credits: XDA Senior Member azteria2000]
STEP 3: Convert LineageOS GSI ROM to TWRP Flashable
- To begin with, download the LineageOS 19 GSI ROM for your device.
- Once downloaded, extract it inside the GSI_Flasher > GSI Folder.
- Likewise, rename it to system, so that the complete name becomes system.img.
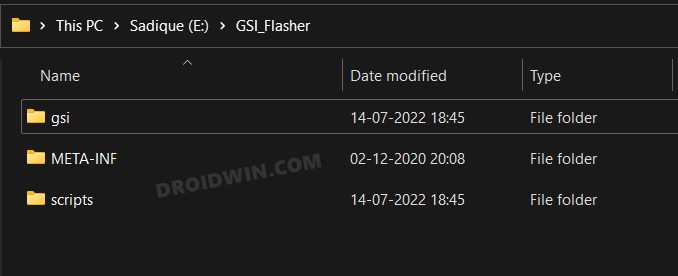
- Then select all the three folders inside the GSI Flasher Tool- gsi, META-INF, and scripts.
- Now right-click on it and select 7ZIP > Add to archive [you may also use WinRAR for this].
- Give it any name of your choice, change the Archive format to ZIP, and hit OK.
- Wait for the process to complete. Once done, send this ZIP file to the platform-tools folder.
STEP 4: Enable USB Debugging and OEM Unlocking
You will also have to enable USB Debugging and OEM Unlocking on your device. The former will make your device recognizable by the PC in ADB mode. This will then allow you to boot your device to Fastboot Mode. On the other hand, OEM Unlocking is required to carry out the bootloader unlocking process.
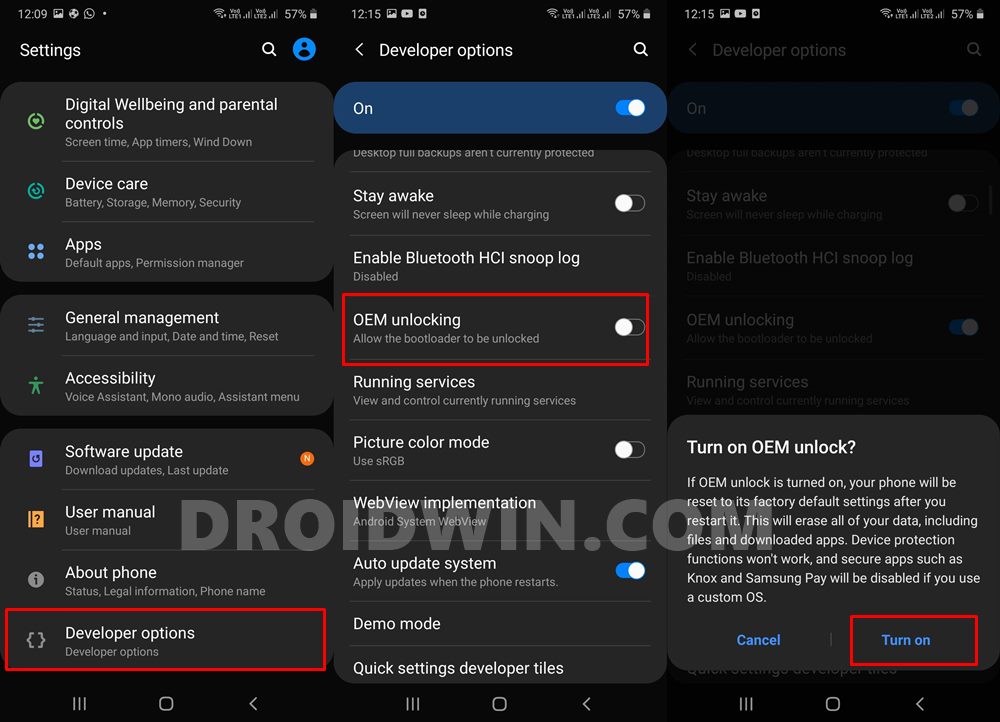
So head over to Settings > About Phone > Tap on Build Number 7 times > Go back to Settings > System > Advanced > Developer Options > Enable USB Debugging and OEM Unlocking.
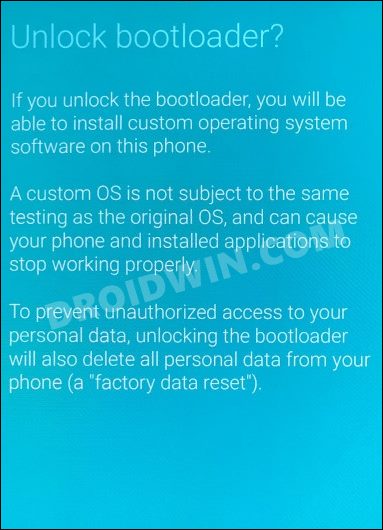
STEP 5: Unlock Bootloader
You will also have to unlock the device’s bootloader to install the LineageOS GSI ROM onto Samsung Galaxy A53 5G. Do note that doing so will wipe off all the data from your device and could nullify its warranty as well. So if that’s all and good, then please refer to our guide on How to Unlock Bootloader on Samsung Galaxy A53 5G
STEP 6: Install TWRP Recovery
Your device also needs to have a working TWRP Recovery installed using the Odin Tool. If you haven’t done so yet, then refer to our guide on Install TWRP Recovery on Samsung Galaxy A53 5G.

STEP 7: Boot to TWRP
- Connect your device to the PC via USB cable. Make sure USB Debugging is enabled.
- Then head over to the platform-tools folder, type in CMD in the address bar, and hit Enter. This will launch the Command Prompt.
- Type in the following command in the CMD window to boot your device to TWRP adb reboot recovery
STEP 8: Install GSI ROM via TWRP
- From TWRP, go to Wipe > Format Data and type in YES in the space provided.
- Then hit the checkmark situated at the bottom right and wait for the wipe to complete.
- Once done, go to Advanced Wipe and select Dalvik, Cache, and Data partitions.
- Then perform a right swipe to wipe these partitions.
- After that, transfer the GSI ZIP file to your device using ADB Sideload, Mount, or OTG .
- Now go to Install, select the GSI ZIP file and perform a right swipe to flash it.
- Finally, go to Reboot and select System. Your device will now boot to the newly installed ROM.
- Debloat/Remove Bloatware from Galaxy S22/Plus/Ultra via ADB
- Remove Bootloader Unlock Warning on Galaxy S22/Plus/Ultra
- Galaxy S22 Ultra WiFi not working: Connected without Internet [Fix]
- Call Dropping and Mobile Data issue in Galaxy S22 Ultra: How to Fix
GSI ROMs are known to go through a few bugs and issues related to network, 5G, or VoWIFI/VoLTE. In case, you also come across such bugs, then you could refer to our below-listed guides to fix them.
- 5G, Bluetooth, 90Hz Display, DT2W not working in GSI ROM: How to Fix
- No Audio in Bluetooth/Wired Headphones in GSI ROM [Fixed]
Likewise, if your device gets stuck in a continuous bootloop, then it’s most probably in need of disabling the verity checks, which requires flashing the vbmeta. All these have been explained in the below-linked guides, do check them out, if needed
- Device not booting after flashing GSI: How to Fix
- Stuck on Bootloop after flashing GSI: Fix by Disabling DM-Verity or Android Verified Boot

- argel 4 years ago Reply Can you provide a photo of the phone running lineageos? there are too many sites online with fake instructions that just brick the device. Oscar 3 years ago Reply I can confirm this method works. Just be sure to follow all the instructions correctly and to have the correct ROM file for your phone.
(Cancel Reply)
Δ
