Install OTA Updates/Firmware via ADB Sideload in Nothing Phone 1/2
In this guide, we will show you the steps to install the OTA update as well as the firmware package via ADB Sideload on your Nothing Phone 1/2. The OEM has promised three years of OS upgrades and an additional year of security patches [delivered every two months]. In this regard, as soon as the update is available, you will be notified of the same and you can download and install it directly from the Settings menu.
So when the updates will automatically be pushed at regular intervals, why is there a need to manually carry out this task? Well, there exists a slew of benefits in manually grabbing hold of these update files and then installing them. For starters, the OTAs are usually rolled out in bathces, meaning only a selected few will get the update in the initial days, and then it will be rolled out for the general audiences. However, if you manage to get hold of the update ZIP, then you could directly flash it onto your device without any delay.
Likewise, if you are a tech enthusiast, then you would need the firmware file to extract the boot.img and patch it via Magisk to obtain the root. Moroever, if any partition on your device is corrupt, then you could easily get that file from the stock firmware and flash it right away onto your device. Now regarding the flashing process, there exist two different approaches- using the Fastboot Method and via ADB Sideload.
For the normal use case scenario if you just wish to install an update on your stock device, then Sideload should be the preferred approach. On the other hand, if you are dealing with technical aspects such as root, then you have no choice but to opt for the Fastboot Method. With that said, this guide will make you aware of the steps to install the OTA update and the firmware package via ADB Sideload on your Nothing Phone 1/2. So without further ado, let’s get started.
- Install OTA Updates and Firmware via ADB Sideload in Nothing Phone 1/2
- METHOD 1: Via Recovery STEP 1: Install Android SDK STEP 2: Download Nothing Phone 1/2 Firmware STEP 3: Enable USB Debugging STEP 4: Boot to Stock Recovery STEP 5: Install OTA/Firmware Via ADB Sideload on Nothing Phone 1
- METHOD 2: Via Dialer Code
Install OTA Updates and Firmware via ADB Sideload in Nothing Phone 1/2
Please take a backup of all the data on your device before proceeding with the below steps. Droidwin and its members wouldn’t be held responsible in case of a thermonuclear war, your alarm doesn’t wake you up, or if anything happens to your device and data by performing the below steps.
METHOD 1: Via Recovery
In this method, we will be installing the firmware via the built-in stock recovery.
STEP 1: Install Android SDK
First and foremost, you will have to install the Android SDK Platform Tools on your PC. This is the official ADB and Fastboot binary provided by Google and is the only recommended one. So download it and then extract it to any convenient location on your PC. Doing so will give you the platform-tools folder, which will be used throughout this guide.

STEP 2: Download Nothing Phone 1/2 Firmware
- Next up, grab hold of the firmware file for your device from below. NOTHING PHONE 1 FIRMWARE COLLECTION NOTHING PHONE 2 FIRMWARE COLLECTION
- It is recommended that you download the full update package and not the incremental ones.
- Once downloaded, transfer the firmware to the platform tools folder on your PC.
- Likewise, rename the file to update, so that the complete name becomes update.zip.
STEP 3: Enable USB Debugging
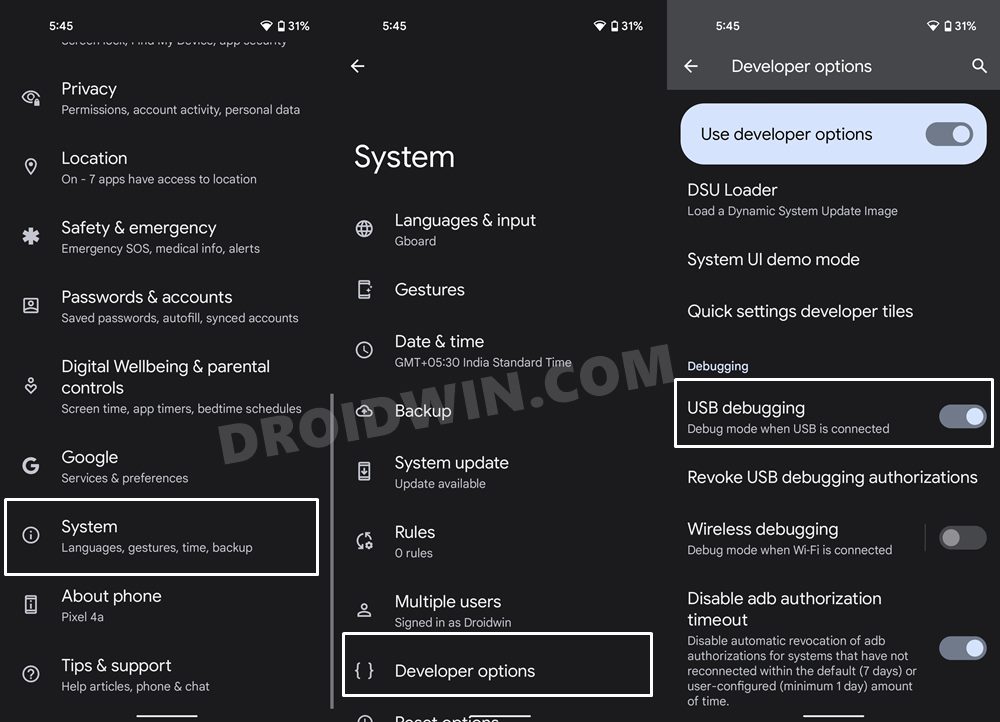
Next up, you will have to enable USB Debugging so that your device is recognizable by the PC in ADB mode. This will then allow you to boot your device to Recovery Mode. So head over to Settings > About Phone > Tap on Build Number 7 times > Go back to Settings > System > Advanced > Developer Options > Enable USB Debugging.
STEP 4: Boot to Stock Recovery
- Connect your device to the PC via a USB cable. Make sure USB Debugging is enabled.
- Then head over to the platform-tools folder, type in CMD in the address bar, and hit Enter. This will launch the Command Prompt.
- After that, type in the following command in the CMD window to boot your device to the stock recovery adb reboot recovery
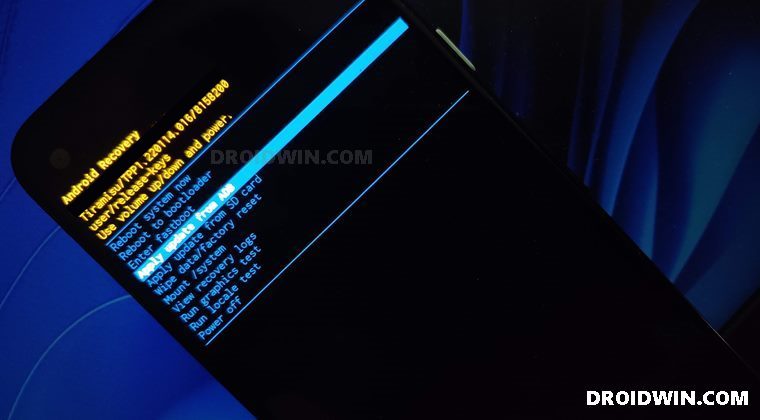
- You will now be taken to the No Command screen .
- To exit this screen, press and hold the Power Button and while doing, so press and release the Volume Up key and then release the Power key as well. You will now be taken to the stock recovery.
STEP 5: Install OTA/Firmware Via ADB Sideload on Nothing Phone 1
- Use the Volume keys to highlight the Apply Update from ADB option and press the Power key to confirm it.
- You should now see a message along the following lines on your device.
- Now head over to the platform-tools folder, type in CMD in the address bar, and hit Enter. This will launch the Command Prompt.
- Type in the following command in the CMD window to verify the ADB Sideload connection: adb devices
- If you get the sideload keyword in the Command Prompt, then the connection stands successful and you may proceed ahead.
- So go to the CMD window (that you have opened inside platform-tools) and type in the below command to install the OTA file: adb sideload update.zip
- The installation process will now begin and could take a few minutes. Once done, use the Volume keys to select the Reboot System Now option and press the Power key to confirm it.
METHOD 2: Via Dialer Code
The device comes built-in with the Local System Update app that you can use to install OTA updates, however, it is hidden by default. But fret not. You can easily invoke this app using a dialer code and then get the job done. Here’s how:
- Create a new folder named ota in the Internal Storage.
- Then transfer the OTA file inside that folder.
- Now dial ##682## to open up the update tool.
- You can also install the Activity Launcher app and then launch the “OfflineOTAUpgrade” app using it [it has the app package name com. nothing.OfflineOTAUpgradeApp].
- It will first try to find the OTA file. If it isn’t able to do so, then you may manually browse to that location and select the file as well.
- The installation will now start. Once done, your device will boot to the OS.
- How to Install Android 13 via Fastboot Method
- Install Custom ROM on Android via ADB Sideload
- How to Use ADB Sideload in Android [Stock and TWRP Recovery]
- ADB Sideload not working: Cannot Read File [Fixed]

(Cancel Reply)
Δ
