Install Qualcomm Diag Drivers: HS-USB MDM Diagnostics 90B6
In this guide, we will show you the steps to install the Qualcomm HS-USB MDM Diagnostics 90B6 Diag Drivers on your Windows PC. These drivers come in handy under numerous circumstances. From repairing the baseband to unlocking the 5G Carrier Aggregation combinations and using the QPST Tool to modifying the carrier_polixy.xml for enabling nr5g_sa_bands and nr5g_nsa_bands, none of these tasks could be possible if these drivers aren’t installed.
This is because once you enable the Diag mode on your device and connect it to PC, the latter won’t be able to identify the connected device in this mode and hence the QPST will fail to recognize the device as well. This is the reason why installing the Qualcomm HS-USB MDM Diagnostics 90B6 Diag Drivers on your Windows PC is of paramount importance and among the first prerequisites that you need to checkmark off the list. So without further ado, let’s get started.
How to Install Qualcomm HS-USB MDM Diagnostics 90B6 Diag Drivers
- To begin with, download and extract the Qualcomm Diag Drivers [ LINK ].
- Now open the dialer and type in *#8011# to enable USB Diag. [Not Working? See Note Below].
- Then connect your device to your PC and open Device Manager.
- Now expand the Other Device section and you’ll see two devices.
- Both these devices will be the same with a yellow exclamation mark.
- First off, right-click on the first device and select Update Drivers.
- Then click on Browse my computer for drivers.
- Now click on Let me pick from a list of available drivers on my computer.
- Then click on Show All Devices and click Next.
- Now click on Browse, navigate to the qcser.inf, and click OK.
- Then select Qualcomm HS-USB MDM Diagnostics 90B6 and click Next.
- You might get a warning, click YES to continue. The drivers will now be installed.
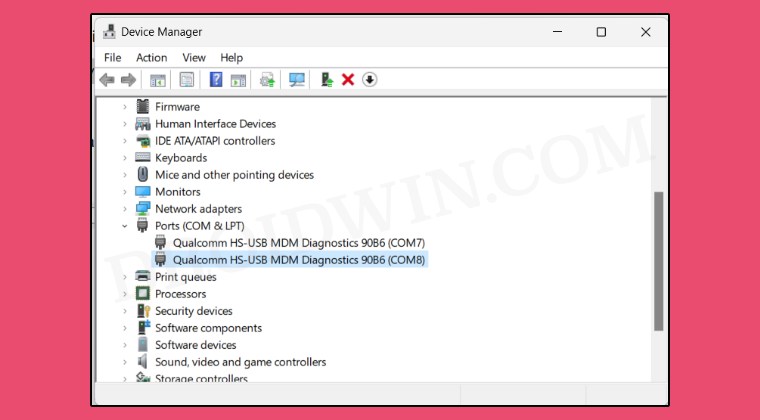
- Now go back to Device Manager. One out of the two devices will be shown as Qualcomm HS-USB MDM Diagnostics 90B6 and will be under the Ports section.
- However, the other device will still be with a yellow exclamation mark under the Other Device section. So install the drivers for it as well exactly as we did above.
- Once done, both devices will now be shown as Qualcomm HS-USB MDM Diagnostics 90B6 under the Ports section and your task stands complete.
Cannot Boot to Diag Mode: How to Fix
The dialer code *#8011# to boot to Diagnostic Mode might not work with all devices, so let’s use the ADB command to get this job done. Here’s how:
- Download and extract the Android SDK Platform Tools on your PC.
- Now enable USB Debugging and connect your device to PC via USB.
- Then root your device via Magisk / KernelSU / APatch .
- Next, set Default USB Configuration to No data transfer (Charging only) mode.
- Now, open Command Prompt inside the platform-tools folder and type adb shell
- Now, in case of KernelSU and APatch, go to SuperUser and enable the toggle next to shell
- Then type in the below command. In case of Magisk, you’ll get a prompt, tap Grant. su
- Now type in the below command to enable the diag mode on your Android device: setprop sys.usb.config diag,diag_mdm,adb
- Go to Device Manager and you should see two unknown devices under “Other devices”.
- Select the first one only and click on Update Driver.
- Then refer to the steps given in the above section to install the drivers.
- Device shown as Qualcomm HS USB Diagnostic 900e [Fix]
- Qualcomm CrashDump Mode ExitCode=0x00007f00 [Fix]
- Install EDL Drivers in Windows 11: Qualcomm HS-USB QDLoader 9008
- Yellow exclamation next to Qualcomm HS-USB QDLoader 9008 [Fix]

- harsh 2 years ago Reply I couldn’t enable USB diag using *#8011# on Realme GT 2 , Realme UI 5(color os 14). I was trying to enable 5G Carrier aggregation/ NR-CA. https://band.radio/2xnrca But I couldn’t access USB diag port, Let me know if you know anything about it. Thx
(Cancel Reply)
Δ
