Multiple Apps Shows Up in Spotlight: How to Fix?
Spotlight has been bugged with numerous issues throughout its existence, with the likes of its inability to find files or taking ages to search for them being the two most common ones. However, there’s a new entry to this list which has become equally troublesome for Mac users.
Numerous users have voiced their concern that multiple instances of the same apps tend to show up in the Spotlight search results. If you are also stuck with this duplicate result bug, then this guide will help you out. Follow along for the fixes.

- How to Fix Multiple Apps Show Up in Spotlight FIX 1: Change ‘Display As’ Settings FIX 2: Re-Build Spotlight Indexing Here’s what the commands mean FIX 3: Reset Spotlight Indexing Here’s what both the commands do: FIX 4: Using Third-Party App
How to Fix Multiple Apps Show Up in Spotlight

It is recommended that you try out each of the below-mentioned workarounds and then see which one spells out success. So with that in mind, let’s get started.
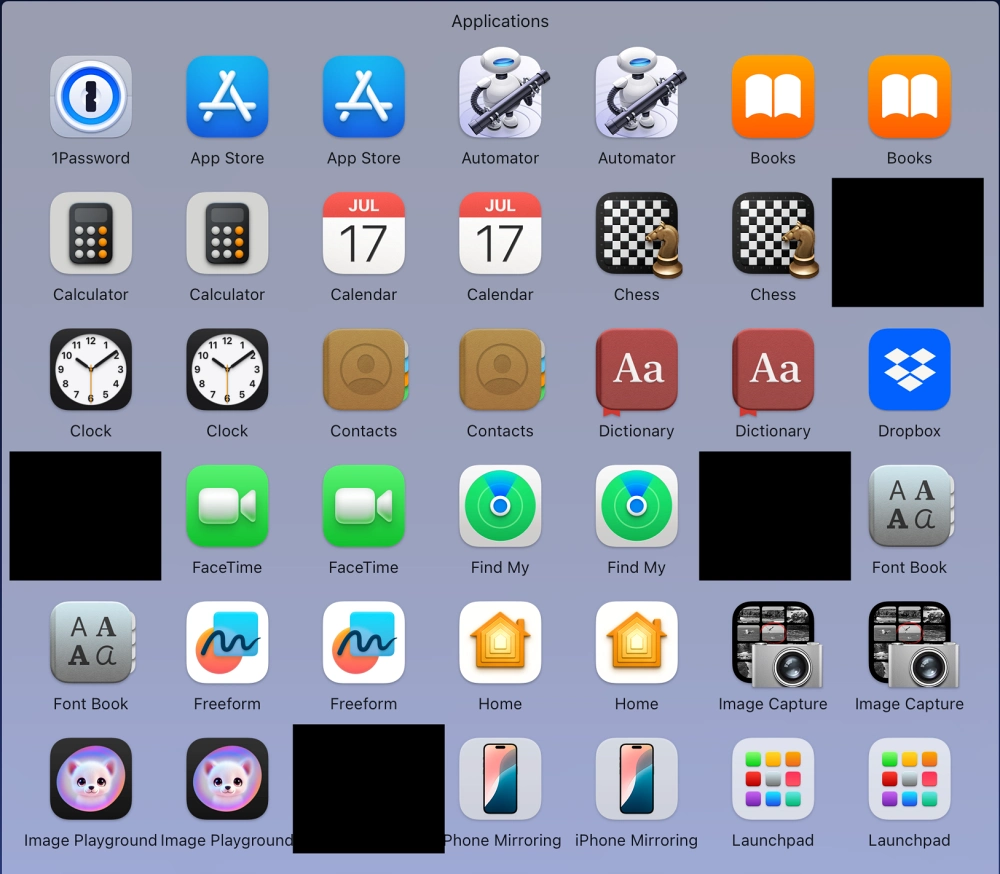
FIX 1: Change ‘Display As’ Settings
Right-click on the Applications folder in the Dock and change the “Display as” to “Stack” and change “Sort by” to “Kind”. This should fix the issue, and you should now change “Display as” back to “Folder” and “Sort by” back to “Name.
FIX 2: Re-Build Spotlight Indexing
Next up, you should consider rebuilding the indexing by disabling and then re-enabling it using the commands given below. We have also explained what each of these commands does, so make sure to go through them if you’re having any doubts.
- Launch Terminal and type in the following three commands: sudo mdutil -Eai off sudo mdutil -Eai on mdutil -as
- Wait for the reindexing to complete, which might take a while.
- Once done, retry performing a search and check out the result.
Here’s what the commands mean
- mdutil → Manages Spotlight indexing
- -E → Erase the existing Spotlight index
- -a → Apply to all volumes
- -i off → Turn OFF Spotlight indexing
- -i on → Turn ON Spotlight indexing
- mdutil -as -a → All volumes -s → Show status
So the first two commands will disable and then re-enable Spotlight on your Mac. Whereas after entering the last command [mdutil -as], you’ll be able to see the current Spotlight indexing status for all mounted volumes [which should show as Enabled].
FIX 3: Reset Spotlight Indexing
If none of the aforementioned commands spelled out success, then your last course of action is to reset the Spotlight Indexing [rebuilding the spotlight from scratch will take some time, so please be patient]. Here’s how it can be done: [We have explained what these commands do, so please go through them once before using them]:
- Open Terminal and type in either of the two commands sudo rm -rf /.Spotlight-V100 OR sudo mdutil -E /System/Volumes/Data
- Once done, restart your Mac and check out the results.
Here’s what both the commands do:
sudo rm -rf /.Spotlight-V100
- rm -rf → force-delete files/folders recursively (no prompts)
- /.Spotlight-V100 → The Spotlight index database folder at the root of a volume
sudo mdutil -E /System/Volumes/Data
- mdutil → Official Spotlight tool
- -E → Erase and rebuild the Spotlight index
- /System/Volumes/Data → Your main data volume (apps, users, files)
FIX 4: Using Third-Party App
The third-party app Onyx OnyX holds a slew of useful features that will help us address the issue at hand. For instance, you can use it to verify the structure of the system files; perform cleaning and computer maintenance tasks; configure parameters in the Finder, Dock, Safari, and some Apple applications; delete caches; remove certain problematic folders and files; rebuild various databases and indexes. So get it from here , run it on your Mac, and see if it can rectify the underlying issue.
- Spotlight not working in macOS Tahoe [Fixed]
- How to Remove Web Search Results in Spotlight
- Fix Spotlight Search Index not working on the External Hard Disk Drive
- Safari App missing in Spotlight Search: How to Fix
- Spotlight Not Working in macOS Sequoia [Fixed]

(Cancel Reply)
Δ
