OnePlus: Disable Google Discover and Replace it with Shelf
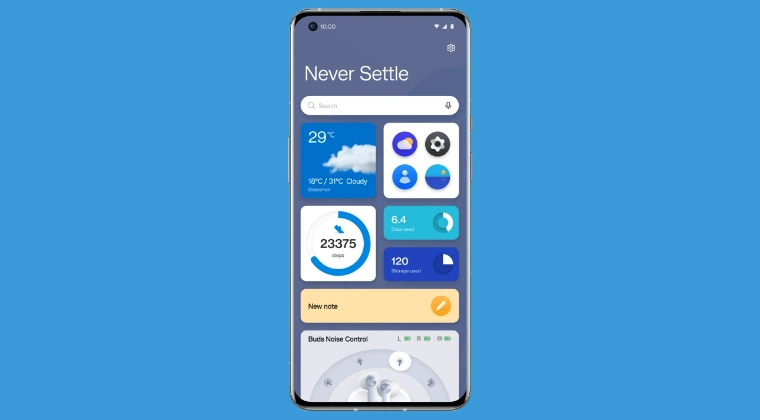
When you perform a right swipe on your OnePlus home screen, you’ll be taken to Google Discover, wherein you’ll find curated news snippets from various sources. This is true for OxygenOS, but in ColorOS, you’ll be taken to the Shelf from where you can carry out a slew of tasks. From checking the current temperature to live steps, from checking the data and storage consumption to creating a new note or opening any desired app of your choice, it beholds a slew of functionalities under its sleeves.

This is in stark contrast to Discover, wherein you can only get access to news. So this is the reason why many users are looking to make a switch from news to Shelf. If you are also in the same boat, then this guide is exactly what you need. And guess what, you can now carry out this task without root [as opposed to earlier times when only the rooted method was available]. So without any further ado, let’s make you aware of the steps to get this job done right away.
- How to Disable Google Discover and Replace it with Shelf on OnePlus The Prerequisites Non-Root Method [ADB Commands] Disable Google Discover Replace Google Discover with Shelf Non-Root Method [Using App] Root Method Disable Google Discover Replace Google Discover with Shelf
- How to Bring Back Google Discover Non-Root Root
- Video Guide
How to Disable Google Discover and Replace it with Shelf on OnePlus
We are listing here two different methods- root and non-root. Go through both of them once and then try out the one that is in sync with your requirement.
The Prerequisites
The steps given here are applicable to both root and non-root methods, unless mentioned otherwise.
- First off, download and extract Android SDK Platform Tools on your PC.
- Then, enable USB Debugging and connect your device to the PC via USB.
- After that, open the Command Prompt inside the platform-tools folder.
- All the commands given below should be typed in this CMD window only.
- Now, if you want to use the root method, then root your device via Magisk / KernelSU / APatch .
Non-Root Method [ADB Commands]
Disable Google Discover
adb shell settings put secure assistant_screen_type 0

adb shell settings put secure assistant_screen_type_left_enable 0
Replace Google Discover with Shelf
adb shell settings put secure assistant_screen_type 1

adb shell settings put secure assistant_screen_type_left_enable 1
Non-Root Method [Using App]
You may also get this job done using a third-party app, SetEdit. However, since we are modifying the Secure values, you will need to give the app the Write_Secure_Settings permissions. Here’s how all of this can be carried out:
- Download and install the SetEDit app from the Play Store.
- Now enable USB Debugging and connect your device to PC.
- Likewise, enable “Disable Permission Monitoring” and restart your device.
- Now, give the app the required permissions using the below command: adb shell pm grant by4a.setedit22 android.permission.WRITE_SECURE_SETTINGS
- Now launch the app, change the table to Secure and find: assistant_screen_type assistant_screen_type_left_enable
- Then change their values to 0 to disable Discover or 1 to replace it with Shelf. To Disable Google Discover assistant_screen_type 0 assistant_screen_type_left_enable 0 To Replace Discover with Shelf assistant_screen_type 1 assistant_screen_type_left_enable 1
Root Method
Disable Google Discover
adb shell

su


settings put secure assistant_screen_type 0

settings put secure assistant_screen_type_left_enable 0
Replace Google Discover with Shelf
adb shell

su


settings put secure assistant_screen_type 1

settings put secure assistant_screen_type_left_enable 1
How to Bring Back Google Discover
Want to get back to Google Discover? We have again listed two methods [root and non-root] for the same. Check them out!
Non-Root
adb shell settings put secure assistant_screen_type 2

adb shell settings put secure assistant_screen_type_left_enable 1
Root
adb shell

su


settings put secure assistant_screen_type 2

settings put secure assistant_screen_type_left_enable 1
Video Guide

- OnePlus Device Stuck in Fastboot: How to Fix
- Custom Launcher Lag on OnePlus? Try This Fix!
- Download Full HD+ Wallpapers for all OnePlus Devices & Tablets
- How to Enable All LTE Bands on any Chinese OnePlus [Non Root]
- Which Partition Does OnePlus Store IMEI Number [It’s Not EFS!]

(Cancel Reply)
Δ
