Preflash Validation Failed: How to Fix
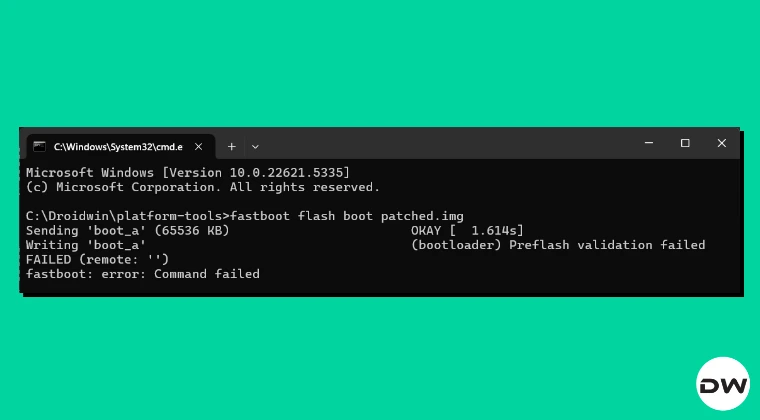
In this guide, we will show you the steps to fix the Preflash Validation Failed error. Recently, I bought a Motorola device and was planning to root it. After patching the boot.img file via Magisk, I proceeded ahead to flash it in the boot partition of my device. But when I tried to do so, I was straightaway greeted with the Preflash validation failed error.

So I did some research, but that proved to be futile because the recommended action was to unlock the bootloader [I mean, seriously!]. This is when I decided to take rectification measures directly on my device [because at this stage I had nothing much to lose] and finally stumbled upon the fix. So without any further ado, let’s make you aware of that fix right away!
Fix Preflash Validation Failed
Before starting, please take a complete device backup. Droidwin and its members wouldn’t be held responsible in case of a thermonuclear war, your alarm doesn’t wake you up, or if anything happens to your device and data by performing the below steps.
The fix for this problem is that you need to flash the file in FastbootD Mode . Here’s how it can be done:
- Download and extract Android SDK Platform Tools on your PC.
- Then, enable USB Debugging & OEM Unlocking on your device.
- Next, unlock the bootloader on your device [take a backup first].
- Now transfer the file that you want to flash in the platform-tools.
- Then open Command Prompt inside the platform-tools and type: adb reboot fastboot //from the OS fastboot reboot fastboot //from Fastboot Mode
- This will reboot your device to FastbootD. You may now flash the desired file.
Video Guide

- What is FastbootD? How to Boot to FastbootD Mode
- Cannot Boot Android to FastbootD Mode: How to Fix
- How to Enable FastbootD Mode in Samsung Recovery
- How to Update GSI Without FastbootD Mode

(Cancel Reply)
Δ
