Proximity Sensor not working on Xiaomi/Redmi/Poco [Fixed]
In this guide, we will show you the steps to fix the issue of the Proximity Sensor not working on Xiaomi/Redmi/Poco devices. A proximity sensor is able to detect the presence of nearby objects without any physical contact. If we talk about its usage in the smartphone, then one of its most common use case scenarios is when you place or pick up a call, the display will turn off straight away.
This happens so that your face or ear doesn’t end up inadvertently interacting with your device, which might result in you putting the call on hold, muting it, or even canceling it. While its benefits are undeniable, there have been a few instances wherein it just refuses to function along the expected lines. When that happens, your first course of action should be to clear the region where it’s located [upper front part of the phone].
Likewise, you should double-check that the screen protector you are using is compatible with your device and that there is no temporary transparent protection film on the screen. Once you have checked all these fixes but the Proximity Sensor is still not working on your Xiaomi/Redmi/Poco device, then you should give the below software side fix a try.
Fix Proximity Sensor not working on Xiaomi/Redmi/Poco
In order to get this job done, we will be making use of the built-in Control and Identification Toolbox on your device, which is also known as the Hardware Test Menu. Make sure to proceed ahead with caution and at your own risk. Droidwin and its members wouldn’t be held responsible in case of a thermonuclear war, your alarm doesn’t wake you up, or if anything happens to your device and data by performing the below steps.
- Brig up the dialer and type in the below command to open CIT: ##6484##
- You could also go to Settings > About Phone > All Specs and tap on Kernel version 5 times to enable CIT.
- Once you are inside CIT, select the Proximity Sensor test.
- Then proceed with the on-screen instructions to complete the test.
- You might be asked to touch on three points (or similar exercises) to calibrate the sensor.
- Do so as instructed and then restart your device. The underlying issue should be resolved.
- Google Pixel 6/Pro Proximity Sensor Not Working: How to Fix
- Pixel 6 Fingerprint Sensor Not Working: How to Fix
- How to Fix Loss Of Fingerprint Sensor Issue on any OnePlus Device
- Location-based Automation not running automatically on iPhone?

(Cancel Reply)
Δ
Pixel 6 Fingerprint Sensor Not Working: How to Fix
In this guide, we will show you various methods to fix the Pixel 6 fingerprint sensor not working issue. The latest offerings from the Silicon Valley giant have bought in a plethora of new goodies. Right out of the box, you will notice a completely revamped design, which was literally the need of the hour for this series. Then there are quite a few nifty camera tweaks as well which is generally along the expected lines for this lineup.
Apart from that, you will now also be getting three years of OS upgrades and five years of security patches. Moreover, the sixth iteration has welcomed an in-display fingerprint scanner, which is a first for any Pixel device. However, as opposed to other flagships that have straightaway opted for the 3D ultrasonic scanner, Google decided to stick with the old 2D optical scanner. And this isn’t proving to be the right decision.
A slew of complaints are getting accrued where users have voiced their concerns that the under-display fingerprint scanner isn’t working along the expected lines. Considering the money being spent on purchasing these flagships, and the issue gets all the more worrisome. Well, if you are also getting bugged with this issue, then fret not. In this guide, we will make you aware of various methods that shall help you fix the Pixel 6 fingerprint sensor not working issue.
- How to Pixel 6 Fingerprint Sensor Not Working Add the Same Fingerprint Twice Give it An Additonal Second Apply Optimal Pressure Use Dry Hands Clean your Screen Use a compatible screen protector Re-Add Your Fingerprint Install Pending Updates Give AI some time! Contact Google
How to Pixel 6 Fingerprint Sensor Not Working
Do note that there’s no universal fix as such. You will have to try out each of the below-mentioned workarounds and see which one works best in your favor. So keeping that in mind, let’s get started.
Add the Same Fingerprint Twice
An old trick out of the books, adding the fingerprint of the same finger twice or thrice will make the job of the scanner a little bit easier in reading those fine prints. So head over to Settings > Security and fill up two-three slots of fingerprints using the same finger. Then check out if it manages to fix the Pixel 6 fingerprint sensor not working issue.
Give it An Additonal Second
Optical under the hood fingerprints are a tad bit slower than the ultrasonic scanner. So bearing that fact in mind, consider giving an additional second to the scanner so that it is able to efficiently scan your prints.
Apply Optimal Pressure
While it isn’t documented anywhere as such, but these in-display fingerprints (especially the 2-D ones) work best when you apply the pressure in an increasing manner. However, the increase should be done gradually and lightly. So try it out and then see if it is able to fix the Pixel 6 fingerprint sensor not working issue.
Use Dry Hands
It’s no hidden secret that the scanner wouldn’t be able to read the fingerprints if your hands are wet. This is because the moisture would end up creating an additional layer between the scanner and your fingerprints, thereby preventing a successful scan. So make sure to remove such roadblocks before proceeding ahead.
Clean your Screen
Not only your hands but the screen should be cleaned as well, especially the bottom half of the screen where the scanner is located. Even the slightest of dust particles are enough to create hurdles in successful scans. So clean your screen via a cloth or fabric and then verify if the Pixel 6 fingerprint sensor not working issue has been fixed or not.
Use a compatible screen protector
Not all screen protectors are created equally! While they might cause any issues in the normal usage of the device, but they sure could cause conflict with the in-display fingerprint scanner. So if you ever plan to replace your Corning Gorilla Glass Victus protection with a third-party one, make sure to go for a tried and trusted name.
Re-Add Your Fingerprint
Since the optical scanner flashes a bright light underneath to read your fingerprints, it might not have been able to register your fine prints correctly during the setup process. So consider removing the registered fingerprint via Settings > Security and then perform a re-scan to re-add your fingerprints. Check if this gives out any favorable results or not.
Install Pending Updates
While the software upgrades might not necessarily add new features to your device, they surely optimize and improve the overall functioning of the OS as well as your device. Along the same lines, they also iron out all the bugs and issues. So make sure to download and install all pending updates via Settings > System > System Update and then verify if it ends up rectifying the issue or not.
Give AI some time!
Well, Artificial Intelligence does take some time to adapt and adjust, after all. So on continued usage of these scanners, they will ultimately learn and optimize themselves according to the use case scenario. So consider letting go of the initial hiccups for a better journey ahead!
Contact Google
If none of the aforementioned tweaks managed to work out in your favor, then you should consider contacting Google and then chalk out the best route forward. We aren’t still implying that it’s a hardware issue, it’s just that contacting the manufacture will give you a clearer picture.
- Scrolling Screenshot Not Working in Android 12: How to Fix
- How to Change Icon Shapes in Android 12?
- Can we change the Lock Screen Clock Size in Android 12
- Bring Back the WiFi toggle in Quick Settings on Android 12
(Cancel Reply)
Δ
How to Fix Loss Of Fingerprint Sensor Issue on any OnePlus Device
In this guide, we will show you the steps to fix the loss of fingerprint sensor issue on any OnePlus device. This OEM has always been among the most active devices in custom development. Be it for flashing custom ROMs, installing custom recoveries, or gaining access to system partition via Magisk, there’s a lot to try out.
But at the same time, all these tweaks are quite risky in themselves and could lead to a few issues if not done correctly. However, more often than not, the MSM Download Tool is able to unbrick your OnePlus device within a few clicks. But some users have complained that even after bringing their device back to life via this tool, the fingerprint issue is still persistent.
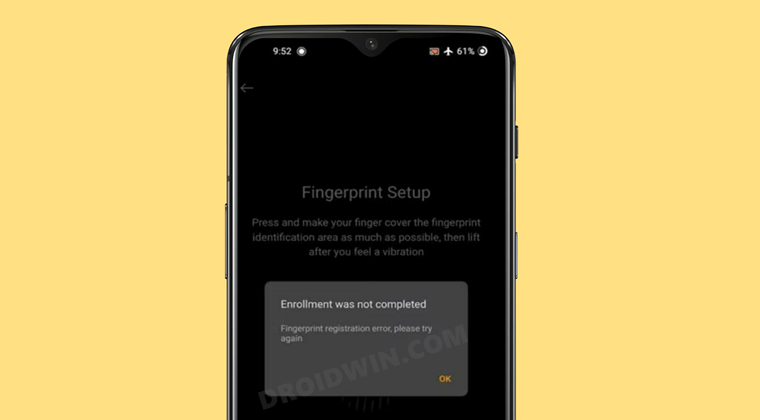
When they are trying to set up fingerprint on their OnePlus device, they are instead being greeted with the “Enrollment was not completed, Fingerprint Registration error” message. if you are also getting bugged with this error, then fret not. In this guide, we will show you how to fix the loss of fingerprint sensor issue on any OnePlus device.
- How to Fix Loss Of Fingerprint Sensor Issue on any OnePlus Device STEP 1: Install Android SDK STEP 2: Backup Current Persist Partition STEP 3: Downgrade OnePlus via MSM Download Tool STEP 4: Unlock OnePlus Bootloader STEP 5: Enable Factory Mode on OnePlus STEP 6: Perform OnePlus Fingerprint Calibration STEP 7: Extract Persist.Img STEP 8: Replace Old Data and Engineer Mode with New One
How to Fix Loss Of Fingerprint Sensor Issue on any OnePlus Device
The below instructions are listed under separate sections for ease of understanding. Make sure to follow in the exact same sequence as mentioned. [All Credits for this guide go to XDA Senior Member antnyhills ]. Droidwin and its members wouldn’t be held responsible in case of a thermonuclear war, your alarm doesn’t wake you up, or if anything happens to your device and data by performing the below steps.
STEP 1: Install Android SDK

First and foremost, you will have to install the Android SDK Platform Tools on your PC. This is the official ADB and Fastboot binary provided by Google and is the only recommended one. So download it and then extract it to any convenient location on your PC. Doing so will give you the platform-tools folder, which will be used throughout this guide.
STEP 2: Backup Current Persist Partition
First and foremost, you need to backup your current persist.img. But since you are already facing fingerprint issues, wouldn’t this partition be already corrupted? Well, although it is broken, it still has all our working calibrations, including the all-important FingerPrint calibrations. So let’s proceed ahead and take a backup of the persist partition.
- To begin with, connect your device to the PC via USB cable. Make sure USB Debugging is enabled.
- Then head over to the platform-tools folder, type in CMD in the address bar, and hit Enter. This shall launch the Command Prompt window.
- Type in the below command in this window to gain administrative privileges: adb shell su
- You might get a prompt on your device, make sure to allow it.
- Finally, execute the below command to take a backup of the persist partition: dd if=/dev/block/bootdevice/by-name/persist of=/sdcard/persist.img
- If the aforementioned command doesn’t work, then you could use the following command:
- su -c dd if=/dev/block/bootdevice/by-name/persist of=/sdcard/Download/persist.img
It is recommended you transfer this backup to your PC as your device will be formatted in the subsequent steps to fix the loss of fingerprint sensor issue on your OnePlus device.
STEP 3: Downgrade OnePlus via MSM Download Tool
You will now have to flash an older build of OxyegnOS on your OnePlus device using the MSM Download Tool. Here’s how it could be done:
- To begin with, install the Qualcomm HS-USB QDLoader 9008 Drivers onto your PC.
- Then download and install the MSM Download Tool on your PC corresponding to your device.
- Now launch the tool, select Other in the Login prompt, and click Next. Credits: OnePlus Forum
- Click on the Target button and select O2 for Internation Firmware, India for Indian, or EU for European Tool.
- Connect one end of the USB cable to the PC. Then press and hold the Volume Up and Volume Down keys on your device and while doing so, connect the other end of the USB cable to your device.
- Your device shall now boot to the EDL Mode and you may now let go of the pressed Volume buttons.
- Finally, hit the Start button and wait for the flashing to complete.
STEP 4: Unlock OnePlus Bootloader
After downgrading via the MSM Download Tool, the device’s bootloader will be locked again. So unlock it using our guide: How to Unlock Bootloader on Any Android Device . Do keep in mind that doing so will wipe off all the data from your device, so take a backup beforehand. Once the bootloader stands unlocked, move over to the next step to fix the loss of fingerprint sensor issue on your OnePlus device.
STEP 5: Enable Factory Mode on OnePlus
- To begin with, download a File Explorer that supports root (such as Solid Explorer).
- Then launch the app and tap on the hamburger menu situated at the top left.
- Select the Root directory and grant it the permission in the Magisk request that appears.
- Now go to the below location: /mnt/vendor/persist/engineermode/
- There you should find the engineermode_config file, open it using a text editor.
- There you should find the following two lines: encrypt_app=true encrypt_adb=true
- Change their values to false, so the above two lines should now be: encrypt_app=false encrypt_adb=false
- Finally, save the changes and reboot your device and then proceed to the next step to fix the loss of fingerprint sensor issue on your OnePlus device.
STEP 6: Perform OnePlus Fingerprint Calibration
Now comes the interesting part. We will have to perform a fingerprint calibration but have to intentionally fail this test. Here’s how:
- To begin with, bring up the phone dialer and type in the below code: *#808#
- Then go to Device Debugging from the top menu bar > Fingerprint test > Fingerprint calibration test(Pure White – 90% Blue).
- Finally, tap on the Start test button situated at the top. Now here are all the tests and what you need to do: First off is the Flash Rubber Sleeve Test 1. Tap on it and then immediately put your fingers over the sensors Next is the Black Rubber Sleeve Test. Tap on it and do not put your fingers over the sensors. The third one is the Positioning Circle Test. Tap on it and then immediately put your fingers over the sensors. The final one is the Stripe Rubber Sleeve Test. Tap on it and then immediately put your fingers over the sensors.
- So black rubber is the only test in which you do not have to put your fingerprint over the sensors.
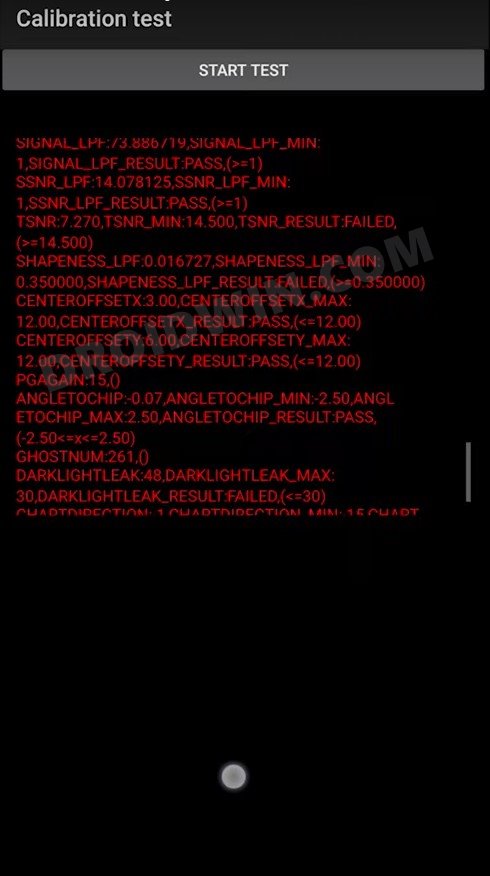
You should now get many red lines of errors indicating the failure of this test. If you only get one or two lines of error, then try again and reproduce more errors, as shown in the below image.
STEP 7: Extract Persist.Img
You will now have to extract the persist.img file, the file that we backed up in the second step. Yp could use the 7-ZIP software to extract this IMG file. Once extracted, you shall get quite a few folders. Copy the data and engineermode folders and transfer them to your device. Once done, proceed to the next step to fix the loss of fingerprint sensor issue on your OnePlus device.
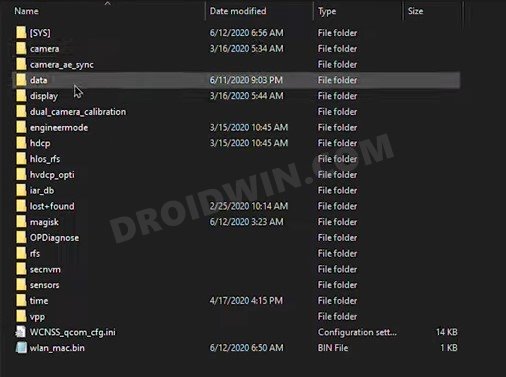
STEP 8: Replace Old Data and Engineer Mode with New One
- Launch the Solid Explorer app, go to the Data folder and delete the gf_persist.so file.
- Once that is done, copy the data and engineermode folders that you had just transfer to your device from the Persist file.
- Finally, paste these two folders in the below location: /mnt/vendor/persist/
- You will now get a confirmation asking whether you want to keep the new folders or the old ones, select the New one.
- Finally, reboot your device. Once it boots up, you may now set up your fingerprint without any issues (Settings > Security and Lock Screen > Fingerprint).
- How to Enable VoLTE and VoWiFi on any OnePlus Device
- Enable and Use ADB Commands in OnePlus Stock Recovery
- How to Enable Hidden DC Dimming on any OnePlus using ADB
- How to Enable Call Recorder on any OnePlus Device
- Umar Ali 1 year ago Reply Hello I have OnePlus 11 and I have lost fingerprint persist after aut smt flashing. Now I read your two posts in one you said that same region and same model can use persist and flash While on other post you wrote that we not able to use persist of another device even they have same model and same region.
- Kedarnath 3 years ago Reply I also had the same issue after sceen replacement. Can you please conform me if your issue is solved. If yes can you please tell me if you followed the procedure mentioned in this article or any other. Please help,this issue is so annoying.
- Parth 3 years ago Reply I have installed a new screen (market copy) on oneplus 6t. After the replacement I cannot unlock phone using fingerprint. It is allowing me to add new fingerprints that means it reads just fine, only thing is it cannot unlock the device. What to do in this case? I dont want to buy the fingerprint rubber calibration tool unless it will work 100%
- Naufil 4 years ago Reply Iam facing finger enrollment issue after installing custom rom derpfest will rhis method still work ?
- Mark 4 years ago Reply I fully reset my device low level, with msmdownloadtool, after I replaced my screen and got this problem with the fingerprint sensor from the get go and other things did not help. So, I don’t think I have a functioning persist.img already. What should I do? Please help.
- playmo 4 years ago Reply this is absolutely amazing, thanks for sharing
- Nicolai 4 years ago Reply I do not have the engineermode_config file on my OnePlus 8T. Fahad 4 years ago Reply Can I relock the bootloader again??
(Cancel Reply)
Δ
