Remove Update and Shutdown Option from Windows 11 Power Menu
In this guide, we will show you the steps to remove the Update and Shutdown option from the Windows 11 Power Menu. The Redmond giants have provided a slew of options to take control of your PC’s update schedule. You could instruct it to automatically download and install the updates right away, auto-download but install at your own convenience, or manually take full control over the same. If you take the latter two options, then you will have to restart your PC for the updates to be successfully installed.
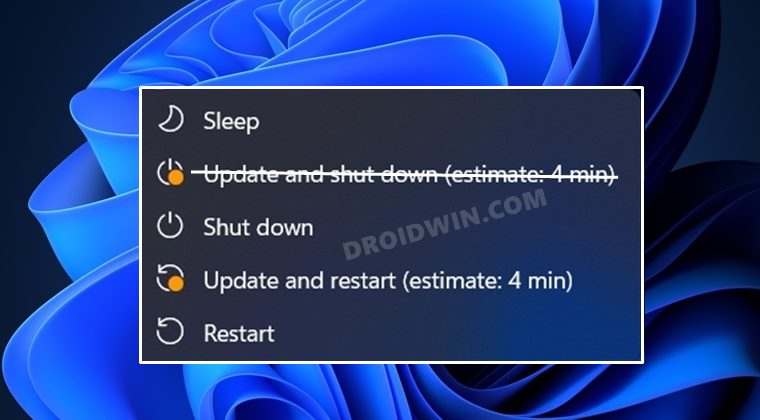
But what if you want to shut down your PC but at the same time, don’t want the pending update to be installed at that point in time? Well, for that, you take several different approaches, such as force shut-down via CMD, delete the downloaded update files from the SoftwareDistribution folder, or simply use the option provided by Windows in the Start Menu. Yes, in Windows 11, if there is a pending update, then you will also get the normal Shutdown and Restart options, along with the usual Update and Shutdown and Update and Restart.
So you could easily select the shutdown option from the Power menu and your PC will turn off without the updates being installed. However, you could take this a step ahead and further simplify the Start Menu by removing the Update and Shutdown option from the Power Menu on your Windows 11 PC. Not only will this give you a cluttered free Power menu, but will also prevent any instance wherein users mistakenly end up clicking on the Update button. So on that note, let’s check out how this could be carried out.
How to Remove Update and Shutdown Option from Windows 11 Power Menu
- To begin with, enable the Local Group Policy Editor on your Windows 11 PC.
- Then bring up the Run dialog box via Windows+R shortcut keys.
- After that, type in the below command and hit Enter to open Group Policy Editor gpedit.msc
- Now go to the following location from the left-hand side: Computer Configuration > Administrative Templates > Windows Component > Windows Update > Legacy Policy
- Then double click on the ‘Do not display Install Updates and Shut Down option in Shut Down Windows dialog box’ policy.
- After that, select Enabled and click Apply > OK to save the changes.
- Then go to the Manage end-user experience from the left menu bar.
- Now double click on Configure Automatic Updates policy.
- Select Enabled and then select 2- Notify for download and auto install’.
- Finally, click Apply > OK to save the changes. That’s it.
- Windows 11 Update Stuck: How to Fix
- Windows 11 Updates Failed Error: How to Fix
- How to Uninstall Windows 11 Updates via Settings/CMD/Recovery
- How to Manually Download a Particular/Specific Windows 11 Update

(Cancel Reply)
Δ
