Rollback from OxygenOS 11 Beta to OxygenOS 11 Stable Without Data Loss
In this guide, we will show you the steps to rollback from OxygenOS 11 Beta to stable without data loss. Likewise, if your device is rooted, then we will additionally show you how to preserve root after this downgrade process. Follow along for the instructions.
Similar to other OEMs, OnePlus runs its beta testing program. The tech enthusiasts usually get enrolled in this for testing out new and intriguing features before the general public. However, it comes at a cost- the cost of stability and performance issues. So while it might be initially a good idea to enjoy the Open Beta goodies, ultimately, users decide to switch to its stable counterpart.
But there’s a string attached- for going from Beta to Stable, all the data on your device will be erased. This is a hefty price to pay- even considering the fact that most of the data are already backed up to the clouds. Fortunately, there does exist a handy method through which you could rollback from OxygenOS 11 Beta to stable without data loss. And this guide will show you how to do just that. So without further ado, let’s get started.
- Rollback from OxygenOS 11 Beta to OxygenOS 11 Stable Without Data Loss STEP 1: Download OnePlus Firmware STEP 2: Download OnePlus Keep Data App STEP 3: Install Firmware via Local Upgrade STEP 4: Install Keep Data app STEP 5: Preserve Root After OTA [For Rooted Devices]
Rollback from OxygenOS 11 Beta to OxygenOS 11 Stable Without Data Loss
So how would this process be carried out? Well, we would be using OnePlus’ official Keep-Data app that has been designed just for this purpose. The existence of this app has a rather unfortunate story attached to this. Back in November last year, the company released the Oxygen OS Open Beta 3 11.0.1.1 update for its 8 and 8 Pro variants. However, some users started receiving the Stable update rather than the Open Beta 3. This lead to an unintentional downgrade on their device and subsequently- a complete factory reset.
To quickly rectify this issue, OnePlus released the Keep-Data app for the users who have got the stable update but haven’t yet rebooted their device for the changes to take place. The good thing that came out of this is that the app still works to this day and for numerous OnePlus devices. And as of now, we will be using this app to rollback from OxygenOS 11 Beta to stable without data loss. Follow along.
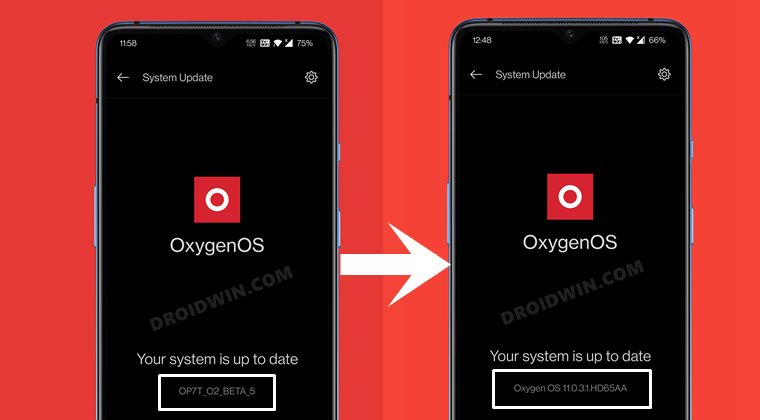
This guide has been confirmed working on the OnePlus 8/8 Pro and OnePlus 7/7T . I have personally tested on OnePlus 7T , downgraded without data loss from Open Beta 5 to OxygenOS 11.0.3.1. But still, to be on the safer side, it is still recommended to take a complete device backup. Droidwin and its members wouldn’t be held responsible in case of a thermonuclear war, your alarm doesn’t wake you up, or if anything happens to your device and data by performing the below steps.
STEP 1: Download OnePlus Firmware
To begin with, download the firmware for your device. It is highly recommended that you download the firmware from the unofficial Oxygen Updater app. This is because OnePlus is somewhat slow to upload the firmware on their site. So if you try via that firmware, you might end up with the “Downgrading is not allowed” error. Therefore, consider using that app for this purpose.
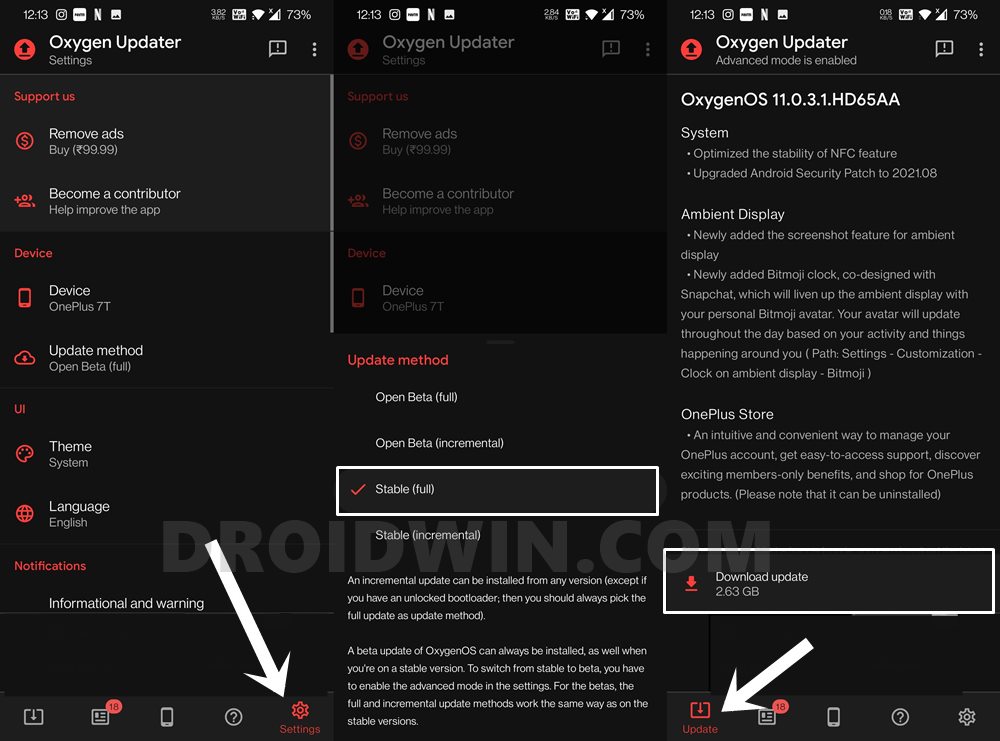
- To begin with, download and install the Oxygen Updater app from Play Store.
- Then launch it and tap on the Settings icon situated at the bottom right.
- Now go to the Update Method and change it to Stable (full).
- Once that is done, go back to the app’s main menu and you shall now see the latest available.
- Download it onto your device and then move over to the next step to rollback from OxygenOS 11 Beta to stable without data loss.
STEP 2: Download OnePlus Keep Data App
Next up, grab hold of the Keep Data app from the following link: Keep-Data.apk . Once you have downloaded the file, transfer it to your device as well.
STEP 3: Install Firmware via Local Upgrade
Let’s now install the downloaded firmware onto your device via the Local Upgrade method. Do not reboot the device after the firmware has been installed.
- To begin with, head over to Settings on your device.
- Then go to System followed by System Updates.
- Tap on the Settings gear icon situated at the top right and go to Local Upgrade.
- Select the firmware that you had downloaded
- You will now get a warning that your device will undergo a factory reset, ignore this warning and hit the Confirm.
- Now, wait for the installation to complete. Once done, do not reboot your device.
STEP 4: Install Keep Data app
- Install the Keep Data app onto your device and open it.
- Then tap on the Keep Data button and the app will carry out the desired task.
- Now if your device is non-rooted or you don’t wish to preserve the root, then you may reboot the device. Once it boots up, you will be on the stable OS build! You may now conclude this guide here.
- However, if you want to keep root, then do not reboot now. Rather move over to the next step.
STEP 5: Preserve Root After OTA [For Rooted Devices]
- Launch the Magisk Manager app on your device
- Then tap on the Install button next to Magisk.
- After that, select Install to the inactive slot (after OTA).
- Let Magisk carry out the desired task. Once done, you may now finally reboot the device to the OS.
- How to Enable VoLTE and VoWiFi on any OnePlus Device
- How to Fix Loss Of Fingerprint Sensor Issue on any OnePlus Device
- Downgrade Android 11 Open Beta to Stable Android 11 OnePlus 7/7T/Pro?
- How to Add any App to Parallel Apps in OnePlus

- Rob D 4 years ago Reply Will this work on 12 Beta?
- Chris 4 years ago Reply Thanks. I’ve been looking for this and it works on my OnePlus 7 Pro.
- Akram 4 years ago Reply Thanks for this tutorial. Tested for oneplus 7 pro ==> it’s OK Sadique Hassan 4 years ago Reply thanks for the confirmation Akram
(Cancel Reply)
Δ
How to Fix Loss Of Fingerprint Sensor Issue on any OnePlus Device
In this guide, we will show you the steps to fix the loss of fingerprint sensor issue on any OnePlus device. This OEM has always been among the most active devices in custom development. Be it for flashing custom ROMs, installing custom recoveries, or gaining access to system partition via Magisk, there’s a lot to try out.
But at the same time, all these tweaks are quite risky in themselves and could lead to a few issues if not done correctly. However, more often than not, the MSM Download Tool is able to unbrick your OnePlus device within a few clicks. But some users have complained that even after bringing their device back to life via this tool, the fingerprint issue is still persistent.
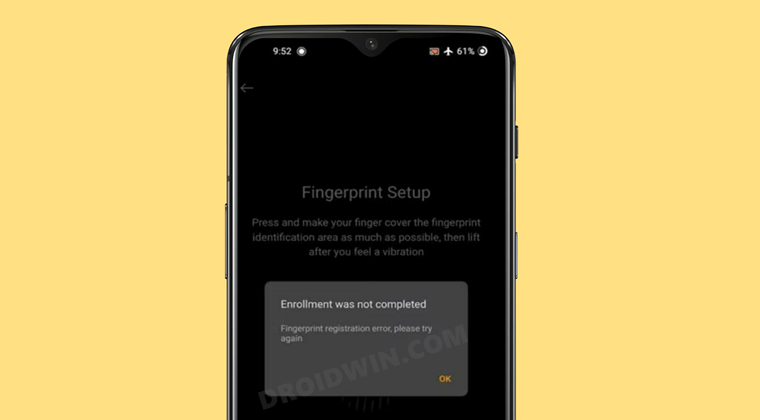
When they are trying to set up fingerprint on their OnePlus device, they are instead being greeted with the “Enrollment was not completed, Fingerprint Registration error” message. if you are also getting bugged with this error, then fret not. In this guide, we will show you how to fix the loss of fingerprint sensor issue on any OnePlus device.
- How to Fix Loss Of Fingerprint Sensor Issue on any OnePlus Device STEP 1: Install Android SDK STEP 2: Backup Current Persist Partition STEP 3: Downgrade OnePlus via MSM Download Tool STEP 4: Unlock OnePlus Bootloader STEP 5: Enable Factory Mode on OnePlus STEP 6: Perform OnePlus Fingerprint Calibration STEP 7: Extract Persist.Img STEP 8: Replace Old Data and Engineer Mode with New One
How to Fix Loss Of Fingerprint Sensor Issue on any OnePlus Device
The below instructions are listed under separate sections for ease of understanding. Make sure to follow in the exact same sequence as mentioned. [All Credits for this guide go to XDA Senior Member antnyhills ]. Droidwin and its members wouldn’t be held responsible in case of a thermonuclear war, your alarm doesn’t wake you up, or if anything happens to your device and data by performing the below steps.
STEP 1: Install Android SDK

First and foremost, you will have to install the Android SDK Platform Tools on your PC. This is the official ADB and Fastboot binary provided by Google and is the only recommended one. So download it and then extract it to any convenient location on your PC. Doing so will give you the platform-tools folder, which will be used throughout this guide.
STEP 2: Backup Current Persist Partition
First and foremost, you need to backup your current persist.img. But since you are already facing fingerprint issues, wouldn’t this partition be already corrupted? Well, although it is broken, it still has all our working calibrations, including the all-important FingerPrint calibrations. So let’s proceed ahead and take a backup of the persist partition.
- To begin with, connect your device to the PC via USB cable. Make sure USB Debugging is enabled.
- Then head over to the platform-tools folder, type in CMD in the address bar, and hit Enter. This shall launch the Command Prompt window.
- Type in the below command in this window to gain administrative privileges: adb shell su
- You might get a prompt on your device, make sure to allow it.
- Finally, execute the below command to take a backup of the persist partition: dd if=/dev/block/bootdevice/by-name/persist of=/sdcard/persist.img
- If the aforementioned command doesn’t work, then you could use the following command:
- su -c dd if=/dev/block/bootdevice/by-name/persist of=/sdcard/Download/persist.img
It is recommended you transfer this backup to your PC as your device will be formatted in the subsequent steps to fix the loss of fingerprint sensor issue on your OnePlus device.
STEP 3: Downgrade OnePlus via MSM Download Tool
You will now have to flash an older build of OxyegnOS on your OnePlus device using the MSM Download Tool. Here’s how it could be done:
- To begin with, install the Qualcomm HS-USB QDLoader 9008 Drivers onto your PC.
- Then download and install the MSM Download Tool on your PC corresponding to your device.
- Now launch the tool, select Other in the Login prompt, and click Next. Credits: OnePlus Forum
- Click on the Target button and select O2 for Internation Firmware, India for Indian, or EU for European Tool.
- Connect one end of the USB cable to the PC. Then press and hold the Volume Up and Volume Down keys on your device and while doing so, connect the other end of the USB cable to your device.
- Your device shall now boot to the EDL Mode and you may now let go of the pressed Volume buttons.
- Finally, hit the Start button and wait for the flashing to complete.
STEP 4: Unlock OnePlus Bootloader
After downgrading via the MSM Download Tool, the device’s bootloader will be locked again. So unlock it using our guide: How to Unlock Bootloader on Any Android Device . Do keep in mind that doing so will wipe off all the data from your device, so take a backup beforehand. Once the bootloader stands unlocked, move over to the next step to fix the loss of fingerprint sensor issue on your OnePlus device.
STEP 5: Enable Factory Mode on OnePlus
- To begin with, download a File Explorer that supports root (such as Solid Explorer).
- Then launch the app and tap on the hamburger menu situated at the top left.
- Select the Root directory and grant it the permission in the Magisk request that appears.
- Now go to the below location: /mnt/vendor/persist/engineermode/
- There you should find the engineermode_config file, open it using a text editor.
- There you should find the following two lines: encrypt_app=true encrypt_adb=true
- Change their values to false, so the above two lines should now be: encrypt_app=false encrypt_adb=false
- Finally, save the changes and reboot your device and then proceed to the next step to fix the loss of fingerprint sensor issue on your OnePlus device.
STEP 6: Perform OnePlus Fingerprint Calibration
Now comes the interesting part. We will have to perform a fingerprint calibration but have to intentionally fail this test. Here’s how:
- To begin with, bring up the phone dialer and type in the below code: *#808#
- Then go to Device Debugging from the top menu bar > Fingerprint test > Fingerprint calibration test(Pure White – 90% Blue).
- Finally, tap on the Start test button situated at the top. Now here are all the tests and what you need to do: First off is the Flash Rubber Sleeve Test 1. Tap on it and then immediately put your fingers over the sensors Next is the Black Rubber Sleeve Test. Tap on it and do not put your fingers over the sensors. The third one is the Positioning Circle Test. Tap on it and then immediately put your fingers over the sensors. The final one is the Stripe Rubber Sleeve Test. Tap on it and then immediately put your fingers over the sensors.
- So black rubber is the only test in which you do not have to put your fingerprint over the sensors.
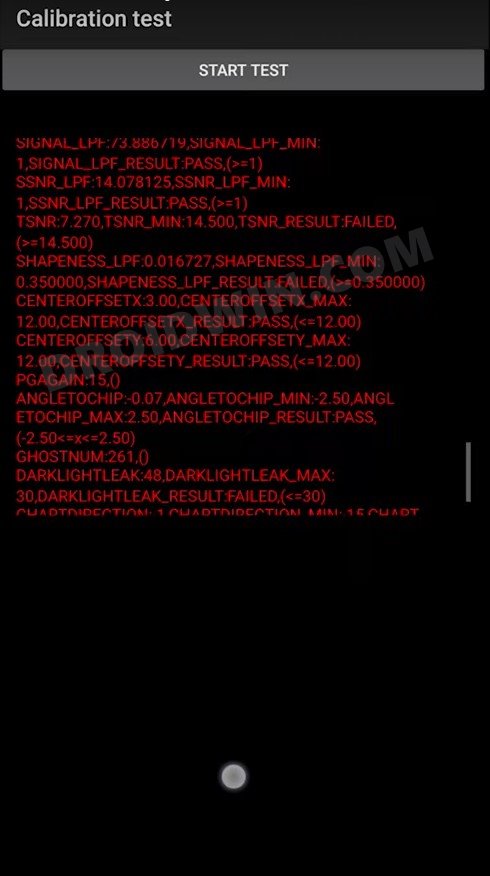
You should now get many red lines of errors indicating the failure of this test. If you only get one or two lines of error, then try again and reproduce more errors, as shown in the below image.
STEP 7: Extract Persist.Img
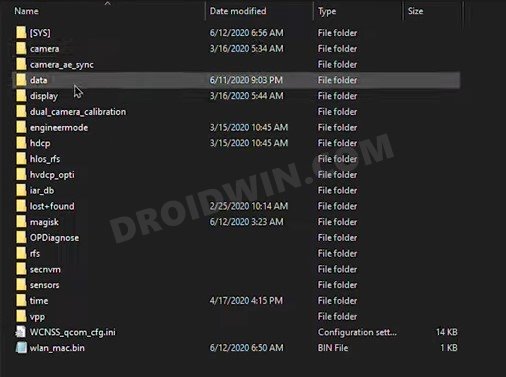
You will now have to extract the persist.img file, the file that we backed up in the second step. Yp could use the 7-ZIP software to extract this IMG file. Once extracted, you shall get quite a few folders. Copy the data and engineermode folders and transfer them to your device. Once done, proceed to the next step to fix the loss of fingerprint sensor issue on your OnePlus device.
STEP 8: Replace Old Data and Engineer Mode with New One
- Launch the Solid Explorer app, go to the Data folder and delete the gf_persist.so file.
- Once that is done, copy the data and engineermode folders that you had just transfer to your device from the Persist file.
- Finally, paste these two folders in the below location: /mnt/vendor/persist/
- You will now get a confirmation asking whether you want to keep the new folders or the old ones, select the New one.
- Finally, reboot your device. Once it boots up, you may now set up your fingerprint without any issues (Settings > Security and Lock Screen > Fingerprint).
- How to Enable VoLTE and VoWiFi on any OnePlus Device
- Enable and Use ADB Commands in OnePlus Stock Recovery
- How to Enable Hidden DC Dimming on any OnePlus using ADB
- How to Enable Call Recorder on any OnePlus Device
- Umar Ali 1 year ago Reply Hello I have OnePlus 11 and I have lost fingerprint persist after aut smt flashing. Now I read your two posts in one you said that same region and same model can use persist and flash While on other post you wrote that we not able to use persist of another device even they have same model and same region.
- Kedarnath 3 years ago Reply I also had the same issue after sceen replacement. Can you please conform me if your issue is solved. If yes can you please tell me if you followed the procedure mentioned in this article or any other. Please help,this issue is so annoying.
- Parth 3 years ago Reply I have installed a new screen (market copy) on oneplus 6t. After the replacement I cannot unlock phone using fingerprint. It is allowing me to add new fingerprints that means it reads just fine, only thing is it cannot unlock the device. What to do in this case? I dont want to buy the fingerprint rubber calibration tool unless it will work 100%
- Naufil 4 years ago Reply Iam facing finger enrollment issue after installing custom rom derpfest will rhis method still work ?
- Mark 4 years ago Reply I fully reset my device low level, with msmdownloadtool, after I replaced my screen and got this problem with the fingerprint sensor from the get go and other things did not help. So, I don’t think I have a functioning persist.img already. What should I do? Please help.
- playmo 4 years ago Reply this is absolutely amazing, thanks for sharing
- Nicolai 4 years ago Reply I do not have the engineermode_config file on my OnePlus 8T. Fahad 4 years ago Reply Can I relock the bootloader again??
(Cancel Reply)
Δ
