Root Tecno Camon Devices via Magisk Patched Boot/Init_Boot
In this comprehensive tutorial, we will show you the steps to root your Tecno Camon device using Magisk patched boot/Init_Boot. When it comes to extracting the device’s full potential, there are a lot of things to try out. Installing icon packs, themes and third-party apps are just the tip of the iceberg. If you look by the viewpoint of a tech enthusiast, then an Android device beholds endless possibilities.
Once you have unlocked the device’s bootloader, you are in a position to try out a plentitude of mods. These include the likes of flashing custom recovery like TWRP or trying out a custom ROM like LineageOS . Along the same lines, you could even gain access to the system partition. This would in turn allow you to try out Magisk Modules , Xposed Framework , Substratum Themes , Viper4Android , among others.
However, for each of these mods to be effectively carried out, you would have to gain administrative privileges. In other words, you would have to root your Tecno Camon device using Magisk patched boot/Init_Boot. And in this guide, we will help you with just that. So without further ado, let’s get started.
Fix Magisk Safetynet API Error: Detailed Guide
How to Pass Magisk SafetyNet on Rooted Android
How to Temporarily Root an Android Device via Magisk
Fix Root not working after flashing Magisk patched boot.img
How to Root Tecno Camon Devices via Magisk Patched Boot.img STEP 1: Install Android SDK STEP 2: Enable USB Debugging and OEM Unlocking on Tecno Camon STEP 3: Unlock Tecno Camon Bootloader STEP 4: Extract Boot/Init_Boot from Tecno Camon Firmware STEP 5: Patch Stock Boot/Init_Boot via Magisk STEP 6: Boot to Fastboot Mode STEP 7: Disable DM Verity STEP 8A: Flash Magisk Patched Boot.img and Root Tecno Camon STEP 8B: Flash Magisk Patched Init_Boot and Root Tecno Spark
How to Root Tecno Camon Devices via Magisk Patched Boot.img
The below instructions are listed under separate sections for ease of understanding. Make sure to follow in the exact same sequence as mentioned. Droidwin and its members wouldn’t be held responsible in case of a thermonuclear war, your alarm doesn’t wake you up, or if anything happens to your device and data by performing the below steps.
STEP 1: Install Android SDK

First and foremost, you will have to install the Android SDK Platform Tools on your PC. This is the official ADB and Fastboot binary provided by Google and is the only recommended one. So download it and then extract it to any convenient location on your PC. Doing so will give you the platform-tools folder, which will be used throughout this guide.
STEP 2: Enable USB Debugging and OEM Unlocking on Tecno Camon
Next up, you will also have to enable USB Debugging and OEM Unlocking on your device. The former will make your device recognizable by the PC in ADB mode. This will then allow you to boot your device to Fastboot Mode.
On the other hand, OEM Unlocking is required to carry out the bootloader unlocking process. So head over to Settings > About Phone > Tap on Build Number 7 times > Go back to Settings > System > Advanced > Developer Options > Enable USB Debugging and OEM Unlocking.
STEP 3: Unlock Tecno Camon Bootloader
You will also have to unlock the device’s bootloader. Do keep in mind that doing so will wipe off all the data from your device. So take a complete device backup and then refer to our detailed guide on How to Unlock the Bootloader on Tecno Camon Devices .
STEP 4: Extract Boot/Init_Boot from Tecno Camon Firmware
Now comes the most important part. If your device came with Android 12 or an older version, then you have to use the boot.img file. On the other hand, if it came with Android 13 or higher version, then use the init_boot.img file. It doesn’t matter on which OS your device is currently, what matters is the OS with which it was initially shipped.
You will now have to download the firmware for your Tecno Camon device. Make sure to download the same firmware version that is currently installed onto your device. Once downloaded, extract it to any convenient location on your PC.
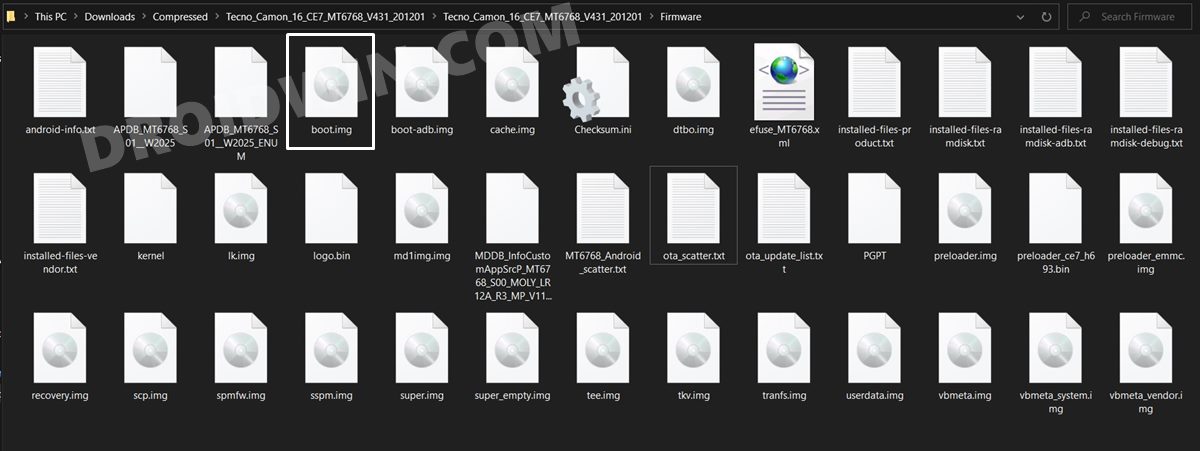
Then go to its Firmware folder and you shall see the boot.img file. Transfer this file to your device and then move to the next step to root your Tecno Camon device using Magisk patched boot/Init_Boot.
STEP 5: Patch Stock Boot/Init_Boot via Magisk
NOTE: The steps to patch boot/init_boot.img via Magisk are the same.
- First off, install the Magisk App onto your device
- Likewise, make sure that the boot/Init_Boot has been transferred to your device.
- Then tap on the Install button situated next to Magisk.
- If you see an Options menu, then make sure to enable both the Preserve Force Encryption and Recovery Mode options, and tap Next.
- You shall now be taken to the Method selection screen, choose Select and Patch a file.
- Browse to the extracted boot/Init_Boot file and select it.
- Then tap on the Let’s Go option situated at the top right.
- Magisk will now load the boot/Init_Boot file and will patch it accordingly.
- Once that is done, you will get the Download Complete message.
- The patched boot image file will be saved in Internal Storage > Downloads. Rename the file to magisk_patched.img.
- Moreover, transfer this file to your device’s Internal Storage and then head over to the next step to root your device via Magisk patched boot/Init_Boot.
STEP 6: Boot to Fastboot Mode
- Connect your device to the PC via a USB cable. Make sure USB Debugging is enabled.
- Then head over to the platform-tools folder, type in CMD in the address bar, and hit Enter. This will launch the Command Prompt.
- Now type in the following command in the CMD window to boot your device to Fastboot Mode adb reboot bootloader
STEP 7: Disable DM Verity
You will now have to disable DM verity and AVB on your device before you could proceed ahead and root your Tecno Camon device using Magisk patched boot/Init_Boot.
- So head over to the extracted firmware folder and you should find a vbmeta.img file. Transfer it to the platform-tools folder on your PC.
- Now type in the following command in this CMD window that you have opened inside the platform-tools: fastboot –disable-verity flash vbmeta vbmeta.img
- If the above command gives out an error, then try the below command: fastboot –disable-verity -disable-verification flash vbmeta vbmeta.img
STEP 8A: Flash Magisk Patched Boot.img and Root Tecno Camon
- To begin with, transfer the magisk_patched.img file to the platform-tools folder.
- Now type in the below command in the CMD window (that is opened inside the platform-tools folder) to flash the Magisk Patched file: fastboot flash boot magisk_patched.img
- Once that is done, reboot your device to the OS via the following command: fastboot reboot
STEP 8B: Flash Magisk Patched Init_Boot and Root Tecno Spark
- To begin with, transfer the magisk_patched.img file to the platform-tools folder.
- Now type in the below command in the CMD window to flash the patched init_boot: fastboot flash init_boot magisk_patched.img
- Once that is done, reboot your device to the OS via the following command: fastboot reboot
- How to Pass Play Integrity in New Android 13+ Checks
- How to Pass Strong Integrity on Unlocked Bootloader & Root!
- Fix Magisk Safetynet API Error: Detailed Guide
- How to Pass Magisk SafetyNet on Rooted Android
- How to Temporarily Root an Android Device via Magisk
- Fix Root not working after flashing Magisk patched boot.img

- Yunus arpacı 3 years ago Reply How to delete Magisk root. I will be glad if you tell me about it.
(Cancel Reply)
Δ
